|
Chapter 3 |
3. Creating Applications
3.1 Defining the Application
After creating a connection definition, select the “2. Setup Application(s)” link on the left side of the screen. Then, click the “Create Application” button. The Application Creation Screen will appear:
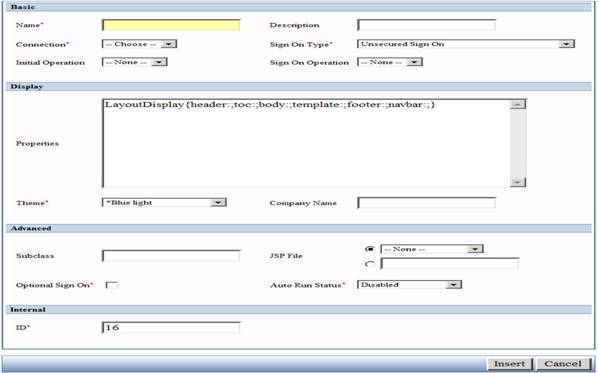
The screen where the application builder defines an application. Each setting is described below.
Basic
Name (Required Field) – The title or name for the application.
Description – A brief description of the application.
Connection (Required Field) – An alias for the system on which the application is located. This must be one of the connections you created, as described in the Connections chapter. All connections, unless otherwise specified, will use this connection.
Sign On Type (Required Field) – The type of security your application will require. This will be covered in the next section.
Initial Operation – The initial Operation the application will automatically run when a user first brings up this application. The Operations chapter describes operations in more detail.
Sign On Operation – The user created Authentication Operation, if any, the application will run when a user signs on to this application. The Operations chapter describes authentication operations in more detail.
Display:
Properties – Parameters to customize the look and some of the features of WOW. Specifying different Property Groups allows for custom JSP’s and many other possibilities. The default Property Group, Layout Display, allows for a custom header, footer, body, and template. Only users familiar with JSP programming should attempt to use these fields. Creating custom headers and footers will be described in more detail in the Creating Custom Themes chapter.
Theme (Required Field) – This will change the look and feel of the WOW application. This includes backgrounds, links, buttons and general appearance of the application. WOW comes pre-installed with several themes. Building custom themes will be discussed in detail in the Creating Custom Themes chapter.
Company Name – The text entered in this field will be displayed in the left hand side of the WOW header provided the current "Theme" supports it. If this field is left blank, the WOW application will in that section of the header be blank as well.
Advanced
Subclass – The class name of the application’s main servlet. Unless the application uses custom programming, this field should be left blank and the default WOW servlet will be used. To use a subclass named MySubClass in the com.mypkg package, specify the following:
com.mypkg.MySubClass
JSP File – The name of the application’s main JSP. Unless the application uses custom programming, this field should be left blank and the default WOW JSP will be used. To use a jsp named myJsp in the “…\webapps\WOW64\user\planetj\jsp” folder, specify the following:
/user/planetj/jsp/myJsp.jsp
Optional Sign-On (Required Field) – [For future support] If this option is selected, an optional sign-on box will appear in the upper left hand side of the TOC as shown in the next screenshot. For more information, see the Optional Sign-on section.
Auto Run Status – Enabling Auto Run allows you to automate the distribution of data via email (for Auto-run Email operations) and to automatically log incoming email. For more information see the Creating and Distributing Automatic Reports and Logging Email sections[c1] .
An example of the optional-sign on window that will appear at the top of the table of contents if enabled.
Internal
ID (Required Field) – The ID of the application. This ID can be used for a reference to the specific application. This field is set automatically by WOW; you should not change its given value.
After filling in the values for each field click the Insert Application button to create the application. This will bring you back to the main screen where you can start creating operations for your customized WOW application.
The screen that is displayed directly after creating and inserting an application. In the sample above, the name of the newly created application is Samples.
3.2 Application Libraries
3.1.1 Application Libraries Overview
By default, the metadata for all applications created using WOW is stored in a single library (PJUSER64). Although this does not pose a problem when running WOW on a single system, it can make it difficult to migrate any WOW applications to a different system. For example, you may have two WOW applications running on your development box and you want to move one of those applications to a production environment. Since metadata records for both applications are stored in the same files; therefore, you will have to copy only records corresponding to the application you want to move over to your production environment without copying the records for the application you do not want to move.
On the other hand, if your applications were stored in two different libraries in your development environment, then copying a single application to production would be easy – you could just copy all of the files in the application’s library over to production. In general, each related group of WOW applications should be stored in its own application library to facilitate any future moves or migrations. However, if you have no need to move applications independently of each other, they can all exist in the same library.
3.1.2 Creating Application Libraries
The default application library (PJUSER64) was installed on the WOW metadata system as part of the WOW installation process. In order to use any other application library, that library must exist on the WOW metadata system. There are two ways of creating a new application library. You could repeat the steps from the WOW general installation which installed the PJUSER64 library, except this time give the installed library a different name. Or you could create a new copy of the PJUSER64 library. Copying an existing application library will of course copy all applications in that library. Copied applications are independent of the original applications and can be modified or deleted without affecting the original applications.
3.1.3 Using Application Libraries
When starting the WOW builder, the application library to be used can be specified directly in the URL. For example, the following link would start the WOW builder using MYAPP as the application library:
http://www.planetjavainc.com/wow/WOWBuilder?_pj_lib=MYAPP
(If no library is specified, the default of PJUSER64 is used as the application library). In general, to start the WOW builder using a particular application library, you append the string
?_pj_lib=<APPLIB>
to the WOW builder URL, where “?” designates the start of URL parameters, “_pj_lib “ is the name of the parameter and <APPLIB> is the name of the application library in which all WOW metadata should be stored. If one or more parameters are already present in the URL, replace the “?” with the parameter separator, “&”:
&_pj_lib=<APPLIB>
Each application library contains its own applications, connections, operations, field descriptors, and user logins. Any user logins, connections, applications, operations, and field descriptors created with the WOW builder in one application library cannot be accessed from any other application library.
3.1.4 Using the CPYWOWENV Command (AS/400/iSeries only)
If the metadata system that you are using isAS/400/iSeries, you can use the CPYWOWENV command provided in the PJSYS64 folder. This command copies a specified WOW library to a new library and gives you the option to clear the files.
From the CL Command Prompt, enter PJSYS64/CPYWOWENV and press F4. You should see the following screen:
CPYWOWENV Command
Enter the source library (in most cases this would be the PJUSER64 library). Enter the name of the destination library. Specify whether or not the file data should be cleared or not and press Enter. You have now successfully created an Application Library. Refer to section above on Using Application Libraries.
3.3 Controlling the Login
WOW allows users to login using different security schemes. This is important for applications that require different forms of user authentication.
Sign On Types
HTTP Referrer - ###
Local Users Only - ###
Local Users Only or Operating System Profile - ###
Operating System Profile – Users are required to sign on with a user id and password before using the application. The user id and password must be recognized by the database or operating system. (NOTE: The actual database access does not use this user id – it uses the one specified in the connection definition.)
Personal Connection Pool - The Personal Connection Pool sign on validates a user ID and password against the database, much like the Operating System Profile sign on. However, when an application uses the Personal Connection Pool sign on method, all database accesses by that application will be tied to the profile of whichever user has signed onto the application and requested that database access. All other sign on methods use a shared pool of database connections when accessing the database – this can significantly improve performance but means that the database cannot determine which particular user is accessing it, only which application is doing the access. This sign on type should be selected when the database needs to know which user is accessing it.
SQL Operation – Users must provide authentication information based upon the fields specified in an SQL Operation. A logical choice for these fields would be the user id and password; however, this option allows increased flexibility in that you can choose any field in a file to authenticate against. For example, you may use a single PIN field instead of the standard user id and password combination. Refer to the Security Chapter for more information on setting up and implementing security using this feature.
Unsecured Sign On – Users are not required to sign on to the application – anyone who knows the application’s URL can use it. This is the default selection.
User List Sign On - ###