|
Chapter 6 |
6. Inserting Records
6.1 Basic SQL Queries using the INSERT Command
This section will cover basic INSERT commands using SQL statements and will include examples to help with the explanation. Once again, a basic knowledge of SQL is recommended.
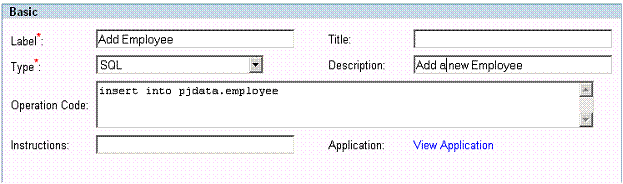
Figure 6-1 An SQL Operation which performs an Insert.
The insert command is followed by the INTO keyword which specifies the table to insert data into. The screen shot below is what will be displayed when this SQL Operation is run:
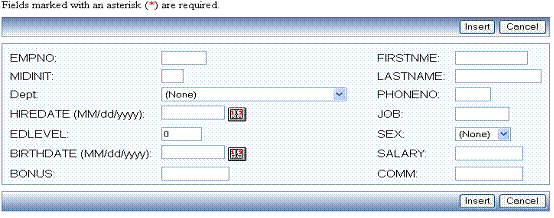
Figure 6-2 The result of the SQL query used in figure 6-1. This shows each field available in the table. Once each field is completed, clicking the insert button will insert the new data into the table.
After the values have been entered, click the Insert button. This will create a new record for the table. Only the required fields (indicated by the red asterisk) need to be given a value in order for the row to be inserted.
6.2 Inserting Records without SQL Commands
WOW makes it possible to insert rows without an INSERT SQL operation. If you specify on an SQL operation to “Allow Inserts”, WOW provides the insert functionality for you. (Running SQL queries will be covered in Chapter 13). For example, a SELECT statement will result in a screen with a table of results that has an Insert button below it. To INSERT a new row, simply press the INSERT button. After the INSERT button has been clicked the follow screen appears:
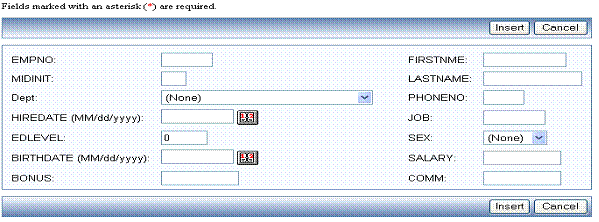
Figure 6-3 A WOW screen similar to Figure 6-2. This is showing an alternative to using the Insert command in an SQL Operation.
Notice this screen is similar to the INSERT screen above. After filling in all of the information that is pertinent, click the INSERT button. This will give you a message letting you know that your row has been inserted into the database.
6.3 Inserting Records Using Parsing
When inserting a record using parsing, you must supply a value for each column to add data to. A value in the VALUES clause for each column named in the INSERT command’s column list must be provided. If a column has a default value, the keyword DEFAULT may be used as a value on the VALUES clause. The screenshot below shows a sample SQL INSERT command using parsing.

Figure 6-4 Example of using parsing with the INSERT command.
Each column is separated by commas. Next is the values keyword that is followed by the three values to be added to the table. The values in the second set of parenthesis should correspond with the column names in the first set of parenthesis. Run Time prompting (‘?’) can be used in place of any hard coded value. Prompting is described in more detail in the Parameters section of the WOW Features chapter. Running this INSERT command will only display the values you choose in the INSERT command.
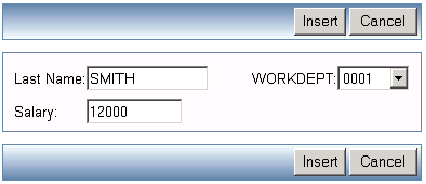
Figure 6-5 Example of an INSERT command using parsing.
The screenshot above corresponds with the Operation Code used in Figure 6-4. Only the three fields and their values that were specified in the INSERT command will be added. Using parsing allows users to only enter the information they want added to the record. In the event that there is a required field in the table into which you are inserting records, you will have to be sure to give the required field a value or else an error will occur.
6.4 Joined Inserts
[ Supported as of WOW 6.3 SP3 ]
A joined insert is an insert statement which inserts data into multiple database tables. For example, the following operation inserts data into two tables, the CUSTOMER and CUSTLOC tables.
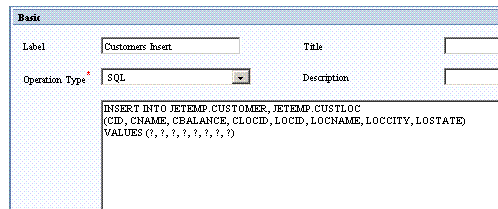
Figure 6-1 A joined insert operation. When run, this operation inserts records into two different tables
(Field names beginning with “C” are from the CUSTOMER table, and field beginning with “L” are from the LOCATION table.)
Joined inserts can also occur when a join is used to select multiple rows from the database (with a query like SELECT * FROM JETEMP.CUSTOMER JOIN JETEMP.CUSTLOC ON CLOCID = LOCID), and the user clicks the corresponding Insert button.
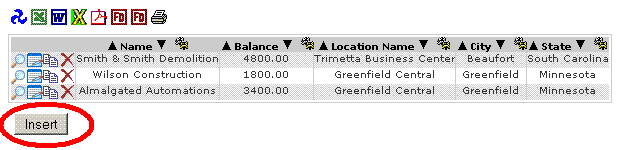
Figure 6-2 Data has been selected from multiple tables. The Insert button will initiate a joined insert
During a joined insert, the user is shown fields from all tables on the same insert screen. There is no indication given to the user of which fields belong to which tables.

Figure 6-3 Fields from all tables are shown together for joined inserts
Restrictions
Each field name in a joined insert must apply to a single table. When two or more tables have columns with the same name, those columns cannot be used in a joined insert into those tables.
Transactions
The SQL standard does not allow for inserting into multiple tables with a single statement, therefore internally WOW splits the insert statement into multiple separate SQL statements and sends them all to the database. It is possible for the one statement to succeed but for the other statements to fail (a dropped network connection or an authorization error are two things that could cause one statement to work and then others to fail). When the first statement fails, WOW abandons the insert and reports the error as usual. However, if a subsequent statement fails after the first statement succeeds, the database could be left in a corrupted state. For this reason you may wish to configure your application not to use joined inserts, or to use database transactions.
A transaction is a way of bundling multiple SQL statements into a single unit of work – that unit of work will either succeed or fail as a whole. If it fails then none of the statements in the transaction will have affected the database. Some databases do not support transactions, and other databases require special configuration before transactions can be used. Check with your database documentation to find out how to configure transactions on your database.
By default WOW will not use transactions for joined inserts. If you want WOW to issue your joined insert as a single transaction (which is recommended if your database supports transactions), you must use the Join property group to specify this:
Join {
transactions: true;
}
This property group should be placed in the properties field of the operation which is inserting the joined rows into the database (or the operation which selected the joined rows, depending on which operation is being run). Alternatively you can place this property group in the properties field of the application, where it will apply to all of the operations in that application.