|
Chapter 9 |
9. Field Descriptors
9.1 Field Descriptors Overview
Field Descriptors are an important and powerful part of WOW. A Field Descriptor describes a field within a table or database. Field Descriptors contain information such as the external name of a field, whether or not the field is required, and the type of data the field contains, such as numeric, time, etc. Utilizing Field Descriptors allows WOW to perform validation, display formatting, and other tasks for your application without any coding on your part.
Field Descriptors should be created for all tables that WOW uses frequently. We encourage creating Field Descriptors for all production level tables/environments.
9.2 Field Descriptor Manager
To edit or create Field Descriptors you first must be in the Field Descriptor Manager. The easiest way to get to the Field Descriptor Manager is to click on the small “FD” icon above any results table:
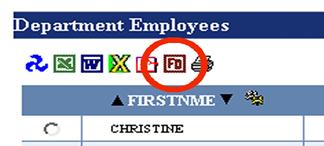
Figure 9-1 The FD icon can be clicked to edit field descriptors.
This will bring up the Field Descriptor Manager in a new window:
 |
Figure 9-2 This is the screen that you will see after clicking on the FD icon.
You can also start up Field Descriptor Manager from WOW directly without first running your application. Click on the Setup Connections link on the left side of the builder. You can then select a connection whose FD’s you want to manage and click the Edit FD’s field. Whenever you are using Field Descriptor Manager, you are managing the field descriptors for a single connection. To manage field descriptors for another connection, you must choose a different connection (or a table retrieved using that connection) and open up Field Descriptor Manager from that connection or table.
The “Enter library” and “Enter table” fields at the top of the main Field Descriptor Manager screen allow you to type in the name of the library and table whose Field Descriptors you want to work with or create. Alternatively, you can click one of the “Select from list” radio buttons and choose the library or table from the list of libraries or tables available (double click an entry in the list to select it). Once you have picked a library or table to work with, the following options are available:
Library Functions
Enter Library – This shows what library you are currently in. If you would like to change your current library click the radio button below and select the library in the list given. If a table’s FDs are shared, specify “*” for the library name.
View FDs – Displays all of the Field Descriptors within the entire library. This may take some time to complete, depending on the number of tables in the library. It is usually better to display the Field Descriptors for a single table at a time.
Create FDs – Creates Field Descriptors for the entire library. Creating Field Descriptors for the entire library is not recommended – it is usually better to create them separately for each table.
Table Functions
Enter Table – This shows you which table you are currently in. If you would like to switch your current table click the radio button below and select the table you would like in the list given.
View FDs – Displays all of the Field Descriptors already created for the table. In most cases the FDs are already displayed below, if for some reason the FDs are not displayed click this button and they will be displayed.
Share FDs – Allows you to share the Field Descriptors for this table with other tables which have the same name, but are in different libraries. By default, a table’s Field Descriptors are only for that table, and not for any other tables, even if those tables have the same name. This function will not share Field Descriptors for multiple connections. Each connection holds a unique set of Field Descriptors. If a table’s FD’s are shared, you must specify “*” for the library name.
Create FDs – Creates field descriptors for the currently selected table.
Reset FD Cache – For advanced users only. This button is used for troubleshooting purposes. Internally we cache Field Descriptors as they are read – this button clears the cached FD’s. This function can be helpful when FD changes recently made do not appear to be affecting the operations using this table and connection.
9.3 Editing Rows Within the Field Descriptor Manager
To change the settings on an individual row that is shown under the Field Descriptor section, click the edit icon next to the Field Descriptor you wish to edit. This will bring up a screen containing the Field Descriptor settings that can be edited. The screen shot below covers the first two sections Basic Settings and Display Settings.
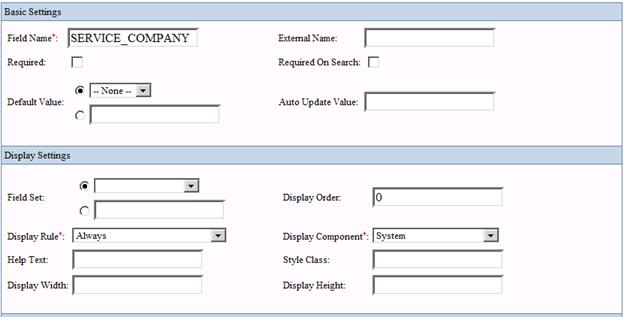
Figure 9-3 This screen shows the basic and display settings that can be used to change different settings for the field descriptors.
9.3.1 Basic Settings
Field Name – The database name of the column which this Field Descriptor describes. In the above example, the Field Descriptor for the SERVICE_COMPANY column is being edited.
External Name – The external name given to the field. External names are used to make the field name more user-friendly.
Required – Indicates whether or not the described field is required. Required fields are displayed with a red asterisk, and are validated when a row is updated or inserted. If a required field is left blank on an insert or update, a validation error is displayed to the user.
Required on Search – Indicates that if the field is used by a search parameter (ex. WHERE FLD1 = ?), a value must be specified before the search operation is performed. See the SQL Prompt Parameters section for more details.
Default Value – The default value for the field. A default value can be any value you want initially displayed.
Auto Update Value – This value will be set for the field when an update is performed. The same rules apply to this setting as the Default Value setting.
A common use for this option would be for a field that is designated to contain the “last changed” date, time, or timestamp value. In this particular example, you would set this option’s value to “*current”. Any time this row is successfully updated, the last changed value would be updated as well.
9.3.2 Display Settings
Field Set – Field Sets are used to group different fields together. By entering a specific name in the Field Set section you can group different fields by the name given. (On this screen, “Basic Settings” and “Display Settings” are examples of Field Sets.)
Display Order –Used to display fields in order specified by the number given (in ascending order). You can use any numbers when ordering fields.
Display Rule – Contains the rule to use when displaying this field. You can set the display rule to one of the following options:
Always – This field should be displayed whenever its row is displayed. This is the default setting
Hide on insert – This field should not be displayed when its row is being inserted
Hide on update – This field should not be displayed when its row is being updated
Hide on update and insert – This field should not be displayed when its row is being updated or inserted.
Never – This field should never be displayed.
There are other display rule options that are for WOW customer programmer only – you should only set the display rule to one of the values listed above.
Display Component – Indicates which display component should be used to display the field. Most of the time, WOW will pick which graphical component to use when displaying a field, based on the type of data contained in the field. If you want to override the system default (for example, by using a text area instead of a text field to display character data) you can choose which display component to use.
(Default) – Component is determined by the DataEngine.
*Associated Operation – Rather than generating a normal association hyperlink, this runs the associated operation and returns the results within the actual field. Note, this option can only be selected if an Associated Operation has been specified in the Advanced Settings section.
EditableSelect – Two components are generated for this option.
The top component is a selectable possible values drop down.
The bottom component is a text field that allows entry for a new value.
EditableSelect - Text Area – Same as an EditableSelect except insures that the bottom component will be a text area instead of a text field.
File Upload – [ For Future Support ]
List – Component is a selectable possible values list displaying all options in which multiple values can be selected.

RadioButtonPVSelect – [For future support] Displays a possible values selection using radio buttons instead of a selection list.

TextArea – Uses a text area instead of a text field for the display component.
Help Text – Text that will be displayed when the user positions their pointer over the component.
Style Class – The fully qualified name of a CSS class that will perform formatting on the “look” of the component generated for the field.
For example, if you need to right justify a field, you can create a unique CSS style class and specify the class name here. In this example, you could add the following to your theme’s fieldstyles.css file:
.mystyle {
text-align: right;
}
Then set the Style Class to “mystyle”.
Display Width - Sets the width of the display in pixels (changes with html settings)
Display Height - Sets the height of the display in pixels (changes with html settings)
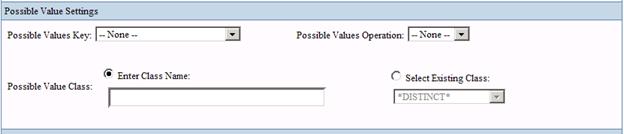
Figure 9-4 This screen shows the Possible Values settings. Possible Values are described in detail in section 10.5
9.3.3 Possible Value Settings
Possible Values Key – The key that determines which Possible Values to use for this field. See the Possible Value Keys section for more information.
Possible Values Operation – This is a drop-down menu listing all of the previously created possible values operations.
Possible Value Class – The specific Java class that is used to hold Possible Values internally on the system. You may also specify a Possible Value Class name
Figure 9-5 This screen shows the advanced settings for the field descriptors. Most of these settings can be left with their default values intact.
9.3.4 Advanced Settings
Field Class – The specific Java class that will be used internally to store the data contained in the field. These classes usually have specialized formatting or display information built in that can be used for fields containing certain types of data. For example, when the planetj.database.field.PasswordField class is selected for a field descriptor, fields using that field descriptor will hide their content with asterisk characters.
Field Class Parameters – If you manually enter the Field Class, you can optionally enter special parameters. These parameters indicate features or attributes of the Field Class. The following are Field Class parameters that you can enter:
![]() minLength=xx
where xx is the minimum length of the field. Ex: minLength=7
minLength=xx
where xx is the minimum length of the field. Ex: minLength=7
To enter a Field Class parameter you must enter the full package and className followed by a comma (,) followed by parameter=value where parameter is the Field Class parameter. If there is more than one parameter, they should be separated by a comma (,).
**Example: planetj.database.field.PasswordField,minLength=7,digitRequired=true
Some Field Classes have special Field Class parameters that are specific only to that field. For instance on a DateField you can specify the date format (see below for special DateField parameters). In the above example, you will notice the digitRequired=true Field Class parameter is used; that is a special parameter for the PasswordField. See each individual field below for specific Field Class parameters.
Here are a few preset Field Classes:
Area Code
The validation of an area code field ensures that the length of the area code is the correct length and only contains digits. If the value contains ‘(‘, ‘)’, or ‘-‘ they are also accounted for.
Date
In the database, a date field might not necessarily be a Date object. It could be a String or a number. To allow for proper reading and setting to the database, a Field’s Field class could be set to DateField, followed with a comma and any user-defined pattern for date formatting. The pattern should be the format the value should be written as when inserted or updated to the database.
Ex:
In the database we have a field that is a CHAR with a length of 8. It takes the format 2 month, 2 day, and 4 year. When we read the value from the database, it needs to be modified from a string of characters into a date before it is displayed. If we set the field class to DateField, then a java Date object will be generated, which gives the field’s value more meaning and flexibility. In this case, we would set the field class to this value:
planetj.database.field.DateField,MMddyyyy
This is the fully qualified class name of the field followed by a comma and then the pattern that the date needs to be in order to be written to the database. This lets WOW know that the field contains a date value, and the format in which that value is stored. There are many formats that you can use and are used in different databases; here are the available formats (case sensitive).
|
yyMMdd |
MMddyy |
yyyyMMdd |
|
MMddyyyy |
cyyMMdd |
cyyMM |
|
cyyDDD |
|
|
All of these formats are used as shown above and allow the application to handle any date input.
Additional examples:
|
Field Class Setting in WOW FD |
Example Date Format |
|
planetj.database.field.DateField,yyyyMMdd |
03/22/2005 |
|
planetj.database.field.DateField,MMddyyyy |
01/13/2005 |
|
planetj.database.field.DateField,ddMMyyyy |
01/23/2005 |
If you wish to have the value of a
DateField set to the current date, set the Default Value to *CURRENT.
Special Case: Multi-field Dates
A commonly encountered date scenario for customers is to have date information stored in multiple database fields. For example, individual fields that store century (19, 20), year (95, 06), month (1-12), and day (1-31). Currently, this cannot be handled through the Field Descriptors, so we’ll use the operation’s SQL to remedy the situation.
Often, during SQL selection, it is desirable to allow the end user to select the multi-field date as a single date field. Doing so can also enable the use of SQL data arithmetic which is very powerful. In the example below, we will use a multi-field date in the WHERE clause of an SQL operation. To enable this date selection, we need to build a String in a format such as “2004-4-3” and use the DATE function on it.
First, add the following SQL segments to your test operation:
SELECT…WHERE…DATE ((CENTURY * 100 + YEAR) || ‘-‘ || MONTH || ‘-‘ DAY ) BETWEEN ?555 AND ?555
NOTE: Since you are concatenating fields to produce a date, WOW doesn’t know what type of prompt you need. Therefore you MUST create a derived Field Descriptor and set its data type to DATE. Substitute the ID of the derived FD in place of 555 in the SQL above. WOW will then know to prompt with a date picker.
Doing this will also allow some very nice “fixed date” queries. Such as:
a. All records in the last 6 months:
SELECT…
WHERE…DATE ((Century* 100 + Year) || ‘-‘ || Month || ‘-‘ Day ) > CURRENT DATE - 6 months
b. All records in the last 3 months:
SELECT…
WHERE…DATE ((Century* 100 + Year) || ‘-‘ || Month || ‘-‘ Day ) > CURRENT DATE - 3 months
*DISTINCT*
Returns all distinct values from the database for that particular field.
*DISTINCT-CACHE*
Returns all distinct values from the cached contents of that particular field.
In the database an email column’s value might be support@planetjavainc.com. By setting the Field Class to Email, the proper display value will be generated automatically. Also, the proper validation will automatically be performed to check for correct email address syntax. In particular, it ensures the value contains a ‘@’ symbol as well as a ‘.’ in the domain. It will also create the HTML mailto link automatically for that display value:
<a href=”mailto:support@planetjavainc.com”>support@planetjavainc.com</a>
Thus, a user could click on the link, then type and send an email to the address. This would especially be beneficial if you wanted to display a list of emails. Rather than manually coding each email link, by setting the Field class to Email, they would automatically be generated.
Password
This field class ensures that when a Password field is displayed it will be replaced with asterisks. The can be very useful for sensitive information, such as passwords.
Field Class Parameters – If you manually enter the Field Class, you can optionally enter special parameters. These parameters indicate features or attributes of the Field Class. The following are Field Class parameters that you can enter for a PasswordField only:
· digitRequired=true This forces the user to enter at least 1 digit/number in the password.
**Example: planetj.database.field.PasswordField,minLength=7,digitRequired=true
In the above example, a valid password would be: abcd123
Invalid passwords using the above example would be: abc123 (too short), abcdefgh (no digits)
Phone Number
The validation of a phone number field ensures that the length of the phone number is the correct length and only contains digits. If the value contains ‘(‘, ‘)’, or ‘-‘ they are also accounted for.
Social Security Number
The validation of a social security field ensures that the length of the social security is correct and its value only contains digits. If the value contains any ‘-‘ they are also accounted for.
Upper Case
This Field ensures that its value is always upper case both when displaying and inserting or updating to the database.
YBlank Boolean
This Field can be used when you want the value in the database to be of type CHAR and length 1. Since the field is a boolean field, then it will be displayed in the form of a check box. Thus, the user cannot enter the wrong value. When setting the value programmatically, a boolean value ‘true’ or ‘false’ can be used, which will in turn set the value to ‘Y’ or ‘ ‘.
YN Boolean
Same as YBlankBooleanField except an ‘N’ instead of a ‘ ‘.
Zip Code
The validation of a zip code field ensures the zip code is the correct length and only contains digits. If the value contains a ‘-‘, it is also accounted for.
Zip Code Suffix
The validation of a zip code suffix field ensures the zip code suffix is the correct length and only contains digits. If the value contains a ‘-‘ it is also accounted for.
Field Descriptor Type - This is where you can select which field descriptor type, if any, you’d like to use with this field.
Default – This descriptor type is the default setting and applies to most FD definitions.
Derived – The FD represents a derived field used in SQL statements (e.g. “ ‘View’ as d_viewfld”, where the text ‘View’ is shown for each row and the field is represented with the name d_viewfld). A derived field does not exist in the table and it’s value is used for display only.
Table Descriptor – This field descriptor represents a table (instead of a field) and has the same name as the table, except it is prefixed with a tilde (~). There can only be one table descriptor for each table. The table descriptor is created automatically by WOW when “Create FDs” is selected.
Formatter Class – Specify the Java class that will be used to format the data for a report. This setting only affects how the data is displayed. For example, setting a CHAR 10 field to “Phone Number” would result in 3185551212 to be shown as (318) 555-1212.
Concurrency – Regulates the concurrent updating or deleting of a row or field by users. A concurrent update occurs when user A views a field, user B then updates that field, and then user A tries to update that same field, overwriting user B’s changes. A concurrent delete is when user A views a field, user B updates that field, then user A deletes the row, erasing user B’s changes. You can adjust this setting to allow or disallow concurrent updates and deletes on the described field.
1. NO_CONCURRENT_ALTERATIONS_ALLOWED: If user A reads a field with this concurrency value from the database, and then user B makes changes to the field, user A cannot update the field or delete the row containing the field without first rereading it.
2. CONCURRENT_DELETES_ALLOWED: If user A reads a field with this concurrency value from the database, and then user B makes changes to the field, user A is allowed to delete the row containing the field without first rereading it.
3. CONCURRENT_UPDATES_ALLOWED: If user A reads a field with this concurrency value from the database, and then user B makes changes to the field, user A is allowed to update the field without first rereading it.
4. CONCURRENT_UPDATES_AND_DELETES_ALLOWED: If user A reads a field with this concurrency value from the database, and then user B makes changes to the field, user A is allowed to update the field or delete the row containing the field without first rereading it. This is the default value.
Getter Method - This attribute is only used for Derived Fields. The DataEngine parses the getter method String to get the method to call and parameters to use. Then Java reflection is used to invoke the proper method to get the Derived Field’s value.
Setter Method - This attribute is only used for Derived Fields. The DataEngine parses the setter method String to get the method to call and parameters to use. Then java reflection is used to invoke the proper method to set the correct Field(s) value.
Association Operation - The pulldown for this attribute will show any associated operations (1-1, 1-many, etc.) available. Setting this attribute to an operation causes that associated operation to execute when the field is clicked on. For more details, see the !h!Associations!h! section.
Notify Status Change - Tells whether or not this field triggers a “Status Change” operation to be called. If a particular field has a value that influences the value of another field, specifying “Yes” for this option will cause a round-trip to the server whenever the value of this field changes. This round-trip will re-render the page and any possible value operations will be executed again. Therefore, if another field’s possible values operation depends on the value of this field, the possible value operation will be executed again, but this time it will contain the new value.
Remarks – User documentation for field only. Otherwise, not used.
XML Tag – This defines the XML tag to be used for this field when the XML icon is clicked.
The screen shot below lists the Authorization Settings.

Figure 9-6 This is screen shot lists the authorization settings for the field descriptors. Like the advanced settings most of these can be kept with their default values intact.
9.3.5 Authorization Settings
Read Authorization Operation – Used to limit the users who can read the data for this field. See the Securing Fields and Operations with User Authorization Operations section for more details.
Edit Authorization Operation - Used to limit the users who can edit the data for this field. See the Securing Fields and Operations with User Authorization Operations section for more details.
The screen shot below lists the Additional Settings and Database Settings. Not all of these settings will be described below. If a specific setting is not described, it is best to leave this setting at its default value.
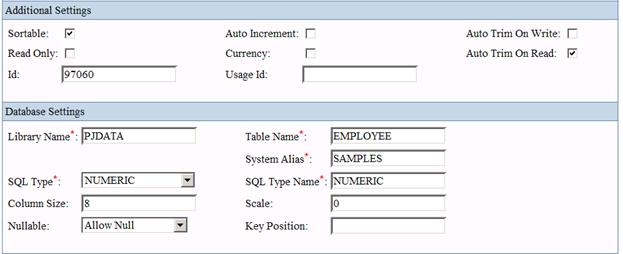
Figure 9-7 This is screen shot lists the additional and database settings for the field descriptors. Like the advanced settings most of these can be kept with their default values intact.
9.3.6 Additional Settings
Sortable – Whether or not results can be sorted by the values in this field. In the results table, sortable fields have small up and down arrows next to their names; the user can click on these buttons to sort by that field.
Auto Increment – Whether or not each row should have a unique value in this field; the value for each row will be incremented automatically as it is inserted into the database. By selecting this option you allow WOW to increment each row on its own, without any user intervention.
Read Only – Whether or not the field is field read-only. Read-only fields cannot be updated.
AutoTrim On Read – If spaces on the end of field values should be automatically trimmed and discarded as the values are read from the database.
AutoTrim On Write – If spaces on the end of field values should be automatically trimmed and discarded before the values are written to the database.
Currency – Whether or not this field represents a currency or monetary value. It’s the same as setting the Formatter Class to “Currency”. Checking this box causes the value to be right justified.
Id – A unique number associated with this field descriptor. This is the ID that can be used when doing field descriptor prompting as described in sections 9.7 and 10.1
Usage Id - An integer that is associated with this database column. This is useful when two columns in different tables have different names, but represent the same logical type of data. They can then be referred to by usage ID instead of by name. More information about usage ID’s can be found in section 10.1 and in Appendix A.
9.3.7 Database Settings
System Alias – The name of the alias being used for the current connection. System Alias was described in the Creating Connections section.
Column Size – The amount of information the described field can contain. This setting specifies the maximum number of characters or digits that can be stored in this field’s database column.
Library Name - The name of the library that the described field is located in. If the Field Descriptor is shared among tables in multiple libraries, this field will contain an asterisk (*)
Scale – For a numeric type field, this is the number of digits to the right of the decimal point.
Table Name - The name of the table that the described field is located in.
Nullable – Whether or not the field can contain null values.
SQL Type – This is the corresponding SQL data type for the field.
SQL Type Name – This is the corresponding SQL data type for the field.
Key Position – Defaults to 0 for non-key fields. This field represents the position of this field in the table’s key. For instance, if this table (Table Name) has only one key, and this FD is the key field, then the key position should be 1. If this table’s key is made up of two columns, you need to set the FDs appropriately. If a Field Descriptor is not a key, this value should be 0. Keys are used to identify a unique record (row) within the table. Only one row is allowed to exist with each key value (or set of key values). See the Setting Key Position Field to Select Unique Records section for more details.
9.4 Field Descriptor Views
When you are viewing field descriptors in Field Descriptor Manager, by default the Id, Field Name, External Name, Required, and Field Class columns are the only columns displayed (these columns are explained in greater detail at the beginning of this chapter). Although you can always choose to view the details of a Field Descriptor to see all of its settings, there are times when you will want to view different columns of multiple field descriptors. There are eight different views or filters that can be used within Field Descriptor Manager to control the columns that are displayed in the table of field descriptors. These views are found on the drop down menus of the Field Descriptor Manager and are described below in the next five sections.
9.4.1 Table FD’s
Auto Trim – Displays the Auto Trim On Write and Auto Trim On Read columns for all the field descriptors in the current table and library.
Default Value – Displays the Default Value field of all the field descriptors in the current table and library.
Display Properties – Displays the Field Set, Display Order, Display Rule, and Display Component fields of all the field descriptors in the specified table and library.
9.4.2 Shared FD’s
Table FD’s – Shows all field descriptors for the current table that are shared. Shared field descriptors will not be shown for a table and library by simply clicking the View FD’s button. This is because shared field descriptors do not correspond to any specific library. You must use the Table FD’s option to view the field descriptors for a table that have been shared.
All FD’s – Displays the shared field descriptors for all tables for the current system alias.
9.4.3 UsageIds
(Usage ID’s are described in more detail in Chapter 10.1 and Appendix A).
Table FDs – Shows the Usage ID field for all the field descriptors for the current table and library.
Table FDs w/UsageId – Shows the Usage ID field for all the field descriptors for the current table and library which have a Usage ID.
All FDs w/UsageId – Shows the Usage ID field for all the field descriptors for the current system alias which have a Usage ID.
9.4.4 Search By
Multiple Fields – This search option provides a means to display a subset of field descriptors based on one or more of the following search fields:
Library Name
Table Name
Field Name
External Name
Id
Usage ID
Field Descriptor Type
9.4.5 Quick Edit
The Quick Edit feature lets you display a subset of field descriptors and edit specific fields from the table view. Each of the views below shows a different set of fields:
Default Value and Required – Shows an editable table that includes the Default Value and Required fields.
Display Properties – Shows the following field descriptor fields: Field Set, Display Order, Display Rule, Display Component, Id, Field Name, and External Name.
Key Position – Shows the following field descriptor fields: Key Position, Id, Field Name, External Name.
9.5 Prompting Using Field Descriptors
When an SQL operation that has a question mark in its code (e.g. SELECT * FROM PLANETJ.CUSTOMER WHERE BALANCE > ?) is run, the Field Descriptor for the BALANCE field is used to generate an input where the user can provide a value for the query at runtime (see figure 5-4). If the Field Descriptor indicated that the maximum value for this field was 9,999,999 then the HTML input would not allow the user to enter a larger value. If the Field Descriptor indicated that the field should be displayed with an HTML text area component (instead of a text field), then the generated input would be a text area.
You can override this behavior and use a different Field Descriptor for generating the user prompt. To do so, append the ID of the Field Descriptor you want to use to the question mark. For example, the query SELECT * FROM PLANETJ.CUSTOMER WHERE BALANCE > ?307 would use Field Descriptor 307 for generating the prompt input shown to the user. This enables you to present a prompt for the same field in different way in different queries.