|
Chapter 10 |
10. WOW Features
10.1 Derived Fields
Perhaps one of the most commonly used features in WOW, derived fields provide the ability to create a “virtual” field. This field is defined by a field descriptor, just a like a normal field, yet it does not actually exist in a physical file. It is simply a container field that can be used to return any value needed. It can be handled and manipulated just a like an actual database field.
A derived field is represented in SQL by a “column name alias.” For instance, the following SQL statement contains a derived field with the column name alias D_DETAILS:
SELECT 'Details' AS D_DETAILS, FIRSTNME, LASTNAME FROM PJDATA.EMPLOYEE
This statement returns three columns, in the following order: D_DETAILS, First Name, and Last Name. The results of this particular statement can be seen in Figure 10-.1 below.
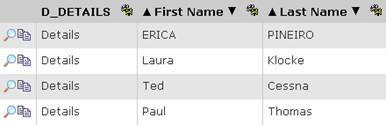
Figure 10-1 Results with the derived field D_DETAILS
Notice the first part of the column name alias ( 'Details' ) represents the the initial value that is displayed in the derived field. A string, which requires single quotes, was used in this example but you could also instead use numbers, functions, other field names, etc. The second part ( AS D_DETAILS ) assigns an alias (column name) to the value defined in the first half.
10.1.1 Creating a Derived Field Descriptor:
Once you have the derived field defined in your SQL, you can format and manipulate it by creating its derived field descriptor. This will allow you to assign it default values, assocations, field classes, and so on. A derived field descriptor differs from a normal field descriptor in really only one way: its Field Descriptor Type is set to ‘Derived’. This allows WOW to handle it appropriately. Also, a field descriptor for a derived field will not automatically generate by clicking the ‘Create FDs’ button in the Field Descriptor Manager.
Thus, you must manually create derived field descriptors. The easiest way to do this is to simply copy another field that is of the desired data type. For instance, if your derived field was a calculation that returned a decimal number, you would copy an existing field desciptor for a field of type DECIMAL or NUMERIC. To continue our example from the previous section, here are the steps to creating a derived field descriptor for D_DETAILS:
Step 1: Create a Field Descriptor
Since the only value that D_DETAILS will hold is the string ‘Details’, a good field desciptor to copy (rather than creating one from scratch) would be a simple CHAR field. Now, navigate to the Database Settings section of this new field descriptor and change the values to reflect those shown in Figure 10-2. In particular, the Library and Table Names are the same as specified in the SQL statement listed above. Also, SQL Type and SQP Type Name specify the CHAR field type and the Column Size is 7 since we only need 7 characters (ie. Details).
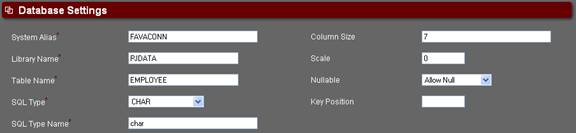
Figure 10-2 Database Settings for the D_DETAILS field desciptor.
Step 2: Set the Field Descriptor’s Settings
Besides the Database Settings given in Step 1, there are two other Field Descriptor settings that are key to success. The first is the Field Name field under the Basic Settings section. In this example, the Field name is D_DETAILS as shown in Figure 10-3. The second is the Field Descriptor Type under the Advanced Settings section. This must be set to ‘Derived’ as shown in Figure 10-4.

Figure 10-3 Specifying the Field Name of the derived field.
Figure 10-4
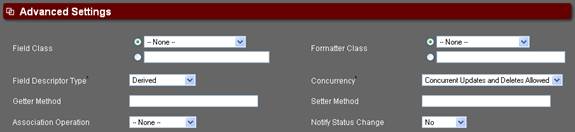 Specifying the Field Descriptor Type as Derived.
Step 3: Update and Run Application
Click Uupdate and run the application. If everything has been done correctly, the column label will say ‘Details’ rather than ‘D_DETAILS’ (see Figure 10-5). This means the derived field has successfully been linked with the derived field descriptor and is picking up the External Name (see Figure 10-3).
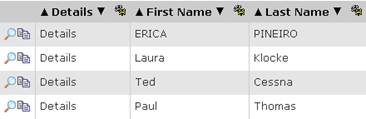
Figure 10-5 The derived field D_DETAILS now has a linked field descriptor.
10.2 Parameters
There are many cases where the statement you want to run cannot be completely specified at design time. This usually happens when the statement contains certain values that either needs to be directly input by the user at runtime, or that depend on the context in which the statement is being run. (The context includes things such as the user's sign on information and previous statements that the user has run.) WOW handles these cases by using parameters. A parameter is represented in code by one or more question marks, possibly followed by additional parameter control characters. For example, the following SQL statement contains 3 different parameters:
SELECT * FROM PLANETJ.CUSTOMER WHERE (BALANCE > ? AND ID = ???CUSNUM) OR ??1 < 0
The "?", "???CUSNUM" and "??1" all serve as placeholders for values that are not known at design time, but will be plugged in to the statement at runtime before it is executed. This section will describe the various parameter types that are available in WOW, and how to use them.
10.2.1 SQL Prompt Parameters
A single question mark in an SQL statement represents a SQL prompt parameter. When a statement containing one or more SQL prompt parameters is executed, the user is prompted to enter values for these parameters. For example when the statement
SELECT NAME, BALANCE FROM PLANETJ.CUSTOMER WHERE BALANCE < ? AND NAME LIKE ?
is run, the user is shown the following screen:
Figure 10-6 WOW prompting the user for values
After supplying values, the user can click the search button to run the statement with the values that were entered. Unlike most types of parameters which can be used in any type of operation, SQL prompt parameters can only be used in SQL Operations.
10.2.2 Field Descriptor Prompt Parameters
A field descriptor prompt parameter is similar to an SQL prompt parameter in that it is used to display an entry field for the user to supply a value for the parameter. The difference between the two is how WOW generates the entry field. For SQL prompt parameters, WOW determines which field descriptor to use for the entry field based on the SQL statement. For a field descriptor prompt parameter, WOW will use a specific field descriptor you specify to generate the entry field. (For more information on field descriptors, see the previous chapter).
Field descriptor prompt parameters are denoted by a single question mark followed by the id of the field descriptor to use. For example, the SQL statement
SELECT * FROM PLANETJ.CUSTOMER WHERE BALANCE > ?49
will use the field descriptor with an ID of 49 to generate the prompt shown to the user. Field descriptor prompt parameters can only be used in SQL statements.
10.2.3 Row Parameters
A row parameter takes information from a row of data and plugs it into a statement. A row parameter is indicated by two question marks followed by a database column name. For example, if a database record describing a single employee has been selected from the EMPLOYEES table, and now information about that employee's department needs to be selected from the DEPTARTMENT table, the SQL statement might look something like this:
SELECT * FROM PJDATA.DEPARTMENT WHERE ID = ??DEPT_ID
This statement assumes that ID is the key in the DEPARTMENT table, and that the "current row" (from the EMPLOYEE table) contains a column called DEPT_ID which is a foreign key to the DEPARTMENT table. When this statement is run, the value of the DEPT_ID field of the "current" row is used as the parameter value. Note that this parameter is automatically filled in by WOW; the user is not shown any type of prompt.
10.2.4 User Parameters
A user parameter is similar to a row parameter, except instead of taking information from the "current" row, the information is taken from a row of data associated with the current application user. A user parameter is identified by three question marks in a row followed by a database column name. So the following statement:
SELECT * FROM PLANETJ.CUSTOMER WHERE ID = ???CLIENT_ID
will select rows where the ID field is equal to the CLIENT_ID field associated with the current user. See chapter WOW Security Protocols, section SQL Operation for more details on how you can associate information with users of your application.
There is a special user parameter called USERID which is always associated with the id that was used to sign onto the application. This user parameter can be used with any type of application sign-on (except for an unsecured sign-on, which does not require the user to enter a user id or password). The SQL statement
SELECT * FROM PLANETJ.USER_INFO WHERE ID = ???USERID
would select every row from the USER_INFO table where the ID column has a value equal to the user ID of the current user. User ID’s are always converted to uppercase, so in the above example all values in the ID column should be uppercase as well.
10.2.5 Usage ID Parameters
In order to use a row or user parameter, you have to know the database column name of the field whose value you are interested in. In some cases this is not possible -- usually this happens when multiple tables contain the same logical piece of information in different fields. In this situation, you can identify the field to use by its usage ID instead of its column name. A usage ID is an integer you can associate with one or more field descriptors. A usage ID parameter will look for a field descriptor with the specified usage ID in the row (either the user row or the current row) and use the value in the field described by that field descriptor.
A user usage ID parameter is denoted by three question marks followed by a caret and the usage ID. The statement
SELECT * FROM PLANETJ.CUSTOMER WHERE ID = ???^18
would take the value associated with usage ID 18 in the user row as the parameter value.
A row usage ID parameter is denoted by two question marks followed by a caret and the usage ID.
SELECT * FROM PLANETJ.CUSTOMER WHERE ID = ??^46
would take the value associated with usage ID 46 in the current row as the parameter value. Usage ID’s are described in more detail in Appendix A.
10.2.6 Table Parameters
A table parameter is used when you want to allow the user to specify the table or tables to run an SQL statement against. For example, you might have multiple tables containing customer orders - every table would have the same structure but be specific to a single customer. You could then build a query which could apply to any of the tables - the user will pick the exact table to run the query against at runtime:
SELECT * FROM ?~PLANETJ.CUSTOMER WHERE ORDER_NUMBER = ?
A table parameter begins with a question mark followed a tilde (~) and includes the name of a table; in the above statement "?~PLANETJ.CUSTOMER" is the table parameter. At runtime, the statement will be executed against whatever table the user specifies, which may or may not be the PLANETJ.CUSTOMER table. However, the PLANETJ.CUSTOMER table will be used to identify the field descriptors which will be used to display the parameter prompts to the user. The prompt for the table parameter will be based off of the table descriptor for PLANETJ.CUSTOMER - this table descriptor can be used to specify a display name and a list of possible table values for the user to choose from. (See the previous chapter for information on table descriptors.) The prompt for the second parameter will be based off of the ORDER_NUMBER field descriptor in the PLANETJ.CUSTOMER table - even if this is not the table the user specifies for the actual statement execution.
10.2.7 Parameter Parameters
A Parameter parameter is a parameter which gets its value from another parameter in the same statement. Parameter parameters are used when multiple parameters in a statement must all have the same value. For example if you wanted to look up customer balances that are within $200 of a certain value, your query might look like this:
SELECT * FROM PLANETJ.CUSTOMER WHERE BALANCE +200 > ? AND BALANCE – 200 < ??1
The first question mark is a normal SQL prompt parameter - the user will be prompted for this value. The second pair of question marks is immediately followed by a number, indicating that it is a Parameter parameter. The user will not be prompted to supply a value for this parameter. Instead it will have the exact same value as the first parameter in the statement.
In general, a Parameter parameter is denoted by two question marks followed by a number. The number indicates which parameter in the statement should be used to supply the value. (In the above example, the number 1 indicates that the first parameter should be used to supply the value.)
10.2.8 Context Parameter Parameters
A Context Parameter parameter is a parameter that is similar to a parameter parameter, but rather than getting its value from another parameter in the same statement, it gets it’s value from a parameter in an associated statement. When Context Parameter parameters are used, parameters in an association need to have the same value as the parameters in the original SQL. For example, an original query might show a summary of a customer’s balance between a certain date range. The query would also contain an association (using a derived field descriptor) that gets transaction details for that customer. The association (2nd SQL listed below) would thus need to use the same search date range:
SELECT CUSTOMER_NAME, SUM(AMOUNT), !!DETAILS FROM PLANETJ.CUSTOMER_TRANSACTIONS WHERE TRANSACTION_DATE BETWEEN ? AND ?
SELECT TRANSACTION_ID, AMOUNT FROM PLANETJ.CUSTOMER_TRANSACTIONS WHERE CUSTOMER_NAME = ??CUSTOMER_NAME AND TRANSACTION_DATE BETWEEN ??&1 AND ??&2
In the association (2nd SQL), the first parameter is a Row parameter used to ensure the proper customer information is retrieved. The last two parameters are the context parameter parameters used to get the same date range to search on as the original query.
In general, a Context Parameter parameter is denoted by two question marks followed by an ampersand (‘&’) and a number. The number indicates which parameter in the original statement should be used to supply the value.
10.2.9 Runtime Parameters
Runtime parameters are parameters which are specified when the user first enters an application, and can then apply to all operations executed by that user. For example, let’s say you have sales offices in three different locations: Atlanta, Boston, and Cleveland. You want to develop a WOW application containing various operations which let people from each branch run different queries against sales made by their branch. You could include the branch name in each query using regular SQL parameters like this:
SELECT * FROM PJDATA.SALES WHERE BRANCH = ? AND AMOUNT > ?
SELECT * FROM PJDATA.SALES WHERE BRANCH = ? AND DATE = ?
SELECT * FROM PJDATA.SALES WHERE BRANCH = ? AND ACCOUNT = ?
The only problem with this scenario is it forces users to select their branch for every query that is run. If you rework these queries to use runtime parameters instead, then the branch can be specified once when the application starts up and used for all subsequent queries without further user input.
Two question marks followed by a colon “:” and an identifying name is the sequence used to indicate a runtime parameter. Using runtime parameters for the branches in the above queries gives:
SELECT * FROM PJDATA.SALES WHERE BRANCH = ??:BCH AND AMOUNT > ?
SELECT * FROM PJDATA.SALES WHERE BRANCH = ??:BCH AND DATE = ?
SELECT * FROM PJDATA.SALES WHERE BRANCH = ??:BCH AND ACCOUNT = ?
To specify a value for the BCH runtime parameter, the application should be started with a URL like this:
http://www.planetjavainc.com/wow/runApp?id=40&BCH=Atlanta
This starts up application 40 and indicates that “Atlanta” is the value for all runtime parameters named “BCH”. The ‘?’ denotes the start of parameters and ‘&’ is used to separate parameters. Users from different branches can use links specifying their branch when starting the application:
http://www.planetjavainc.com/wow/runApp?id=40&BCH=Boston
http://www.planetjavainc.com/wow/runApp?id=40&BCH=Cleveland
When they run the operations, they will not have to select which branch they are querying.
10.2.10Defaulting Parameter Values
Normally when user needs to fill in a parameter’s value, that parameter will default to a blank value. For example, if your query is
SELECT * FROM PJDATA.CUSTOMER WHERE BALANCE > ?
The prompt shown to the user would look something like this:
However, if you want your parameter to have a default value of 1000, you can specify this is your SQL statement. Using the code
SELECT * FROM PJDATA.CUSTOMER WHERE BALANCE > ?{1000}
tells WOW that it should use a default value of 1000 for the parameter. Running an operation with the above code results in this prompt (before the user enters any data in):
The user can type in any value he or she wants; 1000 is just a default value. If your field has possible values (discussed later in this chapter) and you want to use a default value, remember that you need to use the value you want as the default, not the display value.
In general, any parameter that is displayed to the user can be given a default value by appending the default value, enclosed in curly braces, onto the end of the parameter. (There should not be any spaces between the rest of the parameter and the opening curly brace.) Here are several more examples of SQL statements which assign default values to parameters:
CALL PLANETJ.MY_SPROC (?45, ?92{Red}, ?14{Orange})
DELETE FROM PLANETJ.EMPLOYEE WHERE LASTNAME = ?{Stewart} AND FIRSTNME = ?
SELECT * FROM ?~PLANETJ.MYTABLE{PLANETJ.THISTABLE}
10.3 Operation Property Groups
The Properties field allows you to configure your operations in various ways. The screen shot below shows where the Properties field is located in the “Creating Operations” screen:
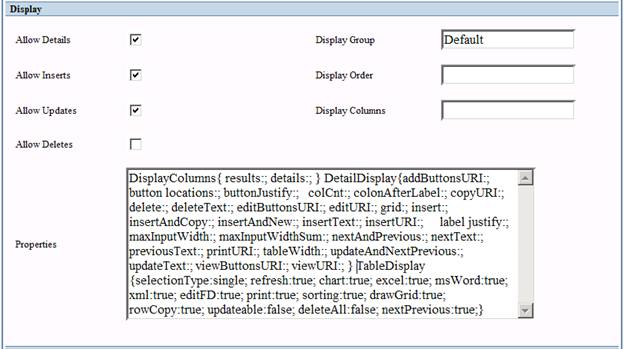
Figure 10-7 A screenshot of the display field in the Create Operation screen. This shows the many different configurations you can have for each Operation.
Within the properties field are different property groups. These groups are used to change the look and feel of the tables and data selected by the SQL statement. For instance, a few of the different property groups available are DisplayColumns, DetailDisplay, and TableDisplay. The properties of each group will be listed between curly brackets {}. For each property, the name of the property is followed by a colon and then the value (or comma separated list of values), and finally by a semicolon. Below are samples of properties groups correctly formatted:
DisplayColumns{ results:*; details:*; }
DetailDisplay{colCnt:; copyURI:; editURI:; insertURI:; maxInputWidth:; maxInputWidthSum:; printURI:;viewURI:;}
TableDisplay{ selectionType:none; refresh:true; chart:true; excel:false; msWord:true; pdf:true; xml:true; editFD:false; print:true; sorting:true; drawGrid:true; rowCopy:false; updateable:true; deleteAll:true; nextPrevious:true; }
OperationLabels{searchDisplay:3;}
Note that whitespaces (new lines, spaces, and tabs) are irrelevant to property group formatting.
10.3.1 AutoRun { }
This property group allows you to set the run schedule for an “Auto-Run – Batch Process” (an operation that is scheduled to run automatically when an application is started).
|
Property |
Value |
Description |
|
startDate |
TODAY | MM/dd/yyyy |
The date the batch auto run operation should start . |
|
startTime |
IMMEDIATELY | hh:mm |
The time the batch auto run operation should start. |
|
frequency |
integer |
How often the batch auto run operation should execute (in seconds – e.g. 900 = 15 minutes, 86400 = 1 day).
In the example below, the first run of the operation would occur on January 1, 2007 at 1 am, repeating every 7 days thereafter.
AutoRun { startDate:1/1/2007; startTime:1:00 am; frequency:604800; }
To see an AutoRun example, see the Logging Email section. |
10.3.2 Browser { }
This property group allows you to control the browser behavior when the operation is run. One use for these properties would be when an operation displays a small pop-up window.
|
Property |
Value |
Description |
|
url |
URL |
URL to load in the window. |
|
target |
window name | _BLANK | _SELF | _PARENT | _TOP |
Target where to load the window. The value “_self” would ensure that the operation runs in the same window. For an example, see the Creating Associations section. |
|
width |
integer |
Width for the browser window.
|
|
height |
integer |
Height for the browser window. |
|
toolbar |
TRUE | FALSE |
Show the toolbar. |
|
location |
TRUE | FALSE |
Show the location bar. |
|
menubar |
TRUE | FALSE |
Show the menu bar. |
|
directories |
TRUE | FALSE |
Show the directories (links / bookmarks). |
|
scrollbars |
TRUE | FALSE |
Show the menu bar. |
|
resizeable |
TRUE | FALSE |
Allow resizing of the browser window. |
|
copyhistory |
TRUE | FALSE |
Copy the browser history. |
10.3.3 Chart { }
This property group allows you to specify properties used to create and generate a chart using JFreeChart. See the Creating Charts and Graphs chapter for more details.
10.3.4 Config { }
This property group allows you to specify a replacement library list for an operation. See the Replacement Libraries Support chapter for more details.
10.3.5 CSV { }
Specifies formatting information for CSV documents. (CSV documents include Microsoft Word and Microsoft Excel formats). When a user chooses to view data in a CSV document, this property group describes how that document should be formatted.
|
Property |
Value |
Description |
|
columnHeadings |
INTERNAL | EXTERNAL |
Indicates whether the internal database names or the external “user-friendly” names should be used for the column names in the CSV. The default is INTERNAL.
Example: CSV{ columnHeadings:external;}
This would cause the Excel download to use external labels for column headings. |
|
outputRows |
ALL | SCREEN | SELECTED |
Indicates which rows should be exported. Possible values are ALL (all rows which satisfy the query), SCREEN (only rows on the current screen), and SELECTED (only rows which the user has selected). By default, all rows are exported. |
|
displayColumns |
field,field,… |
Indicates which columns should be exported. You may type in a comma separated list of column names that should be exported. By default, all columns returned by the query are exported.
|
10.3.6 DetailDisplay { }
When a single entry (row) is displayed, this section contains information about how to display the details of a row to the user. (Row details are what the user sees when they insert a new row into the results, or when they select a row from the list of rows in the results, and choose to view, edit, or copy that row.) Most SQL Operations do not need to include these properties – they can simply use the WOW defaults. If you want to use a different JSP to display detailed results, set the appropriate DetailDisplay property. The features described below should only be used by advanced programmers who have experience with Java and JSP programming.
|
Property |
Value |
Description |
|
addButtonsURI |
file path |
JSP to use for buttons during an insert. |
|
button locations |
TOP | BOTTOM |
Designates where the buttons are located on details screen. The default is to show buttons on both top and bottom. |
|
buttonJustify |
RIGHT | LEFT |
The buttons for the Detail screen are displayed at the top and bottom of the detail and have values such as Insert, Update, and Cancel. The default value is right. |
|
colCnt |
integer |
Number of columns to display when showing Row details (default is 2). |
|
colonAfterLabel |
TRUE | FALSE |
Append colon after labels on the details screen. The default is false. |
|
copyTargetWindow |
window name | _BLANK | _SELF | _PARENT | _TOP |
Describes how to use a new window for copying a row. For more details see the editTargetWindow property. |
|
copyURI |
file path |
The JSP to use when displaying copied database rows. |
|
delete |
TRUE | FALSE |
Allow delete on details screen. |
|
deleteText |
text |
Text to be used on the Delete button. |
|
detailsTargetWindow |
window name | _BLANK | _SELF | _PARENT | _TOP |
Describes how to use a new window for viewing, editing, copying, or inserting a row. For more details see the editTargetWindow property above. |
|
editButtonsURI |
|
JSP to use for buttons during detail viewing. |
|
editTargetWindow |
window name | _BLANK | _SELF | _PARENT | _TOP |
Information about the window to use when a row is edited. If this property is omitted, then the main browser window is used to edit a row’s details. When this property is specified, a new window will be used to edit a row’s details. The value of this property can either be a name for the new window, or a list of detailed information about the new window. For example, if the property is specified like this:
editTargetWindow: claimEdit;
Then when a row retrieved by this operation is edited, the editing will be done in a new window entitled “claimEdit”. In general, the exact name which the new window is given does not matter, however if there is already a window with that same name open, then that window is used instead of opening a new one. If the special name “_blank” is used then a new window is always opened:
editTargetWindow: _blank;
Alternatively instead of just specifying a name, a whole list of information about the new window can be specified:
editTargetWindow: name=_blank,height=600,width=400, status=yes,menubar=no,scrollbars=no,resizable=no;
The above example would cause the new window for editing to have a height of 600 pixels, a width of 400 pixels, a status bar, no scrollbar or menu bar, and not be resizable. Only the name value is required – the rest are optional and can be omitted if you want to use the defaults. |
|
editURI |
file path |
The JSP to use when editing database rows. |
|
grid |
TRUE | FALSE |
Use grid to display details. |
|
insert |
TRUE | FALSE |
Allow insert on details screen. |
|
insertAndCopy |
TRUE | FALSE |
Show the insert and copy buttons. |
|
insertAndNew |
TRUE | FALSE |
Show the insert and new buttons |
|
insertTargetWindow |
window name | _BLANK | _SELF | _PARENT | _TOP |
Describes how to use a new window for inserting a row. For more details see the editTargetWindow property above. |
|
insertText |
text |
Text to be used on the Insert button. |
|
insertURI |
file path |
The JSP to use when inserting new database rows. |
|
label justify |
TOP | LEFT |
Determines where the field's label is to be located, top (above) or to the left of the field's display. The default is to the left. |
|
maxInputWidth |
integer |
The maximum input width allowed for table display (default is 36). |
|
maxInputWidthSum |
integer |
The maximum sum of the input widths in the table display (default is 72). |
|
nextAndPrevious |
TRUE | FALSE |
Show the next and previous buttons |
|
nextText |
text |
Text to be used on the Next button. |
|
previousText |
text |
Text to be used on the Previous button. |
|
printURI |
file path |
The JSP to use when printing database rows. |
|
tableWidth |
integer |
The width (in pixels) to be used to display the details. |
|
updateAndNextPrevious |
TRUE | FALSE |
Show the update and next buttons. |
|
updateText |
text |
Text to be used on the Update button. |
|
viewButtonsURI |
file path |
JSP to use for buttons during detail viewing. |
|
viewTargetWindow |
window name | _BLANK | _SELF | _PARENT | _TOP |
Describes how to use a new window for viewing a row. For more details see the editTargetWindow property above. |
|
viewURI |
file path |
The JSP to use when viewing database rows. |
10.3.7 DisplayColumns { }
There are two properties in the DisplayColumns group, results and details. In the above sample, both of the properties are set to display all data. This is indicated by the * asterisks. In all the properties of this property group, the values ‘all’ and ‘none’ may be used.
|
Property |
Value |
Description |
|
details |
ALL | NONE | * | field,field,… |
Used to specify what columns you want displayed in a details (single row) display. You can view details of any entry (row) by clicking on the corresponding View icon for the entry (row). Like the results property, the details property can also take specific column names.
For Example:
DisplayColumns{ results: *; details:empno,firstnme,lastname,sex;}
Now if you were to view an entry instead of showing all of the fields, it will only display the employee number, first name, last name, and gender fields. |
|
detailsExclude |
ALL | NONE | * | field,field,… |
Columns to exclude from the details view. |
|
editableResults |
ALL | NONE | * | field,field,… |
Used to specify what columns should be editable in the results view. Same functionality as the resultsEditable property. This must be used in conjunction with the updateable property in the TableDisplay property group:
TableDisplay{ updateable: true; } |
|
results |
ALL | NONE | * | field,field,… |
Used to designate which columns (fields) are displayed in the table when a set of rows are displayed. To display only specific fields simply delete the asterisk and replace it with the column names or column number values you want to display. Each column name should be separated by commas. For Example:
DisplayColumns{ results: empno,firstnme,lastname; details:*;}
The example above would only display the employee number, first name and last name fields of the table. Syntax is very important. The property groups are case sensitive. Each property group must start with a capital letter on each word with no spacing between them. The field names are not case sensitive though. Another technique to displaying certain fields in the table is by using numeric values instead of row names.
DisplayColumns{ results: 3,1,2; details:*;}
In the example above, the row names were simply replaced by their corresponding number. For example the above DisplayColumns settings would display the third column, then the first column, and lastly the second column. |
|
resultsEditable |
ALL | NONE | * | field,field,… |
Used to specify what columns should be editable in the results view. Same functionality as the editableResults property. This must be used in conjunction with the updateable property in the TableDisplay property group:
TableDisplay{ updateable: true; } |
|
resultsExclude |
ALL | NONE | * | field,field,… |
Columns to exclude from the results. |
10.3.8 Distribution { }
This property group allows specification of the frequency, start date, end date, and timing for an automatic report. See the Creating and Distributing Automatic Reports section for more details.
10.3.9 Email { }
This property group allows you to specify properties that are used for emailing.
|
Property |
Value |
Description |
|
from |
integer |
From ID |
|
password |
text |
The SMTP/POP3 account password. |
|
pop3 |
integer |
The pop3 (incoming) mail server IP address to use. |
|
to |
integer |
The To ID(s). |
|
cc |
integer |
The CC ID(s). |
|
bcc |
integer |
The BCC ID(s). |
|
replyTo |
text |
The address replies should be sent to. |
|
smtp |
IP address |
The smtp (outgoing) email server IP address to use. |
|
subject |
text |
The email subject. |
|
user |
text |
The SMTP/POP3 account user name. |
10.3.10LayoutDisplay { }
This property group allows you to override the layout display properties for this operaton. See the Further Customization chapter for an example.
|
Property |
Value |
Description |
|
toc width |
integer |
Width of leftside navigation. |
|
css |
file path |
CSS file. |
|
company text |
text |
Company name. |
|
heading text |
text |
Heading text on page. |
|
sub heading text |
text |
Sub-heading text on page. |
|
help uri |
file path |
Help URI link. |
|
title |
text |
Title text |
10.3.11OperationLabels { }
This property group allows you to specify how to organize the search parameters and prompts.
|
Property |
Value |
Description |
|
button |
text |
The search/update button label text |
|
buttonImg |
file path |
New search button image file. |
|
secondaryInstructions |
text |
Instructions for second set of parameters. |
|
dropDownItemDisplay |
NULL | text |
Controls the search drop down text. Can change to anything you want including “ — Choose – “ or “NULL” if you don’t want any other drop-down values but the actual values (Default: -- All --) |
|
dropDownItemOrder |
TOP, BOTTOM |
Controls the search drop down item order. |
|
dropDownItemValue |
text |
Value for the drop down item specified by the dropDownItemDisplay property. The value that is passed to WOW when that option is selected.
NOTE: You cannot specify a value for the dropDownItemValue property unless you also specify a value for the dropDownItemDisplay property.
|
|
searchDisplay |
integer | field,field|field… |
The order and/or rows to display search parameters in application. You specify the number of prompts to be shown on each row (using the order you specified in the SQL statement), or you can put all the search parameter field names with ( | ) to specify a new row and ( , ) to delineate each field name.
NOTE: Property only used for Horizontal Parameters NOTE: If you specify fieldnames and order you must list all fields that you would like to show up in Application (See Figure 10-8 and 10-9). |
Horizontal Parameters-
An example of one way to use the OperationLabels property group is horizontal parameters. It allows you to specify the order and number of search prompts on each row. To setup horizontal parameters you must first specify the parameters JSP with /dataengine/jsp/horizontal_gen_params.jsp as shown below.
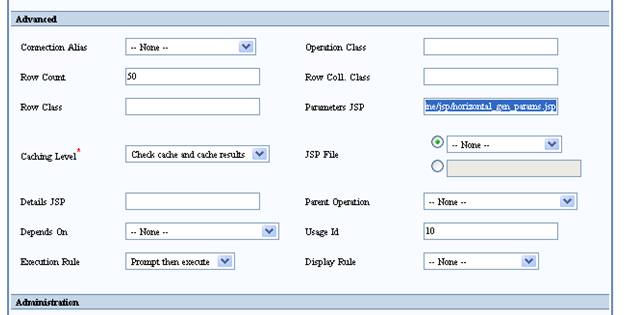
Figure 10-8 Specifying the Parameters JSP for horizontal parameters.

Figure 10-9 Ex 1. Horizontal Parameters with 4 fields horizontally - OperationLabels{searchDisplay:4;}
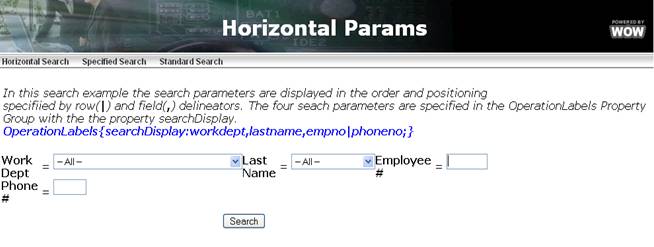
Figure 10-10 Ex 2. Horizontal Parameters with fields specified OperationLabels{searchDisplay:workdept,lastname,empno|phoneno;}
10.3.12OperationSettings { }
This property group is used in creating a possible values selector. See the Possible Values Selector for more details.
10.3.13OptionalSignon { }
This property group allows you to override some of the default features for an optional signon. See the Optional Signon section for more details.
|
Property |
Value |
Description |
|
userLabel |
text |
The default is “User:” |
|
passwordLabel |
text |
The default is “Password:” |
|
title |
text |
The default is “Optional Signon” |
10.3.14Paging { }
Paging refers to the process of returning a specific number of records per “page” or screen. This property group allows you to control if and how the paging is presented. It can either be specified for an application, or on an individual authentication operation (if specified in both places, the properties in the operation will take precedence).
|
Property |
Value |
Description |
|
enabled |
TRUE | FALSE |
When set to false, paging links are not displayed. This does not necessarily mean there isn’t a Next or Previous page. This just means that if there are links, they will not be shown. |
|
justify |
LEFT | RIGHT |
Sets on which side of the page the paging links are aligned |
|
firstAndLast |
TRUE | FALSE |
Determines whether or not to display the ‘First’ and ‘Last’ page links. |
|
pageNumbers |
TRUE | FALSE |
Page numbers allow the user to jump to a specific page in the results. This property determines whether or not to display these page number links. |
|
pageCount |
integer |
Used in conjunction with pageNumbers set to TRUE. Speficies the number of page numbers to show at one time. For example, lets say there are 6 pages. If the page count was set to 3 and you were currently on page 4, only pages numbers 3, 4, and 5 would be displayed. The default is to show all of them. Any negative number means to show all page numbers. |
|
useText |
TRUE | FALSE |
Paging also allows the ability to include descriptive text of what page the user is currently on. When set to TRUE, the default text displayed would be something like the following “Displaying rows 4 - 6 of 16”. The text property (see below) can be used to change what text is being shown. There are a few placeholder properties that can be used in the text as well (see the text property for details). |
|
text |
text |
Used in conjunction with the FALSE useText property to control what is displayed for text. For example, you could specify “Displaying page %page of %totalpages.” which would show something like “Displaying page 10 of 23.”Additional placeholders are list below:
%firstrow - the number of the first row being displayed on the screen %lastrow - the number of the last row being displayed on the screen %totalrows - the total number of rows available %page - the current page number being viewed %totalpages - the total number of available pages
|
|
nextAndPrevious |
TRUE | FALSE |
Determines whether or not to display the ‘Next’ and ‘Previous’ page links. |
10.3.15ParameterOperators { }
This property group allows you to override default display behavior of an operation’s search prompts.
|
Property |
Value |
Description |
|
like |
text |
This property can be used to replace the “LIKE” text next to a search parameter that uses a ‘LIKE’ statement in the SQL. Leave this property blank (eg. like:;) to get rid of the operator label altogether. |
|
= |
text |
This property can be used to replace the “=” text next to a search parameter that uses an ‘=’ statement in the SQL. Leave this property blank (eg. =:;) to get rid of the operator label altogether. |
|
< |
text |
This property can be used to replace the “<” text next to a search parameter that uses a ‘<’ statement in the SQL. Leave this property blank (eg. <:;) to get rid of the operator label altogether. |
|
> |
text |
This property can be used to replace the “>” text next to a search parameter that uses a ‘>’ statement in the SQL. Leave this property blank (eg. >:;) to get rid of the operator label altogether. |
10.3.16PDF { }
This property group allows you to override how a PDF file is displayed.
|
Property |
Value |
Description |
|
bottomMargin |
integer |
Bottom margin |
|
evenColor |
#hexColorCode |
Even color |
|
evenReportColor |
#hexColorCode |
Even report color |
|
fontSize |
integer |
Font size |
|
headerColor |
#hexColorCode |
Header color |
|
headerFontSize |
integer |
Header font size |
|
landscape |
TRUE | FALSE |
Sets page layout to landscape mode |
|
leftMargin |
integer |
Left margin |
|
oddColor |
#hexColorCode |
Odd color |
|
oddReportColor |
#hexColorCode |
Odd report color |
|
relativeWidths |
integer |
Relative widths controls how wide your PDF columns will be. If you have 4 columns you might pass in 1,2,1,4 to have your second column be twice as wide as the 1st or 3rd columns (separately), and your fourth column is twice as wide as the 2nd. This doesn't affect the width of the table, just the columns within the table. So passing in 0.5, 1, 0.5, 2 would have the exact same effect. |
|
repeatTableHeader |
TRUE | FALSE |
Repeat table header |
|
rightMargin |
integer |
Right margin |
|
showGrid |
TRUE | FALSE |
Show grid |
|
topMargin |
integer |
Top margin |
10.3.17PleaseWait { }
This property group allows you to set the JSP used by the please wait function. See below the following table for an example.
|
Property |
Value |
Description |
|
jsp |
file path |
JSP to use.
NOTE: If no file path is specified in the jsp property area then the default please wait jsp will be used. |
The please wait page is normally used on larger queries or operations that may take longer than a few seconds to execute. Instead of showing the user a blank screen you will show them a specified please wait page that informs them the action is occurring. In the example below we are not specifying a please wait page url so it uses the WOW default.
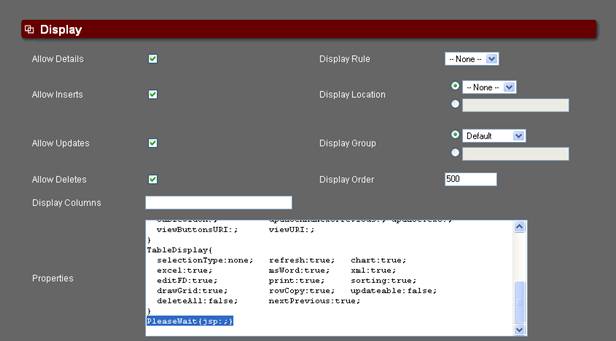
Figure 10-11 Specifying PleaseWait property group in operation
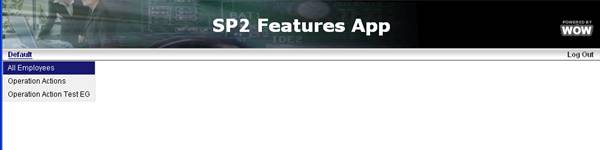
Figure 10-12 Running All Employees Operation

Figure 10-13 Please Wait Page shows up while operation is running
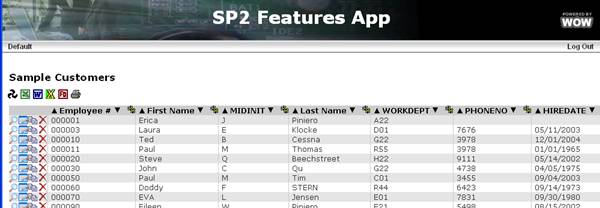
Figure 10-14 When operation/query finishes please wait page disappears
10.3.18ReportBreak { }
This property group allows you to define report breaks for an operation. Please see the Creating Reports section for more details.
10.3.19SignOn { }
This property group allows you to specify properties used in the signon process. It can either be specified for an application, or on an individual authentication operation. (If specified in both places, the properties in the operation will take precedence.)
|
Property |
Value |
Description |
|
failureMessage |
text |
The message to display to the user when a signon attempt fails. The default is "Sign on failed. Please enter a valid userid and password". |
|
maxFailures |
integer |
The maximum number of times a user is allowed to fail the signon process. After this many signon failures, an application specific action takes place. (The default action is to redirect to the original signon page.) By default, there is no maximum number of failures. |
10.3.20StoredProcedure { }
This property group allows you to set the properties for a stored procedure call. See the Stored Procedures and Utilizing Existing RPG Applications chapters for more details.
|
Property |
Value |
Description |
|
rowCollection |
TRUE | FALSE |
Return row collection (result set) by the procedure |
|
successMessage |
text |
Completion message text. |
|
tables |
library.table,… |
A list of tables to use for the reports fields descriptors (e.g. planetj.customer, planetj.balancedta;) |
10.3.21Styles { }
This property group allows you to specify which CSS styles to use when generating an operation. Of course, any styles referred to in this property group must be defined in a css file which is used by your application’s theme.
|
Property |
Value |
Description |
|
body |
css style name |
The general CSS style to apply to the body. |
|
operator |
operator: text,… |
The style to use for the search operation. =, >=, and BETWEEN are all examples of search operators. The following example removes the ‘LIKE’ operator and changes ‘=’ to ‘equals’: Styles {like: none; =:equals;} |
|
searchLabel |
css style name |
The style to use for the search label. |
|
submitButton |
css style name |
The style of the INPUT button used to submit the parameters the user has entered in. |
10.3.22TableDisplay { }
There are many properties in the TableDisplay group. Most all of them are boolean values, unless specified otherwise (ex. selectionType and cellPadding). Boolean means they are either set to “true” or “false”. If the property is set to true, the feature it controls will be visible to the user. If the property is set to false, the feature it controls will not be available to the user. The screen shot below will be used to demonstrate which icons will appear and disappear according to the Boolean value:

Figure 10-15 Above is a screenshot of the operations that have been created. These are sample operations, the different Operations types are not important right now.
|
Property |
Value |
Description |
|
chart |
TRUE | FALSE |
Show the charting icon. The default for this value is true. By clicking this button WOW allows you to chart the table being displayed. Charting covered in more detail in Chapter 11. |
|
cellPadding |
integer |
Padding between the border of a table cell and the contents of a table cell, specified in pixels (1 = 1 pixel). |
|
colCnt |
integer |
Number of columns to generate for vertical generated row tables. Property only applies when display vertical is true.Number of columns to display when showing table results. Default is 2. |
|
delete |
TRUE | FALSE |
Show the delete button. Default is false. |
|
deleteAll |
TRUE | FALSE |
Show the deleteAll button. The default for this setting is false. Clicking this button deletes all the data being displayed. |
|
deleteAllText |
text |
Text for the delete all button. |
|
details |
TRUE | FALSE |
Show details button. |
|
detailsText |
text |
Text for the details button. |
|
display vertical |
TRUE | FALSE |
Whether or not the table should be displayed vertically (false by default). If true, colCnt determines how many records are included per row. |
|
drawGrid |
TRUE | FALSE |
Show grid lines. The grids are the vertical and horizontal lines that separate the rows and columns. The default value is true. Grid lines tend to improve the look and feel of the table being displayed. |
|
edit |
TRUE | FALSE |
Show Edit Record button. |
|
editFD |
TRUE | FALSE |
Show the red edit FD. The default value is false. Clicking this button allows you to edit the Field Descriptors for the displayed data. For more information on FDs, refer to Chapter 9. |
|
editText |
text |
Text for the edit button. |
|
excel |
TRUE | FALSE |
Show the Excel icon. The default value is true. Clicking this icon sends the selected data into a Microsoft Excel spreadsheet. |
|
excelXls |
TRUE | FALSE |
Show Excel file button. |
|
fdManager |
TRUE | FALSE |
[DEPRECATED] Use editFD property instead. Determines whether or not the FD manager quick link is visible. |
|
header |
TRUE | FALSE |
Show the column header. |
|
helpTextInHeaders |
ALL | NONE | field,field,… |
This is a list of the columns which will display the hover help text defined in the field descriptor when the user hovers over the column header. You can also use the special values ALL or NONE to refer to all columns in the table. The default value is ALL, so by default all columns headers will use their hover help text. |
|
helpTextInCells |
ALL | NONE | field,field,… |
This is a list of the columns which will display the hover help text defined in the field descriptor when the user hovers over the column cells. You can also use the special values ALL or NONE to refer to all columns in the table. The default value is ALL, so by default all columns cells will use their hover help text. For very large tables, you can reduce the amount of HTML which is generated by disabling the hover help text for cells. |
|
insert |
TRUE | FALSE |
Show the insert button. |
|
insertable |
TRUE | FALSE |
Determines whether or not the table should allow direct inserts without viewing the details of a single row. |
|
insertText |
|
Text for the insert button. |
|
linkable |
TRUE | FALSE |
Determines whether or not the user has the option to generate an HTML link directly to the current results |
|
msAccess |
TRUE | FALSE |
Show the MS Access quick link. |
|
msWord |
TRUE | FALSE |
Show the MS Word quick link. The default value is true. Clicking this icon sends the selected data into a Microsoft Word document. |
|
multipleDelete |
TRUE | FALSE |
Determines whether or not deleting multiple rows is supported. |
|
nextPrevious |
TRUE | FALSE |
[DEPRECATED] Use the paging property group instead. The Next and Previous links are usually shown when there is more data than can be displayed on a single page. The default for this value is true. If this value is set to false the Next and Previous buttons are hidden from view. |
|
nextPreviousJustify |
TRUE | FALSE |
[DEPRECATED] Use the paging property group instead. The nextPreviousJustify property specifies which side of the table the Next and Previous links appear on. The nextPreviousJustify property is a String property with values of right and left. The default value is right. |
|
paging |
TRUE | FALSE |
[DEPRECATED] Include paging. Replaces old implementation of nextPrevious. It is recommended that you instead use the newer, more robust Paging property group (see below). |
|
|
TRUE | FALSE |
Show the PDF quick link. |
|
|
TRUE | FALSE |
Show the Print quick link. The default for this value is true. Clicking this icon displays the selected data in a printer-friendly format. |
|
refresh |
TRUE | FALSE |
Show the Refresh pinwheel quick link. The default for this value is true. The refresh button allows you to refresh the data being displayed, much like the refresh button on your web browser. |
|
removeAll |
TRUE | FALSE |
Show the Remove All button. |
|
rowCopy |
TRUE | FALSE |
Show the Row Copy button that allows a row from the result table to be copied. The default for this value is true. |
|
rowCopyText |
text |
Text for the row copy button. |
|
selectionType |
NONE | SINGLE | MULTIPLE |
Indicates how the data in the table can be selected. The possible values are MULTIPLE, SINGLE, or NONE. MULTIPLE allows the user to select more than one entry in the table at a time with check boxes. SINGLE allows the user to only select one entry in the table at a time with a radial button. The above screen shot is an example of selectionType being set to SINGLE. Setting the selectionType to NONE eliminates the option of selecting specific entries from the table. The default for this value is set to MULTIPLE. |
|
selectableRecords |
TRUE | FALSE |
Determines whether or not the records in the Table can be selected |
|
showSelection |
TRUE | FALSE |
Show the selection buttons for each record. |
|
sorting |
TRUE | FALSE |
Showing descending and ascending sort buttons next to column headers. The default value is true. Sorting allows you to sort each column by alphabetical or numeric order. |
|
spooledFile |
TRUE | FALSE |
Show the export to spooled file link. |
|
tableClass |
subclass |
You can optionally specify a subclass of HTMLTable to use when rendering your RowCollection. For advanced WOW programmers only. |
|
tableWidth |
integer |
Specify width of results table (in pixels). |
|
updateable |
TRUE | FALSE |
Allow each field to be updated by the user directly from the displayed table. The default value is false. By changing this value to true you will have the ability to edit each entry directly from the table shown. |
|
updateText |
text |
Text for the update button. |
|
wrap headers |
TRUE | FALSE |
Wrap header if too wide. |
|
xml |
TRUE | FALSE |
Show XML quick link. The default value is true. By clicking this icon WOW will send the selected data into an XML document. An XML-ready browser is required for this option. |
10.3.23Tabs { }
This property group allows you to configure tabs (display the results of an operation in a tabbed layout). See the Tabs chapter for more details.
|
Property |
Value |
Description |
|
allowInTab |
RESULTS | DETAILS | BOTH | NEVER |
Determines what can be displayed inside of this tab. |
|
automaticTabView |
TRUE | FALSE |
Automatically show the tabbed view of a query result. |
|
defaultTab |
tab field name |
Default tab to display. |
|
emptyMessage |
text |
Message displayed to user when there are no results returned. Use in conjunction with hideWhenEmpty property. |
|
hideWhenEmpty |
TRUE | FALSE |
Determines whether or not to display an empty row collection if there are no results returned to the tabbed operation. Use in conjunction with emptyMessage property. |
|
tabFields |
tab field name,… |
Specifies which fields are to be rendered as tabs. |
|
tabFieldsExclude |
tab field name,… |
Specifies which fields are not to be rendered as tabs. |
|
tabHeadingsJSP |
file path |
The JSP to display the tab’s headings. |
|
tabParentJSP |
file path |
The JSP to display the tab’s parent row. |
|
maxTabsPerLine |
integer |
The maximum number of tabs that can be displayed in a single line on the screen (default is 10). |
|
alwaysShowSearch |
TRUE | FALSE |
Hide search parameters once results for the parent tab are returned. |
10.3.24XLS { }
This property group allows you to set properties for an Excel worksheet. See the Interfacing WOW with Excel chapter for more details.
10.4 Creating Reports
10.4.1 ReportBreaks { }
Reports are another important feature of WOW. Reports are used to perform different mathematical operations on the data in the table. Reports will find the minimum, maximum, sum, or average of any numeric data that is in the table. With a simple SQL command which will be shown later on in this section, the information in the table can be sorted by specific groups such as work department or gender. Reports are defined in the properties section like the displayColumns above. The syntax is listed below:
ReportBreak {}
In between the open and closed brackets above, any of the following properties may be added. Property names must be followed by a colon; the property values should be separated with a comma, and end with a semicolon. The example below shows an actual report break. The syntax needs to be exactly as it is shown:
ReportBreak { columnFunctions:max; columns:salary,comm; breakColumns: workdept; overall:false:}
|
Property |
Value |
Description |
|
columnFunctions |
SUM | TOTAL | AVG | MIN | MAX | COUNT |
The columnFunctions are simple mathematical commands such as SUM (or TOTAL), AVG, MIN, MAX and COUNT. |
|
columns |
field,field,… | * |
The name of the columns you wanted reports on. Each column is separated by a comma. If you wish to generate the report on every single column in the results, you may use an asterisk ( * ) instead of listing every column name. |
|
breakColumns |
field, field,… |
Used to sort data by a specific field, such as Work Department, City, etc. BreakColumns is usually used in conjunction with the ORDER BY SQL command. This will be covered in the ReportBreak example later on in this chapter. |
|
overall |
TRUE | FALSE |
Whether or not an overall “grand total” should be displayed at the bottom of the table. If you don’t add the Overall property to the property group, it will automatically give an overall total. Setting Overall to false is the only way to avoid displaying an overall total. |
|
reportSingleRow |
TRUE | FALSE |
Generate reports for a single row. |
|
evenCSSStyle |
text |
The name of the CSS style class applied to even report rows. The default value is pjr-r-e for normal report rows, and pjr-or-e for overall report rows. If this report break property group is used for both normal and overall report breaks, then the style for overall report breaks cannot be altered from the default. To specify a style for overall report breaks, you need to create a separate report break property group. |
|
oddCSSStyle |
text |
The name of the CSS style class applied to odd report rows. The default value is pjr-r-o for normal report rows, and pjr-or-o for overall report rows. If this report break property group is used for both normal and overall report breaks, then the style for overall report breaks cannot be altered from the default. To specify a style for overall report breaks, you need to create a separate report break property group. |
|
evenBlankCSSStyle |
text |
The name of the CSS style class applied to odd blank report rows (a blank report row is used when a report row would normally be added, except that there is only one row over which to report). The default value is not to apply any type of special style. |
|
oddBlankCSSStyle |
text |
The name of the CSS style class applied to even blank report rows (a blank report row is used when a report row would normally be added, except that there is only one row over which to report). The default value is not to apply any type of special style. |
|
javaClass |
text |
The name of the Java class to use which provides report break functionality. This property should only be specified if you have created your own custom report break subclass. |
Below is a screen shot of an operation which uses report breaks:
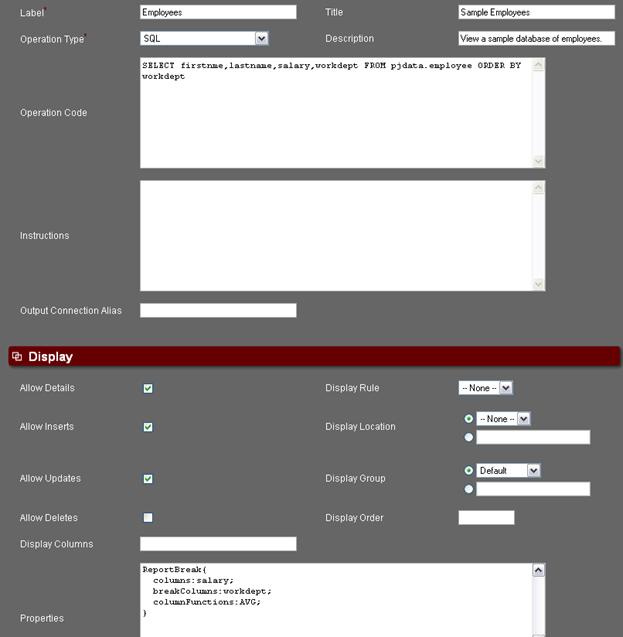
Figure 10-16 Above is a screenshot of the SQL creation screen. Notice the SQL uses the ORDER BY clause. This is used to create specialized report breaks.
The SQL statement in the SQL field is:
SELECT FIRSTNME, LASTNAME, SALARY, WORKDEPT FROM PJDATA.EMPLOYEE ORDER BY WORKDEPT
Notice it says ORDER BY WORKDEPT; this will have the SQL sort the rows using the values in the WORKDEPT column. This same column name is identified in the breakColumn property. The screen shot below shows the result of running this operation.
Figure 10-17 Above is a screenshot of report breaks in action. Report breaks are added directly into the tables you selected in your SQL Query
10.4.2 Header/Detail Reports
Using the ‘Header/Detail Reports’ JSP File setting (Figure 10-7), a report with a title, header, body, and footer can be generated very easily. In the example below, we create a Department report that has a
1. Title graphic with dynamic title
2. Header section containing the department’s details (name, location, etc.)
3. Body section listing each employee within the department and their details
4. Footer graphic.
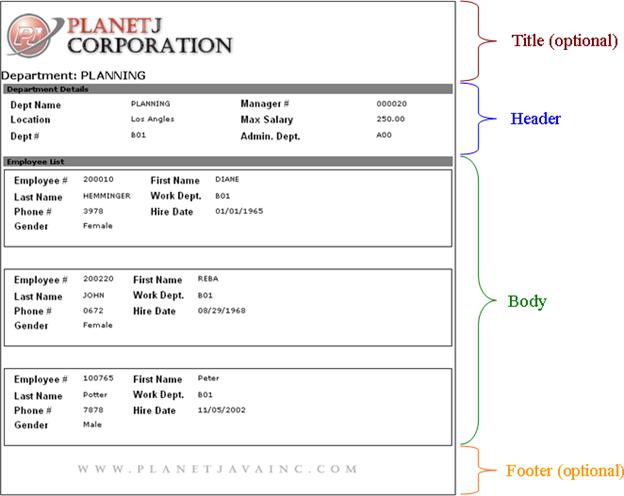
Figure 10-18 Above is a screenshot of Header/Detail Reports in details view.
Here is the SQL Operation used to create this sample report:
SELECT
![]()
![]() '<img
src="user/report/header.gif"><h2>Department: '||deptname as
Title,
'<img
src="user/report/header.gif"><h2>Department: '||deptname as
Title,
DEPTNO,DEPTNAME,MGRNO,ADMRDEPT,LOCATION,MAXSALARY,
![]() 'EMPLIST'
as EMPLIST,
'EMPLIST'
as EMPLIST,
'<img src="user/report/footer.gif">’ as Footer
FROM pjdata.department
**Note: If your SQL Operation returns more than one record (like in the example above), then a header/detail report will be generated for every record, one right after another.
On the surface, this SQL Operation may not seem any different than normal. Yet, obviously, the resulting output is significantly different than the standard result set. This is due to several key features in the SQL statement and the operation settings that allow this report to format correctly:
1. The ‘Header/Detail Reports’ setting was selected from the ‘JSP File’ field.
2. In the SQL statement, the fields must be listed in the appropriate order (Title, Header, Body, Footer)
3. All title content must be contained in a field named ‘Title’. In the example above, this is done with a derived field (as Title).
4. All footer content must be contained in a field named ‘Footer’. In the example above, this is done with a derived field (as Footer). Note: the footer is optional.
5. The Header and Body sections are simply all fields between the Title and Footer (i.e. they are not specifically designated within the SQL like Title and Footer). It is usually most convenient to group the Header fields together using the FD’s Field Set property (as seen in Figure 10-8) and likewise for the Body fields.

Figure 10-19 Above is a screenshot of the JSP File and Details JSP ( /dataengine/jsp/default_row_details.jsp ) operation settings necessary for a Header/Details Report in details view. For the list view, the Details JSP field would be left blank.
Other than these five characteristics, this SQL statement is no different than any other. Note, however, that the ‘EMPLIST’ field’s FD is set to a 1-MANY association with the following SQL Operation that lists all employees within the relevant department:
SELECT empno,firstnme,lastname,sex,phoneno,workdept,hiredate
FROM pjdata.employee
WHERE workdept = ??deptno
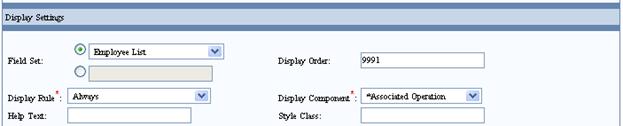
Figure 10-20 Above is a screenshot of the FD properties of the derived field ‘EMPLIST’. Note the Display Component setting: *Associated Operation. This causes the Associated Operation to execute within the ‘EMPLIST’ field.
This SQL Operation is also designated as a 'Header/Detail Reports' in its settings to achieve the details format. Alternately, the JSP File could just be set to ‘None’ rather than ‘Header/Detail Reports’. This would result in the association displaying in list format (see Figure 10-9 below). Also, the associated operation’s Display Component is set to '*Associated Operation' so that the associated field is not just a hyperlink to the operation but actually runs the operation within that field (Figure 10-8).
Figure 10-21 Above is a screenshot of Header/Detail Reports in list view.
10.5 Associations
Associative programming is one of the key features of WOW. An association links data from two different tables by using fields that are common for both tables. An association may also link data from a table to some other functionality. There are SQL, HTML, and Java associations.
In the example below, we will link the EMPLOYEE table with the DEPARTMENT table which can both be found in the PJDATA schema. Any two tables can be linked together as long as they have data that is similar or linkable, and the tables are accessible through a previously created database connection. There are two types of SQL associations that can be used with WOW; they are 1-1 Association and 1-Many Association. After an association is created a hyperlink will be available for the user to click on. The screenshot below is an example of this.
Figure 10-22 An example of an association. Each field under the Work Dept column can be clicked on. The hyperlink will then show you the corresponding data in the associated database.
Below is a brief explanation of the two different kinds of associations, 1-1 Associations and 1-Many Association.
1-1 Association – A 1-1 Association links a specific field in a table to a single entry. The format is similar to viewing an entry using the view button described in the introduction. Below is an example of what to expect after creating a 1-1 Association and following the hyperlink that was created.
Figure 10-23 An example of 1-1 Association. Notice it links you to only one row, as opposed the multiple rows which are displayed when using a 1-Many Association
1-Many Association – A 1-Many association is the same as a 1-1 association except the 1-Many association will link you to more than a single row of data. 1-Many associations are useful when there is more than one row of data you would like displayed. Below is an example of what to expect from a 1-Many association.
Figure 10-24 An example of a 1-Many Association. Notice it links you to more than one data record as opposed to the 1-1 Association linking to a single view only entry.
HTML Code Association – Essentially an HTML Code operation with association capabilities, this type of association allows you to link to some specified HTML. This is an exceptionally powerful feature in WOW and is often used for stylizing reports and other data. See Chapter 10.5.2 for an example HTML Code Association.
a. Full Field Rendering
WOW 6.45 includes enhanced support for HTML Code Association scripting. New support includes the following features, which are coded directly into the HTML Code Association. The special character of ‘*” appended as the last character indicates that WOW should generate the entire field rendering, not just the value. For example, a field with an association referenced with ??Field will only display the value and not a hyperlink-capable rendering. However ??Field* would render the entire hyperlink HTML code.
|
WOW Script |
|
Description |
|
??FLDNAME* |
|
Using the associated Row, render the entire fields formatting as defined in it’s field descriptor |
NOTES: In all cases, the fields can only be used for display not for updating databases.
HTML Reference Association – In this association, rather than linking the data between two tables, records, or Rows, it is linking the current data with some HTML reference. For instance, take the example listed below. The results have a bunch of Rows with address information. Each Row also contains a derived field that has its association set a HTML Reference Association that links to MapQuest.
Figure 10-25 Above is an example of an HTML Reference Association. The View Map link shown above is this HTML reference.
Clicking the “View Map” link on the first record would pull up the following.
Note: This example is provided in the Association’s application with samples.
Figure 10-26 Above shows the result of clicking on the View Map link shown in figure 10-9. .
Associated Java Operation – Actual calls to Java methods can be executed via an Associated Java Operation. These methods must be static and all of their parameters must be of type java.lang.String, with the exception of a few special cases listed below. This operation has specific signature that is used to accomplish this task. The name of the class, name of the method to be called, and the parameters to the method are separated by the “pipe” special character which is designated as the vertical bar ‘|’. The first part of the operation is the fully qualified class name of the class that the method is to be executed on. The second part of the operation is the name of the method that will be called on the fully qualified class. This method must be static since there will not be a specific instance of the fully qualified class. Every part thereafter is a treated as a String parameter to the method.
For example, if we have a class planetj.examples.Log that has method writeEntry which takes an entry argument that writes and entry to a log located on the file system, it would be called in the following manner:
planetj.examples.Log|writeEntry|Calling Java method from an operation
This would result in the method writeEntry in the class planetj.examples.Log to be executed with the String argument of “Calling Java method from an Operation”.
There are certain parameters that can be specified that will automatically be filled in with their associated values.
· *REQUEST – Passes the current Request Object to the method
· *RESPONSE – Passes the current Response Object to the method
· *USER – Passes the current User Object to the method
· *ROW – Passes the current Row Object to the method
· *ROW_COLLECTION – Passes the current Row Collection Object to the method
For example, if we have a class planetj.examples.Log that has a method logParameterValues which takes an HttpServletRequest Object that writes all of the current parameters on that Request to the file system, it would be called in the following manner:
planetj.examples.Log|logParameterValues|*REQUEST
The Associated Java Operation also allows for dynamic entries from the current Row that is associated with the Operation. For example, if we have an Associated Java Operation that has the Make, Model,and Year of vehicles, and the names of the columns in this row are specifically “MAKE”, “MODEL”, and “YEAR”, these values can be passed to a Java method in the following manner:
planetj.examples.Log|logCarMakeModelYear|??MAKE¿|??MODEL¿|??YEAR¿
The dynamic entries must be designated by start and end characters in order for WOW to determine the beginning and end of the column name. The start characters are ‘??’ and the corresponding ending character is “¿”. (This character can typed by holding down the ALT key and typing 0191 on the keypad area of the keyboard.)
10.5.1 Creating Associations
Creating an association is very similar to creating any other type of Operation. The first thing you need to do is create an Operation as described in Chapter 4. To create an association you change the Operation type from SQL to one of the association operation types. Association operations have the word “Association” in their display name. Then just set its operation code. After the operation is set, then you need to modify a field’s Field Descriptor to set the association, so when the Field generates, it will have a link to the association. The two examples below show how to create both SQL and HTML associations.
SQL Association Example
For an SQL association, the operation type should be either a 1-1 Association or a 1-Many Association. The screenshot below shows an example an SQL 1-Many association.
Figure 10-27 Above is an example of the Operation screen, notice Type is changed to Association 1-Many.
The Type and Operation Code are the two most commonly used fields when creating an association. The code used to create an association may vary depending upon the type of association you are creating. E.g. HTML Associations are different from SQL associations. The screenshot below shows an SQL association. You only need to pay attention to the Operation Code. The code shown will link the DEPARTMENT table to the EMPLOYEE table using the similar fields WORKDEPT and DEPTNO:
Figure 10-28 Above is an example of the Operation Code that is used to create a 1-Many Association.
The Operation Code used for this association is:
SELECT * FROM pjdata.employee where workdept = ??deptno
Notice the SQL code is similar to a SELECT SQL statement as described in
Chapter 5. The first thing you need to notice is the table it is selecting
from. This table contains the information which we will link to. Next
is the WHERE statement, this statement shows which field the association is
being linked from, in this example the WORKDEPT field in EMPLOYEE is
being linked with the DEPTNO field which is located in the DEPARTMENT table.
The linking of the two fields is done by using an equals (=) sign followed by
double question marks (??) and the field the association will be linked from.
The DEPARTMENT table is not mentioned anywhere in the code because the
association link will be visible in any query on the DEPARTMENT table. After
inserting the Association you will see it listed in the group of other
Operations that you have created for your application. The final step to
creating an association is to assign your association to a specific field. To
do this run an Operation to display the table you are using for your
association; in the example above we are using the DEPARTMENT table so we will
run the Operation to display the DEPARTMENT table. Your query should look
similar to the screenshot below, substituting the table you are using with the
DEPARTMENT table:
Figure 10-29 Above is an example of the DEPARTMENT table query, notice associations are already set up in the screenshot.
Once you have a screen similar to the one above, but without the associations, you can set up the association you previously created. To do this click on the gear icon next to the column you want to use along with your association. In this example we’ll click the gear icon directly to the right of the DEPTNO column as shown below:
Figure 10-30 Above is an example of the gear icon located to the right of each column. The gear icon is used for field descriptors which explained in more detail in Chapter 9.
The ‘gear’ icon located next to each column is used to edit the Field Descriptors of each field. (Field Descriptors are described in greater detail in Chapter 9.) For now all you’ll have to do is locate the association operation field which is found under the Advanced Settings section as shown below:
Figure 10-31 Locating the association operation field which is used to assign an association to a specific field.
To activate the newly created association, pick the name that you gave your newly created association operation. In this example, we will pick the WorkDept Assoc operation as shown below
Figure 10-32 Locating the association operation field which now has the WorkDept Assoc.
Once you have saved your change to the field descriptor, the association is complete. Now, whenever the DEPTNO field of the DEPARTMENT table is displayed, it will have a hyperlink to the employees associated with that department as shown below.
HTML Code Association Example
In this example, we will demonstrate how the HTML Code Association can be used to easily arrange and format data. In particular, we are going to be creating simple, dynamic PlanetJ business cards. In other words, the user will click ‘Generate Business Card’ and WOW will use row parameters (??field) to dynamicly plug in data to a HTML based business card template. The goal here is to show you how this association type can be used to format your data in just about any way imagineable.
Overview:
We want to transform our employee data from the standard table layout to a nice, stylized business card layout.
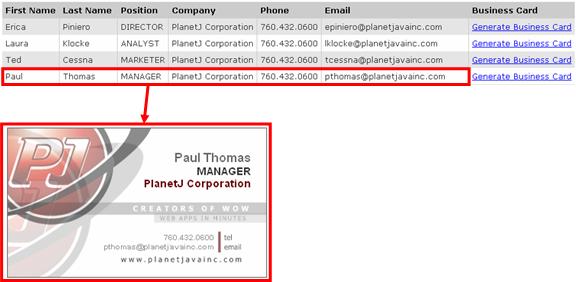
Figure 10-33 Transforming an employee data row into a business card.
Step 1: Create Employee Operation
First, we need to create the operation that will return the data and derived field that on which we set the association (as shown above in Figure 10-26). Insert a new operation of type ‘SQL Operation’ and enter the following Operation Code:
SELECT *,’Generate Business Card’ as busCard FROM PJDATA.EMPLOYEE
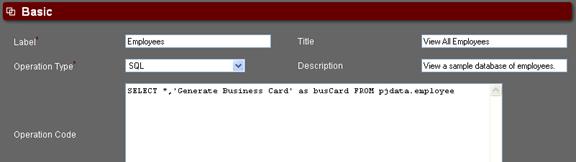
Figure 10-34 Creating the initial SQL Operation with a derived field for the association.
Step 2: Create HTML Code Association operation
Second, we will create the HTML Code Association operation that will act as the HTML template for the business card. Insert a new operation of type ‘HTML Code Association’ and enter the HTML given below in the Operation Code field. The blue text is all standard HTML and CSS, and if you’re not too familiar with either, can be easily generated using a HTML editor like Dreamweaver or Frontpage. The important text to note is the bold red text that contains the row parameters used to retrieve data from the data row. These are in the form: ??fieldname. Note that there must always be a space after a row parameter.
<div style="width: 340px; height: 196px; background-image: url(user/sample/images/PJ_BusinessCard.jpg); background-repeat:no-repeat;">
<!-- Name, Position, Company -->
<div style="position: relative; text-align: right; font-family:Arial, Helvetica, sans-serif; left: 130px; top:30px; width: 189px; height: 56px;">
<span style="color:#666666; font-size:16px; font-weight:bold;">
??firstname ??lastname
</span><br>
<span style="color:#333333; font-size:14px; font-weight:bold;">
??position
</span><br>
<span style="color:#660000; font-size:14px; font-weight:bold;">
??company
</span>
</div>
<!-- Telephone, Email -->
<div style="position: relative; text-align: right; font-family:Arial, Helvetica, sans-serif; left: 82px; top: 81px; width: 189px; height: 29px;">
<span style="color:#999999; font-size:10px; font-weight:bold;">
??telephone
</span> <br>
<span style="color:#999999; font-size:10px; font-height:bold;">
</span>
</div>
</div>
This HTML code is simply laying our employee data (the row parameters) on top of a background image (see the figures above and below).

Figure 10-35 The background image used as a template for the employee data.
Step 3: Set the Association to a Field
Third, and last, we need to assign the association we created in Step 2 to the derived busCard field from Step 1. Create a derived field descriptor for the busCard field in the pjdata.employee table (for info on creating derived fields, see Chapter ###). Set its Assocation Operation to one created in Step 2. Hit update.
That’s it. All that is left to do is run the application and click the ‘Generate Business Card’ field. Hopefully, you have seen from this example that the layout of your data is only limited to what you can create using HTML and CSS. Invoices, reports, dynamic web pages, etc…all as easy as plugging in ??fieldname.
This example only used the basic row parameter. However, by using row parameters with Full Field Rendering notation, you can generate fields within an HTML Code Association with all the formatting (possible values, association hyperlinks, etc.) specified in their respective field descriptors rather than just a plain field value.
HTML Reference Association Example
This example will show how to create an HTML Reference Association.
We will create an association which links from a row containing address information to a map of this address. MapQuest will provide the actual maps; all our association has to do is pass MapQuest the address information. First, an SQL Operation needs to be created to select the address information. The screen shot below shows part of the results from an address file.
Figure 10-36 Results from executing the following query against an address file. Selects street,city,state,zipcod,”map from qiws.qcustcdt
You’ll notice that it contains a derived field that has a link to view map for each address. We’ll get to setting the association, but first, we need to create the HTML Reference Association. Create an Operation and set its type to HTML Reference Association. For its operations code, enter the following url.
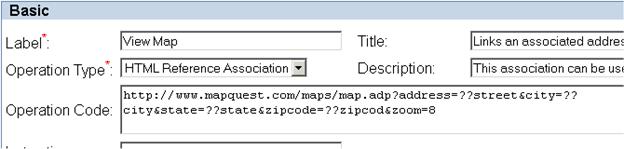
Figure 10-37 Screen shot of an HTML Reference Association operation's type and code.
As with all operation code strings, you can specify parameters. In the above URL, there are parameters specified for the street, city, state, and zip code (for more information on Row parameters see section 10.1). That way, when the association is set on a Field, the link to the association will actually have the parameter values set from its Row’s values. The above results contain the columns: street, city, state, and zip code. So when the URL link is generated, any Row parameters are replaced with the Field’s value. The following is the link generated when for the first record, which when clicked opens up the following map.
http://www.mapquest.com/maps/map.adp?address=8959+Elm+Ave&city=Dallas&state=TX&zipcode=75217&zoom=8
Figure 10-38 Screen shot which was created by executing the HTML Reference shown in Figure 10-17.
In order for the link to show up in the results, the association needs to be set on a Field. In this example a derived field is created. A derived field isn’t absolutely necessary. The association could have been set on the street field, in which case its display value would be a link to the map.
Open up the FieldDescriptor Manager and click the edit icon next to the FieldDescriptor for the Field you wish to have the associated map link generated for. Then change the FieldDescriptor’s association operation to the newly create HTML Reference Association.
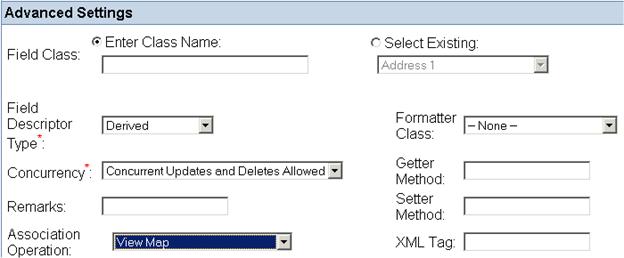
Figure 10-39 Screen shot showing the advanced settings and where to select the associated HTML Reference.
By default the HTML Reference Association will open a different window as your application which in many cases is desired, but in some cases you may want to run the link in the same window. For this case you need to edit the HTML Reference Association operation and in the properties section add the property group Browser with the property target set to _self.
Browser {target:_self; }
10.5.2 Associated Inserts
An Associated Insert will insert a row or collection of rows into the database, using one or more values from a row in an associated table. It is possible to insert a row where some of the row’s values are dynamically entered by the user and other values are retrieved from a row in an associated table.
Creating an Associated Insert is very similar to doing basic 1-1 or 1-many associations (described in the beginning of this section). To create an association, you change the Operation Type from SQL to either the 1-1 Association or 1-Many Association Type. Then you need to set its operation code. After the operation code has been set, you need to modify a Field’s Field Descriptor to set the association, so when the field is generated it will have a link to insert in its associated row or rows. This process is described in detail below:
SQL Associated Insert Example
To create an associated insert, select the Create Operation link from the TOC, and 1-Many for Operation Type. You next have to enter the Operation Code for the associated insert. This is very similar to the code for a normal SQL insert, except that you must specify where to retrieve the associated value for the insert from. For each associated value you wish to insert, you use two question marks followed by the name of the column containing the data in the associated table (not the table where the row is being inserted).
The Code shown below will link the Department table to the Employee table allowing you to insert into the Employee table using the similar fields WORKDEPT and DEPTNO:
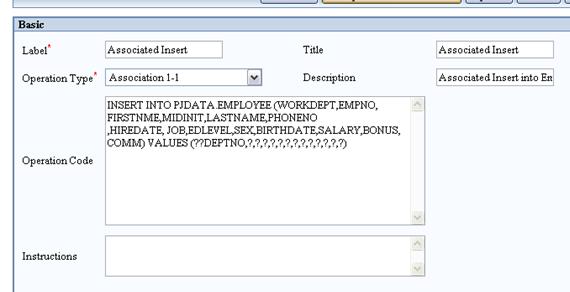
Figure 10-40 An example of the operation code that is used to create a 1-Many Associated Insert
The operation code used for the Insert:
INSERT INTO PJDATA.EMPLOYEE (WORKDEPT, EMPNO, FIRSTNME, MIDINIT, LASTNAME, PHONENO, HIREDATE, JOB, EDLEVEL, SEX, BIRTHDATE, SALARY, BONUS, COMM) VALUES (??DEPTNO,?,?,?,?,?,?,?,?,?,?,?,?,?)
Notice the SQL code is similar to the normal INSERT SQL statement described in the Insert chapter. In this example, PJDATA.EMPLOYEE is the table into which data is inserted. The parenthesis hold all the fields which are going to have information inserted. The VALUES clause tells where the values for this row, with columns specified, will come from. In this example, the WORKDEPT field, in EMPLOYEE, is being linked with DEPTNO field, which is from the DEPARTMENT table. The linking is done with the double question marks (??) and the field where the associated data is being retrieved from. The other single question marks in the parenthesis will take user input for the new row.
After creating the Associated Insert, you will see it in your list of operations but will not see it in your application. This is because your operation cannot be directly run. It can only be initiated once an associated row is available. Now you have to assign your association to a specific Field in the associated table (in our example, this is the DEPTNO field). To do this. run an operation that displays the table you are using for your association. In the example above, we are using the DEPARTMENT table. So we will run the operation to display the DEPARTMENT table. Then we will edit the field descriptor of the field in the table to be associated with the insert operation. In our example, we will edit the field descriptor of the DEPTNO field in the DEPARTMENT table.
Figure 10-41 The department table. To edit a field descriptor, click the gear icon next to the name of the column whose field descriptor you want to edit. After editing the field descriptor, the values in that field will be hyperlinks, allowing users to perform an associated insert by clicking on them.
Once you have a screen similar to the one above, (but without the hyperlinks), you can connect the association you previously created. To do this click the gear symbol next to the field you want to link to your insert operation. In the Field Descriptor Screen scroll down to the Advanced Setting area (shown below) and set the Association Operation to your previously created Operation.
Figure 10-42 Setting the association operation of a field. This causes the field to be hyperlinked to that association.
Once you have saved your changes to the field descriptor, the association is complete. Now, whenever the DEPTNO field of the Department table is displayed, it will have a hyperlink to insert into the employees table with the selected department number and asking the user for the other values.
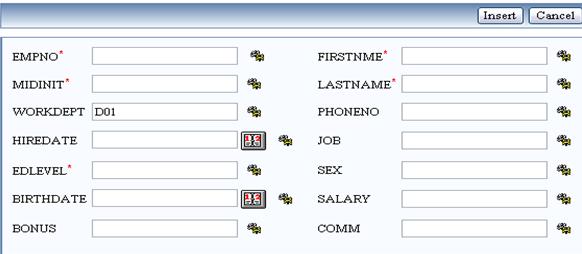
Figure 10-43 This input screen is displayed when using Associated Insert
10.5.3 Associated Updates
Creating an associated update is very similar to creating an associated insert, but instead of inserting a row with values from an associated row, it updates a row with values from an associated row.
Creating an Associated Update is very similar to doing basic 1- 1 or 1-many associations (described in at the beginning of this section). To create an association operation, begin by creating a new operation as described in the Operations chapter. Next, change the Operation Type from SQL to either the 1-1 Association or 1-Many Association Type. Then you need to set its operation code. After the operation code has been set, you need to modify a Field’s Field Descriptor to set the association, so when field is generated it will have a link to update in its associated row or rows. This process is described below:
SQL Associated Update Example
The operation code needed for an SQL Associated Update is very similar to the SQL statement for a normal update (described in the Update chapter), with some changes for the association.
Here is an example for a 1-1 Associated Update: after selecting the Create Operation from the TOC, select 1-1 for Association Type. The Operation Code is the SQL statement for updating the database. In our example we will be updating the SALARY field in the EMPLOYEE table by adding 1000 to the original value, linking from the Department Table. (We want to update all salaries for a single department only.) The code shown below will link the Department table to the Employee table allowing you to update entries in the Employee table with the similar fields WORKDEPT and DEPTNO:
The operation code used for the Update:
UPDATE PJDATA.EMPLOYEE SET SALARY = SALARY + 1000 WHERE WORKDEPT = ??DEPTNO
Notice the SQL code is similar to UPDATE SQL statement described in the Update chapter. In this example, the PJDATA.EMPLOYEE table is being updated. The Set clause sets the salary equal to the current salary plus 1000. The WHERE clause, shows the which field the association is being updated from, in this example the WORKDEPT field in the EMPLOYEE is being linked with DEPTNO field which is the DEPARTMENT table. The linking is done with double question marks (??) and the name of the field from the associated row which is used in the update. After creating the associated update you will see it in your list of operations but will not see it your application. (This is because the associated update cannot be directly run, it must be invoked after the associated row has been retrieved.)
Now you have to assign your association to a specific Field - in our example this is the DEPTNO field. To do this run an operation that displays the associated table (in our case the DEPARTMENT table, shown below).

Figure 10-44 The department table. To edit a field descriptor, click the gear icon next to the name of the column whose field descriptor you want to edit. After editing the field descriptor, the values in that field will be hyperlinks, allowing users to perform an associated insert by clicking on them.
Once you have a screen similar to the one above (without the hyperlinks) you can set up the association you previously created. To do this click the gear symbol next to the field you want along with your association. In the Field Descriptor Screen scroll down to the Advanced Settings area (shown below) and set the Association Operation to your previously created Operation.
Figure 10-45 Setting the association operation of a field. This causes the field to be hyperlinked to that association.
Once you have saved your changes to the field descriptor, the association is complete. Now, whenever the DEPTNO field of the Department table is displayed, it will have a hyperlink to increment by 1000 the SALARY field of the associated rows in the EMPLOYEES table .
10.5.4 Associated Deletes
Associated deletes allow you to delete one or more rows based on the values contained in an associated row.
Creating an Associated Update is very similar to creating basic 1- 1 or 1-many associations (described in the beginning of this section). To create an operation for doing associated deletes, you first create a new operation and set its Operation Type from SQL to either 1-1 Association or 1-Many Association Type. Then you set its operation code to do the actual delete; finally you attach the operation to an associated field by editing that field’s field descriptor. This process is described in detail below:
SQL Associated Delete Example
The operation code needed for the SQL Associated Delete is very similar to a normal SQL DELETE statement, with some changes for the Association. Our example will deal with a 1-Many Associated delete. After selecting the Create Operation from the TOC, choose 1-Many for Association Type and set the Operation Code to the SQL for performing the delete. The code shown below will link the DEPARTMENT table to the EMPLOYEE table allowing you to delete entries in the EMPLOYEE table whose WORKDEPT field matches the DEPTNO field of a row in the DEPARTMENT table:
The operation code used for the Associated Delete:
DELETE FROM PJDATA.EMPLOYEE WHERE WORKDEPT = ??DEPTNO
Notice the SQL code is similar to DELETE SQL statement described in the SQL Delete chapter. The WHERE clause links WORKDEPT field in the EMPLOYEE table to the DEPTNO field in the DEPARTMENT table. After creating the Associated Delete you will see it in your list of operations but will not see it your application. (This is because the operation can only be run after an associate row has been displayed.) The next step is to assign your association to a specific field in the associated table (DEPTNO). To do this run an operation that displays the associated table:
Figure 10-46 The department table. To edit a field descriptor, click the gear icon next to the name of the column whose field descriptor you want to edit. After editing the field descriptor, the values in that field will be hyperlinks, allowing users to perform an associated insert by clicking on them.
Once you have a screen similar to the one above (without the hyperlinks) you can set up the association you previously created. To do this click the gear symbol next to the field you want to associate with your delete operation (the DEPTNO field in our example). In the Field Descriptor Screen, scroll down to the Advanced Setting area (shown below) and set the Association Operation to your previously created Operation.
Figure 10-47 Setting the association operation of a field. This causes the field to be hyperlinked to that association.
Once you have saved your changes to the field descriptor, the association is complete. Now, whenever the DEPTNO field of the DEPARTMENT table is displayed, it will have a hyperlink to delete the rows from EMPLOYEE table with the selected department number.
10.5.5 Join Associations
One widely used feature of SQL lets you combine, or “join” data from two tables into a single result table. If your data is on two separate systems however, you cannot use regular SQL to join it. Using associated joins, WOW gives you the ability to join data from two separate systems.
As an example, say we have a table (CUSTOMER) on one system with columns ID, NAME, and BALANCE; and another table (CUSTINFO) on a second system with columns ID and COLOR; and we want to join the two table together on the ID column, letting the user view a customer’s name, ID, balance, and favorite color all in a single table. (For our example, we will assume that field descriptors for both tables have already been created, as described in the previous chapter, and that connections for both systems have been created.) The first step is to create the “base” query. This is a normal SQL Operation, selecting the rows of interest from a single table:
Figure 10-48 The base operation
In our example, we are selecting all the rows, but you can use any type of WHERE clause you wanted with this query.
The next step is to create the “join” query – which should select all the rows from the second table. Do not specify a WHERE clause in the join query. This operation’s type must Associated Join:
Figure 10-49 The join operation
Note that you will want to specify a different connection alias for the join operation than you did for the base operation since they are on two different systems.
Next, start the application and run the base operation (only data from one table should be retrieved):
Figure 10-50 The results of running the base operation (join not yet implemented)
Click the gear icon to edit the FD of the column you want to join the two tables on. This column must be common to both tables. In our example, this is the ID column. In the Field Descriptor Manager window, location the field descriptor’s association operation, and set it to the Associated Join Operation we created earlier.
Figure 10-51 Setting the join operation in Field Descriptor Manager
Now when the base operation is run again, the results will a join between the two tables on different systems:
Figure 10-52 The results of running the base operation, including the joined data
10.6 Possible Values
Possible Values are a crucial part of WOW. When a field has possible values, the application will display a drop down menu with the values that are possible for the field. This is important because it allows the user to pick a specific value instead of typing in a value that may or may not be valid. For example, let’s say we want to create possible values so that when a user searches for an employee by department number, they can pick the department number from a drop down list of all department numbers.
To create Possible Values with WOW, you first need to create field descriptors for the table with which the possible values will be associated. In our example, this is the EMPLOYEE table. Once your table has field descriptors, the next step is to add a possible values operation to your application. To create a possible values operation, click on the “Create Operation” link that is visible when viewing a list of your application’s operations. Below is an example of setting up a possible values operation:

Figure 10-53 Above is a screenshot of an SQL Operation used to create possible values for a field.
To setup a possible values SQL operation, the Operation Type must be set to Possible Values. The SQL command above will select all of the distinct DEPTNO fields from the DEPARTMENT table (these are the values that the user will be able to choose from). DISTINCT is used so there is only one instance of each DEPTNO value.
After you have created the Possible Values Operation, you need to associate it with a specific field. This will be very similar to setting up Associations as described in the Association section of this guide. To associate our PV operation with a specific field, we will first run a query on the EMPLOYEE table to display all of its rows. The result will look similar to the screenshot below:
Figure 10-54 Above is a screenshot showing where to setup Possible Values.
In the example above, we are setting up Possible Values for the WORKDEPT column. To setup the Possible Values, click on the ‘gear’ icon on the immediate right of the WORKDEPT column name. This will bring up the Field Descriptor Manager application in a new window. The only section we’ll pay attention to will be the Possible Values Settings, which looks similar to the screenshot shown below:
Figure 10-55 Above is a screenshot showing the Possible Values Settings.
To complete your Possible Values, find the correct Possible Value that is listed under the Possible Values Operation (in the example, the “Dept # PV” was chosen). The Operations listed are all Possible Value Operations that have been created for your specific WOW application. After finding the corresponding Possible Value Operation, update the screen and your Possible Value will be setup and ready to use.
Now when we run an operation with this code: “SELECT * FROM PJDATA.EMPLOYEE WHERE WORKDEPT = ?”, we will get a drop down with all the possible department numbers available:
Figure 10-56 Possible values being displayed to the user
10.6.1 Multiple Fields in Possible Values Drop Down
When creating a Possible Values operation, there are times where you may want the Possible Values Drop Down to include two or more fields to give the user more feedback and information. When creating a Possible Values operation, such as the one created, the first field selected is the value or field that is inserted into the database. The second field is the display value, which is what are going to change so that both department number and name are shown in the possible values drop down. In the possible value operation, we need to change the SQL code so that it adds the deptno field and the deptname field together as shown below:
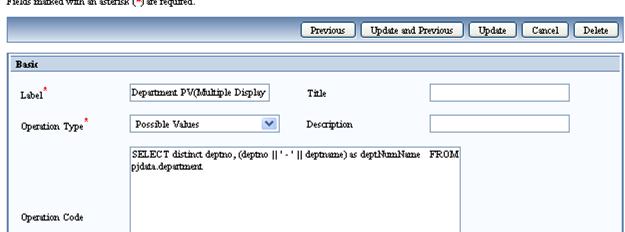
Operation Code:
SELECT distinct deptno, (deptno || ' - ' || deptname) FROM pjdata.department
When accessing data from an iSeries, use the || command to concat fields together for the display value. If you are using MySQL, then you need to use the CONCAT() function instead of the || command. In this case the operation code would look like this:
Operation Code:
SELECT distinct deptno, CONCAT(deptno,CONCAT(‘ – ‘, deptname)) FROM pjdata.department
In the above example, the deptno is displayed with a dash and then the department name is shown:
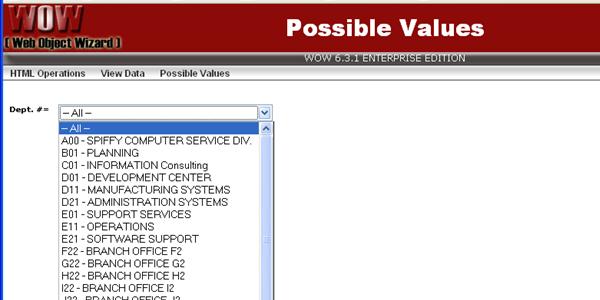
When “B01 – Planning” is selected, the SQL statement that runs uses “B01” as the actual value:

10.6.2 Possible Values and the – All – Value
In the above screen shot, notice that WOW has added in a special “– All –“ value to the list of department numbers. The all option lets the user search for employees with any department number. However the “– All –“ choice will only work correctly if your SQL has been coded properly to handle it.
The “– All –“ value always corresponds to a NULL SQL value. This means if your SQL statement was SELECT * FROM PJDATA.EMPLOYEE WHERE WORKDEPT = ? and the user selected the “– All –“ value, no rows would be returned. This is obviously an incorrect result. The proper SQL in this case would be SELECT * FROM PJDATA.EMPLOYEE WHERE WORKDEPT = VALUE(CAST(? AS CHAR(3)),WORKDEPT). This SQL is written so that if the value supplied by the user is NULL, then all rows of the EMPLOYEE table are returned, regardless of the department number.
Customizing the – All – Item
Although WOW puts the “– All –“ item into search parameters by default, you can change this text to anything you like, or even remove it altogether. This text is controlled by the dropDownItemDisplay property of the OperationLabels property group (property groups were covered earlier in this chapter). If you wanted the text to say “– Choose –“ instead of “– All –“ you would insert the following text into the properties field of your operation:
OperationLabels {
dropDownItemDisplay: – Choose –;
}
If you like, you can also instruct WOW to eliminate this extra item altogether. This is done by specifying NULL as the value of the dropDownItemDisplay property:
OperationLabels {
dropDownItemDisplay: NULL;
}
NOTE: The OperationLabels property group is specified with the regular current operation, NOT with the possible value operation.
Further Customizing the – All – Item
Whether you change how the “– All –“ item is displayed or not, by default the value that is actually sent to WOW and placed in your query is the special null value. If you like, you can choose to have a different value placed into your query when this item is selected. Just specify the value you want using the dropDownItemValue property:
OperationLabels {
dropDownItemDisplay: – Choose –;
dropDownItemValue: Nothing;
}
The above example would add an item to the possible values drop down with a display text of “– Choose –“. When this item is selected, the value “Nothing” would be sent to WOW. You cannot specify a value for the dropDownItemValue property unless you also specify a value for the dropDownItemDisplay property.
Removing the – All – Item in a Search
To remove the “– All –“ item from a search prompt, go to the FD of the relevant field and check the “Required on Search” box. This will remove the “– All –“ option and force the user to select a value. This is particularly useful when you have two (or more) different drop down fields in one SQL operation and only want one field to have the “– All –“ item. Rather than using the OperationsLabels feature which applies to all fields in the operation, you would use the “Required on Search” feature to selectively remove the “– All –“ item.
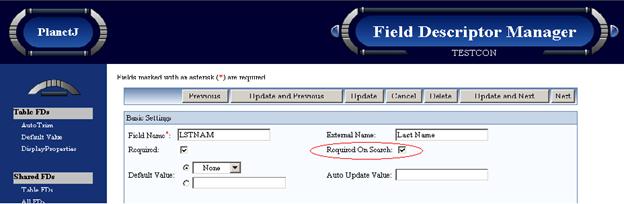
10.6.3 Removing – Next – and – Previous – from Possible Value List
If you have a long list of choices resulting from your possible values (PV) operation, you may see the choices “— Next –-“ and “— Previous –-“ (added automatically by WOW). If you want to eliminate those choices, increase the Row Count value in the Advanced section of your possible values operation. For example, if your Row Count is set to 25 and the total number of choices returned from your PV operation is 35, increase the Row Count to a value larger than 35.
10.6.4 Possible Values Paging (Next/Previous)
If you have a long list of choices resulting from your possible values (PV) operation, you may see the choices “— Next – “ and “— Previous – “ (added automatically by WOW). You can click on the “-Next-“to see the next result of Possible Values. If you want to eliminate those choices or increase the # returned for each page of PV, increase the Row Count value in the Advanced section of your possible values operation. For example, if your Row Count is set to 25 and the total number of choices returned from your PV operation is 35, increase the Row Count to a value larger than 35. A better option for a large # of Possible Values is the Possible Values Search operation.
10.6.5 Possible Value Keys
WOW also comes with several predefined Possible Values. There are Possible Values for US States, days of the week, and several other common scenarios. To select one of these predefined possible values for a field, use the Possible Values Key drop down in the field descriptor.
Figure 10-57 Selecting a possible values key
It is also possible to create your own possible values keys and have them appear alongside the predefined keys in the drop down. The process of creating your own possible values keys is described in the Possible Values section of the WOW Utilities chapter.
10.6.6 Possible Values Selector
This operation is very powerful but requires a few steps in order to utilize. This operation is capable of setting several field values in a row based on the selection of a possible value. Consider an “order”; an order normally requires many fields to be set in the order header record. These fields may include the customer number, customer name, shipping address, etc. When you select the customer for an order, you want to “select” other fields to be copied into the row.
The SQL specified in this operation retrieves the Possible Values for the field and displays them like a normal Possible Values operation. The difference for the Possible Values Selector is when the user selects a value from the Possible Values drop-down, a call is made to the server which calls the method "handlePossibleValueOperation" on the field associated with this operation. The default behavior is to copy the values of the operation’s SQL query via common usage id into the source row. The user may also specify to copy via common field name. This setting is determined by the value of the “copyRule” property of the Display Groupings Property Group. The valid values for this property are usageid and fieldNames.
For the following example, consider the following 2 tables:
Customer File
|
CustomerId |
LastName |
FirstName |
CustZIP |
|
|
1 |
Jones |
Paul |
92029 |
|
|
2 |
Lawson |
Fred |
57401 |
|
Order File
|
OrderId |
OrderCustId |
OrdFirstName |
OrdCustZIP |
OrdLastName |
|
1 |
1 |
Paul |
92029 |
Jones |
|
2 |
2 |
Fred |
57401 |
Lawson |
Follow these steps to utilize this operation:
1. Typically you will have a normal SQL edit or insert operation.
Ex: INSERT INTO mylibrary.myOrderFile
2. Create a operation of type PossibleValueSelector such as:
SELECT customerId as OrderCustId, lastName || FirstName as FullName, lastName as OrdLastName, firstName as OrdFirstName, custZip as OrdCustZip FROM myLib.customerFile
a. Notice how the SQL uses the “as” feature to match customer field names to order field names. WOW will copy the fields from customer that match fields in the Order file
b. In the properties of this operation specify the following property group:
OperationSettings{copyRule:fieldNames;}
3. Now open the field descriptor on the “OrderCustid” field and set the possible value operation field to the operation created in step 2. Also set the field descriptors “Status Change” to yes which will force a screen refresh when a new value is selected. At this time, WOW will attempt to copy the fields from the possible value row to your current row.
4.
a. As an alternative, you can also set the usageid values in both the customer and order file and WOW will copy fields which have matching usageid values. In this case you would specify the following property group.
OperationSettings{copyRule:usageid;}
An instructional video on this topic may be available for licensed users at this URL: Often a picture or video is best to demonstrate.
http://www.planetjavainc.com/demos/possibleValueSelector.avi
10.6.7 Possible Values Search
Possible Values Search operation allows you to create any operation with or without search parameters to find a particular possible value to use for a field. WOW opens the Possible Values Search operation in a separate pop-up window, runs it after you have specified parameters and then the user selects the correct value. For example you may have a possible values operation that returns two thousand options for the user to select; this can cause problems because of the extremely large size of the drop-down. In this case you would want the user to be able to search or query down to a more manageable list of options and then select the correct value.
Steps to Utilize Possible Values Search Operation:
1. Create Possible Values Search Operation
Create new operation and set the operation type to Possible Values Search. In operation code create a standard SQL select statement; just make sure you specify the Possible Value field first. Note: Job is the first field in the select because you will set this PV Search operation to the Job field. The first field returned should always be the field with a value that you want to use as the Possible Value. After specifying the other fields and search that you want to present the user then click the create operation button.
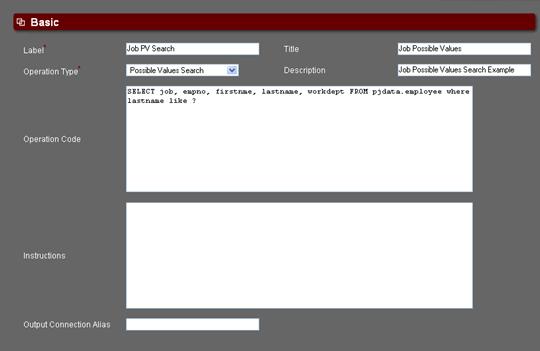
2. Set Possible Search Operation to desired field’s field descriptor
Run an operation that includes the field that you would like to set the PV Search operation and open that fields Field Descriptor. If no Field Descriptor exists then create Field Descriptors for the entire table. In this case we set the PV Search operation to the Job field in a sample employee table as shown below.
![]()

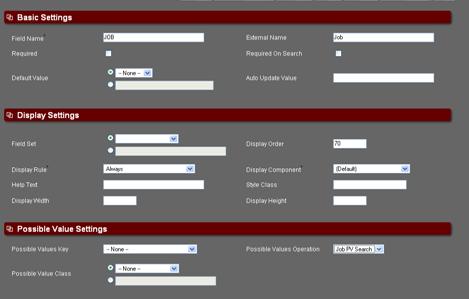
3. Update or Insert with new Possible Value Search
When you edit (update or insert) a record with the Job field WOW will generate a retrieve button next to the field. This will retrieve the user’s desired possible value by running the Possible Value Search operation in a new pop-up window.
![]()
![]()

4. Retrieve Possible Values
The new pop-up window will run the Possible Values operation, in this case searching last name. After entering in a search parameter value, WOW will bring back a resultset with all possible values.
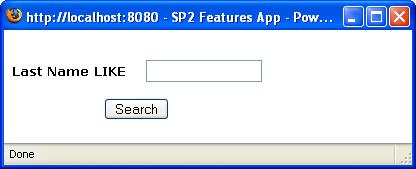
5. Populate Field with valid Possible Value (PV)
The returned results have a populate button that when clicked will grab the first field’s (column) value and set as the current field’s PV. In this example the first field is Job and the first populate button is clicked fills the ‘MANAGER’ value into the field as seen below.
![]()
![]()
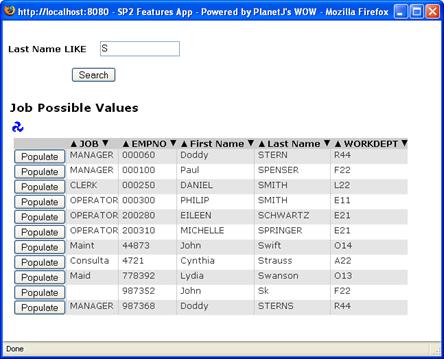
![]()
![]()
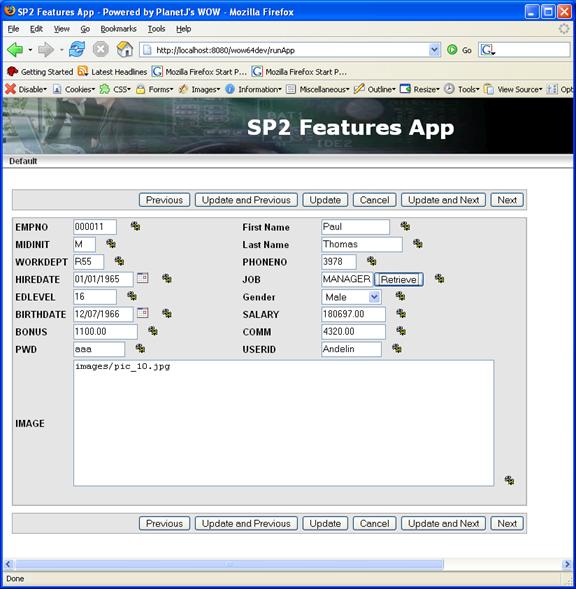
Now that the value has been filled in proceed as normal with your update, insert or search. There is no limit to the # of fields that can have Possible Value Search in a particular operation.
10.7 Creating and Distributing Automatic Reports
It is often desirable to send applications and operations to a set of users via email. Users can then either directly view or hyperlink to the application directly from the convenience of their email system. For example, a sales organization might want to distribute new order information and reports to its management team via email. Each morning, order information from the preceding day is viewable to management. WOW allows this capability via specification of an Email operation. An Email operation is simply a SQL operation that returns a list of rows which contain email fields. The Distribution property group also allows specification of the frequency, start date, end date, and timing of each automatic operation. NOTE: This is currently only supported for iSeries DB databases.
Follow these steps to enable automatic report distribution:
- Create an operation of type “Auto-Run-Email”.
a. For example “Select email from ERP.EmployeeList where type = ‘MANAGER’
b. The returned list of email address would be used as the distribution list.
c. Ensure that “email” returned from (a) has it’s field descriptor is set to a type of Email for the field class. This tells WOW which field identifies the email address. It is recommended that the usageId also be set to “-40”. Refer to the usageid section below for details.
d. Set the operation’s “Auto Run Status” to enabled (Administration Section).
e. Specify the distribution list properties as shown below. These properties should be specified in the properties section of the “auto-run-email” operation.
Distribution { }
In between the open and closed brackets above, any of the following properties may be added. Properties names must be followed by a colon; the property values should be separated with a comma, and end with a semicolon. The example shows a typical distribution property setting. The syntax needs to be exactly as it is shown:
Distribution {
smtp: smtp.planetjavainc.com.hosting.pacbell.net;
user: support;
password: mypass;
from: support@planetjavainc.com;
type: link;
startDate: 01/01/2003;
startTime: 6:00 am;
frequency: 8640;
subject: This email is for you;
}
|
Property |
Value |
Description |
|
smtp |
ip address | domain |
The TCP address of a valid mail server. This server will be used to perform the actual emailing. This may be also specified as a IP number. |
|
user |
text |
User with authority to email servers. In some email systems, this value could be the entire email plus domain (support@planetjavainc.com) or may be just the id without the domain such as (support). Consult your email administrator. |
|
password |
text |
The SMTP password corresponding to the user name above. |
|
from |
|
Email address that will appear in the "from" part of the email. |
|
type |
LINK | INLINE |
“LINK” will result in an email that contains a link back to the source server. The user would click on the link to launch a browser session and access the application as normal. “INLINE” type causes the report’s HTML to be sent to users. Specifying “INLINE” may reduce the load on your server since the operation/report is only run once and then is distributed to many users. However, the report only contains the data at the time the report was executed. |
|
startDate |
date |
Date when reporting should start. |
|
startTime |
time |
Time when reporting should start. |
|
frequency |
integer |
The number of seconds between reports. |
|
subject |
text |
The subject of the email. |
- Locate the SQL operation that you want to automatically run and set the value of its Auto Run Operation field to the operation created in step 1. For example, an operation such as: “SELECT CUSTOMERID, CUSTNAME, BALDUE from ERP.CUST WHERE BALANCEDUE > 0” The results of this operation would be emailed to all email addresses returned from the “auto-run-email” operation from step #1.
When an operation has been selected to be run automatically, it will not appear in the list of operations which can be run manually when the application is started.
3. Automatic reports can be enabled or disabled for an entire application. When viewing the list of all applications, choose to edit an application. You can adjust the value of the Auto Run Status field to disable or enable the automatic running of that application’s operations:
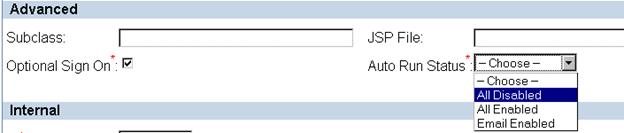
Figure 10-58 Setting the auto run status for an entire application.
4. In addition auto run must be turned on for the entire application server. This is done in the application servers (Tomcat or WebSphere) ….webApps/wowxx/web-inf/web.xml
For example:
<init-param id="WOW_Auto_Run_Feature">
<param-name>PJ_AUTO_RUN</param-name>
<param-value>true</param-value>
</init-param>
After, changing the web.xml, you must restart your application server.
TIPS:
· First create normal SQL operations to test your operations and make sure they return data as you would expect.
· Create field descriptors as required.
· If email is not produced, check the log files within your application server. Since these operations run in batch, all errors and messages will be sent to the application servers log location.
· If you change an operation with an attached auto-run-email operation, it will be rescheduled and restarted.
10.8 Logging Email
It is sometimes desirable to log incoming email for one or more email accounts. You can set up a WOW auto-run operation to automatically monitor and log email received into designated email accounts on a regular time schedule. The email log file (including email title and email contents) can then be queried using another WOW operation. There will also be a separate log file that will be populated with email attachments. A second associated operation (1 – many) can then be defined to query the attachments file for all attachments belonging to a specific email.
NOTE: You will need the email logging add-on package to utilize this functionality. Contact PlanetJ support for more details.
Follow these steps to implement WOW’s mail logger batch function. To implement this function, you will need to create several database files and a WOW application with two operations. You will also need to update WOW’s web.xml file to activate/turn on the mail logging function.
10.8.1 Database Files Required for Mail Logger
It is mandatory that each email logging file and its corresponding attachments file exist in the same library.
NOTE: Substitute your own library name for MYMAILLIB in each SQL statement. You may want to use your metadata library (ex. PJUSER63).
Email Control File
The first file required is the email control file. This file is read by a WOW operation (to be created in a later step) to determine which email accounts are to be logged. Run the following SQL scripts to create the email control file. Substitute your own library name for MYMAILLIB:
CREATE TABLE MYMAILLIB.EMAILCNTRL (
CONTROLID INTEGER NOT NULL ,
EMAILTYPE CHAR(4) NOT NULL ,
EMAILADDR VARCHAR(128) NOT NULL ,
SMTPIP VARCHAR(128) NOT NULL ,
POP3IP VARCHAR(128) NOT NULL ,
USERNAME VARCHAR(128) NOT NULL ,
USERPWD VARCHAR(128) NOT NULL ,
EMAILREMOV CHAR(1) NOT NULL ,
ACTIVE CHAR(1) NOT NULL ,
LOGLIB CHAR(12) NOT NULL ,
LOGFILE VARCHAR(128) NOT NULL ,
CONNALIAS VARCHAR(128) NOT NULL ,
EHANDLER VARCHAR(128) DEFAULT NULL ,
CNTRLINF1 VARCHAR(128) DEFAULT NULL ,
CNTRLINF2 VARCHAR(128) DEFAULT NULL ) ;
ALTER TABLE MYMAILLIB.EMAILCNTRL
ADD CONSTRAINT MYMAILLIB.EMAILCNTRL
UNIQUE( CONTROLID ) ;
Next you’ll need to add a record/row for each email account that is to be logged. You can use an INSERT statement similar to the following:
INSERT INTO MYMAILLIB.EMAILCNTRL
(CONTROLID, EMAILTYPE, EMAILADDR, POP3IP, USERNAME,
USERPWD, EMAILREMOV, ACTIVE, LOGLIB, LOGFILE, CONNALIAS)
VALUES(1, 'REC', 'joeuser@hotmail.com', 'pop.addr.net', 'joeuser@hotmail.com', 'mypassword', 'N', 'Y', ' MYMAILLIB', 'EMAILLOG', 'MYCONNECTION' );
The fields and their possible values are as follows:
- CONTROLID – A unique number assigned to this mail account.
- EMAILTYPE – ‘REC’ is for incoming mail (POP3). Currently this is the only email type supported.
- EMAILADDR – The mail address to be logged.
- SMTPIP – Currently not used.
- POP3IP – The IP address of the POP3 incoming mail server handling the email address to be logged.
- USERNAME – The account name for the mail server.
- USERPWD - The account password for the mail server.
- EMAILREMOV – ‘Y’ designates to delete the email from the mail server once the email is logged. ‘N’ designates to leave the email on the mail server after it is logged.
- ACTIVE – ‘Y’ specifies that this email account should currently be logged whenever the mail servers are to be queried. ‘N’ means to keep this email account inactive at this time.
- LOGLIB – The library to contain the email logging files.
- LOGFILE – The name of the file to contain the email log entries.
- CONNALIAS – The connection alias defined for this mail logging application.
- EHANDLER – Field for the email handler class. Reserved for future use.
- CNTRLINF1 – Mail control information. Reserved for future use.
- CNTRLINF2 - Mail control information. Reserved for future use.
Email Logger File
The next file required will contain a record/row for each email logged. Run the following SQL scripts to create each needed email logger file. Substitute your own library name for MYMAILLIB:
CREATE TABLE MYMAILLIB.EMAILLOG (
EMAILNUM BIGINT DEFAULT 1 ,
CONTROLID INTEGER NOT NULL ,
FROMID VARCHAR(128) NOT NULL ,
TOID VARCHAR(1000) NOT NULL ,
SUBJECT VARCHAR(128) DEFAULT NULL ,
PRIORITY CHAR(12) DEFAULT NULL ,
CONTENT CLOB(1048576) NOT NULL ,
RECDATE TIMESTAMP DEFAULT CURRENT_TIMESTAMP ,
SENTDATE TIMESTAMP NOT NULL ,
OWNERID VARCHAR(128) DEFAULT NULL ,
CATEGORY CHAR(10) DEFAULT NULL ) ;
ALTER TABLE MYMAILLIB.EMAILLOG
ADD CONSTRAINT OTSLIB.NODUPS
PRIMARY KEY( SENTDATE, CONTROLID, FROMID, SUBJECT ) ;
ALTER TABLE MYMAILLIB.EMAILLOG
ADD CONSTRAINT OTSLIB.EMAILNUMBER
UNIQUE( EMAILNUM ) ;
The fields and their possible values are as follows:
- EMAILNUM – A unique number assigned by WOW for each email logged.
- CONTROLID – The control ID assigned to the logger email account in the Email control file.
- FROMID – The From ID of the user who sent the email.
- TOID – A list of To ID’s the email was sent to, up to 1000 characters.
- SUBJECT – The email subject.
- PRIORITY – The priority that was used to send the email.
- CONTENT – The content of the email.
- SENTDATE – The timestamp of when the email was sent.
- RECDATE - The timestamp of when the email was logged.
- OWNERID - Reserved for future use.
- CATEGORY- Reserved for future use.
Email Attachments File
The last file required will contain a record/row for each attachment logged. The file name must be called “FILES” and must reside in the same library as the email logger file. Naming the file FILES is necessary to take advantage of the current WOW binary support. Email attachments are stored in a folder in the server’s root directory. The folder name will be “ATTACHMENTS” + controlID value. Run the following SQL script to create each needed email attachments file. Substitute your own library name for MYMAILLIB:
CREATE TABLE MYMAILLIB.FILES
( ID INTEGER NOT NULL ,
OWNER_ID INTEGER DEFAULT NULL ,
KEY1 CHAR(30) DEFAULT NULL ,
KEY2 CHAR(30) DEFAULT NULL ,
KEY3 BIGINT DEFAULT NULL ,
KEY4 BIGINT DEFAULT NULL ,
LOCATION CHAR(100) NOT NULL ,
FILENAME CHAR(40) NOT NULL ,
INT_FILENAME CHAR(50) NOT NULL ,
DESCRIPTION CHAR(120) DEFAULT NULL ,
MIME_TYPE CHAR(50) DEFAULT NULL ,
FILE_SIZE BIGINT DEFAULT NULL ,
UPLOAD_TMSP TIMESTAMP NOT NULL DEFAULT CURRENT_TIMESTAMP ,
UPLOAD_USER CHAR(20) DEFAULT NULL ,
DOWNLOAD_RULE CHAR(20) DEFAULT NULL ,
LAST_DOWNLOAD_TMSP TIMESTAMP DEFAULT NULL ,
APPLICATION_ID INTEGER DEFAULT NULL ,
FILE_BLOB BLOB(10485760) DEFAULT NULL ,
CONSTRAINT MYMAILLIB.PRIMARYKEY PRIMARY KEY( ID ) );
The fields and their possible values are as follows:
- ID – A unique ID assigned to each attachment.
- OWNER_ID – This field is not used.
- KEY1 – The email logger file name that corresponds with this attachment.
- KEY2 – The library containing the email logger file in KEY1.
- KEY3 – The message number assigned to the email containing the attachment.
- KEY4 - The control ID assigned to the logger email account in the Email control file.
- LOCATION – The location from the root directory of where the attachment is stored.
- FILENAME – The original attachment name.
- INT_FILENAME – The attachment name used to store the file. If more than one attachment with the same name is stored in the same folder, the attachment name must be changed for all but the first occurrence of the attachment.
- DESCRIPTION – A description of the attachment.
- MIME_TYPE - This field is not used.
- FILE_SIZE - This field is not used.
- UPLOAD_TMSP - The timestamp of when the attachment was logged.
- UPLOAD_USER - This field is not used.
- DOWNLOAD_RULE - This field is not used.
- LAST_DOWNLOAD_TMSP - This field is not used.
- APPLICATION_ID - This field is not used.
- FILE_BLOB - This field is not used.
10.8.2 Create a WOW Mailer application
You can create a new application for mail logging or use and existing application. On the application, in the Advanced section, make sure the “Auto Run Status” is enabled.
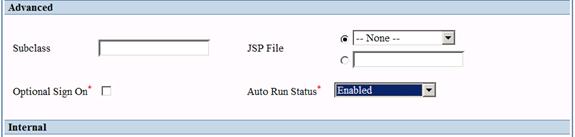
Create an Auto-run Batch Operation
You’ll need to create an auto-run batch operation that will specify the email logging schedule. The operation type must be set to Auto-run Batch Process.
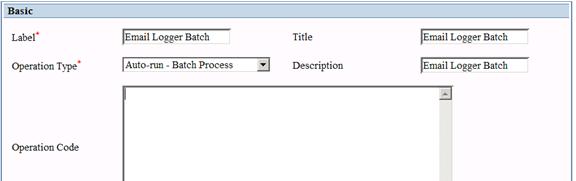
In the Display section, replace the Properties with AutoRun specifications that include startDate, startTime, and frequency settings similar to those below.
NOTE: These four keywords are case sensitive.
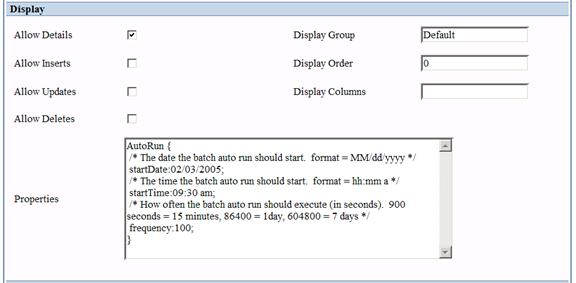
Here is another AutoRun example that can be used for copy/paste purposes:
AutoRun {
/* The date the batch auto run should start. format = MM/dd/yyyy */
startDate:1/1/2005;
/* The time the batch auto run should start. format = hh:mm a */
startTime:1:00 am;
/* How often the batch auto run should execute (in seconds). 900 seconds = 15 minutes, 86400 = 1day, 604800 = 7 days */
frequency:604800;
}
In the Administration section, the Auto Run Status needs to be enabled.

Create a Control File Query Operation
You’ll need to create an operation that will read the data from the email control file. The operation type must be set to SQL. In the Operation code, specify a SELECT statement to read the rows from your email control file.
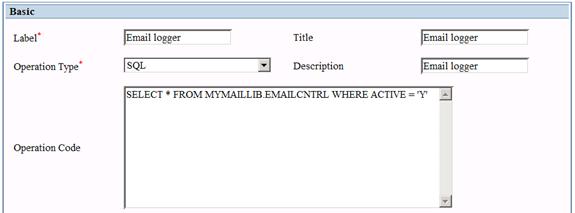
In the Advanced section, set the Row Coll. Class to
planetj.dataengine.email.EmailLoggerRowCollection.
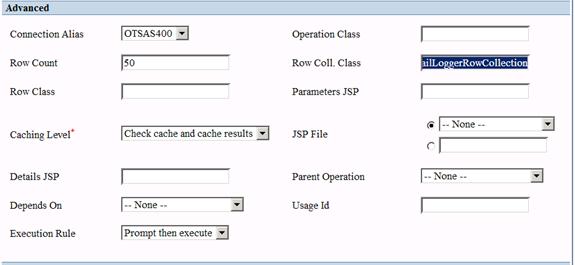
In the Administration section, the Auto Run Operation needs to be set to the batch operation defined in the previous step.
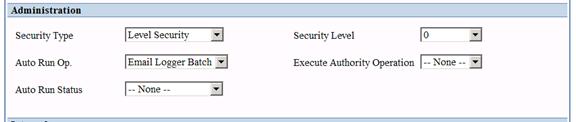
Locate the web.xml file located in WOW’s WEB-INF folder (…\WOW\WebContent\WEB-INF – the folder names may vary). Edit this xml file and locate the init parameter PJ_AUTO_RUN. Change the param-value to true.
<!-- Below is the AutoRun parameter. If true, Operations that
are set to autorun while WOW starts will
start. Defaults to false since it is rarely used. Please NOTE
if you are running your metadata from
MySQL, the AutoRun may not work correctly. -->
<init-param id="WOW_Auto_Run_Feature">
<param-name>PJ_AUTO_RUN</param-name>
<param-value>true</param-value>
</init-param>
After, changing the web.xml, you must restart your application server
10.9 Auto Population of Fields
To demonstrate this operation, we will be using the same sample data in PJDATA: the EMPLOYEE and DEPARTMENT tables. We will be using the DEPTNO field of the DEPARTMENT table as the Target Field to match up with the WORKDEPT field of the EMPLOYEE table. First, you need to create an operation to display the DEPARTMENT Data, such as “select * from pjdata.department”. Next, create a new operation and set the operation type to Auto Populate. An Auto Populate operation will show up in the list of operations for an application; however, it will not show up in the application itself. Create the SQL statement that matches up the field with the information to fill the new row.
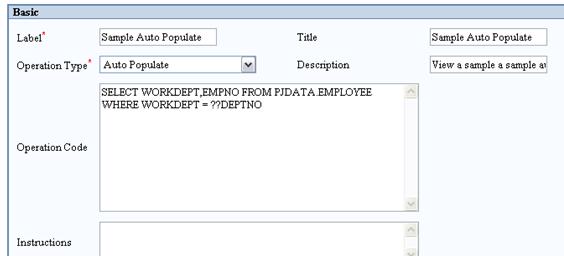
Figure 10-59 Example of an Auto Populate Operation
SELECT WORKDEPT, EMPNO FROM PJDATA.EMPLOYEE WHERE WORKDEPT =??DEPTNO
Notice the SQL code is similar to the SELECT SQL statement described in chapter 5. The SELECT command retrieves the fields WORKDEPT and EMPNO FROM the EMPLOYEE table. Next, the WHERE statement specifies which field the association is aligned with. In this example, the WORKDEPT field in the EMPLOYEE table is being linked with DEPTNO field in the DEPARTMENT table. The link between the two tables is established with the use of the double question mark (??). This special WOW Builder syntax tells WOW to take the value for DEPTNO from the current row, which is coming from the DEPARTMENT table. Now the field needs to be notified that it should use the Auto Populate operation. In the FD Manager, set the Possible Values Operation for the Field that you want to have the retrieve button generated next to. In this example, this would be the DEPTNO field.
The key to an Auto Populate operation is that it fills in values for other fields in the same row as the field that the operation is associated with. This is accomplished by specifying a usage id on the fields that need to be populated. If you are pulling information from a file that has different fields than the file that your detail Row came from, you must specify the FDs for the fields that return from the file.
Once you have created these FDs, assign the same usage ids to the fields so they will match up to the fields in the Detail Row (source Row). Certain usage ids are set aside for special designations such as Email Field (-40), Password Field (-80), and State Field (-120). Special system usage ids are always negative. You should pick an arbitrary positive # to start your usage ids from. For this example the starting value of the usage id is 5000.
Once again, you must assign a usage id to each field that is returning from the query, and also assign that same usage id to the respective FDs in the Detail Row. For instance, if the field name in the Detail Row was WORKNO and the field name in the file that you are retrieving it from was WORKDEPT, you must assign the Usage Id 5000 to both of those fields so that they will match up in the copy. The Usage ID is set in the Additional Settings group and the Auto Population operation is set to the possible values operation in the Possible Value Settings Group.(Shown Below)
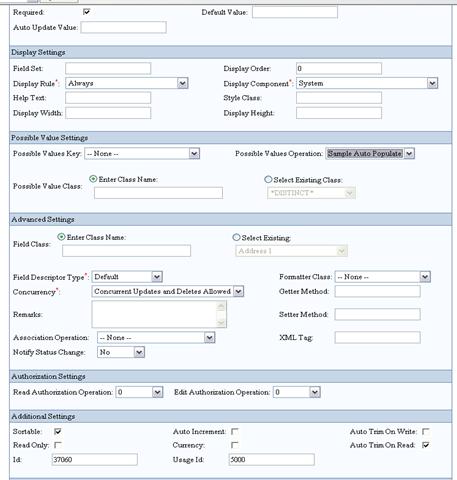
Following these steps will generate the “Retrieve” button next to the DEPTNO field on the Insert Screen. Enter a department number into the DEPTNO field and press “Retrieve”. The query specified in the Auto Populate operation will be executed. Any resulting fields that come back from the query that have corresponding usage ids in the source Row will be filled in. For example, we used the EMPNO in the SQL statement and it can match up with the MGRNO. The EMPNO and MGRNO fields need to have the same usage ids to match up, we used 501. Now the manager number will fill with employee table data when the retrieve button is pressed with valid department number.
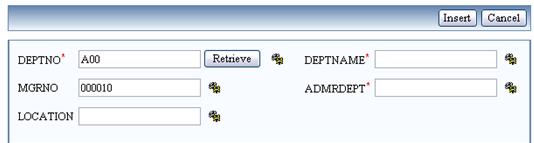
10.10 Blob File Upload and Download
[ Supported as of WOW 6.4 SP3 ]
Instead to setting up WOW as a File Server there may be cases where you would actually like to store files inside of the database rather than on the Application Server. WOW can upload any file into a blob field of a database or you can serve documents off of WOW from a database blob field. Some examples include storing/serving contracts, forms, pictures, PDF’s and word documents that are associated with records in the database. Any type of binary file can be served or uploaded into the Blob field using WOW. In this example, the WOWSAMPLES.EMPLOYEEFILES table which is shipped with WOW will be used.
The table used to store blob entries and other files
including attachments must contain at least the required fields marked with a *
below (and have the specified usage id if needed).
The fields and their possible values are as follows:
- ID – A unique ID assigned to each blob file. *
- EMPLOYEENUM – This field is used to match files to the employee table.
- FILENAME – The file name. * Usage Id: -200
- DESCRIPTION – A description of the file.
- MIME_TYPE – Type of file specification. * Usage Id: -190
- FILE_SIZE – Size of the file being stored in the database. * Usage Id: -210
- UPLOAD_TMSP - The timestamp of when the file was uploaded.
- LAST_DOWNLOAD_TMSP - The timestamp of when the file was last downloaded.
- FILE_BLOB – Blob field that stores the file. *
Any file can be used to store the blob field but it must at least have the required fields and usage ids set from the files table above.
10.10.1Set Up File Upload
In this example we will upload some files and associate them with employees from the pjdata.employe table. The operation we used, All Employees, selects some basic fields from the employee table and also includes a derived field called d_upload_files.
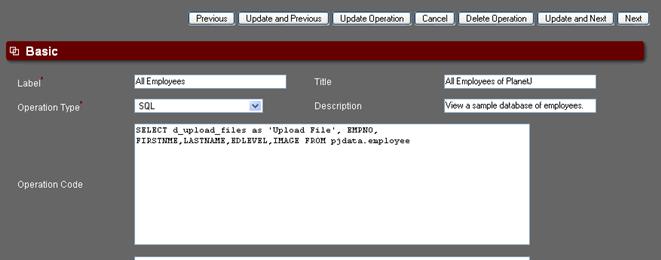
Figure 10-60 All Employees operation with derived field to upload files
Create the derived field descriptor for d_uplaod_files (Derived Fields are explained in Chapter 10.1).
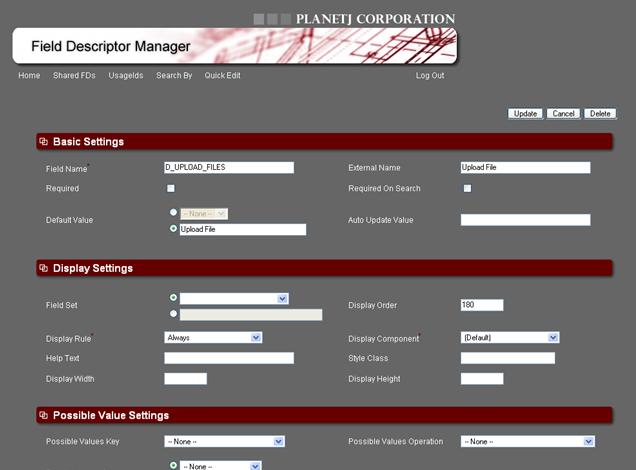
Figure 10-61 Derived field d_upload_files field descriptor
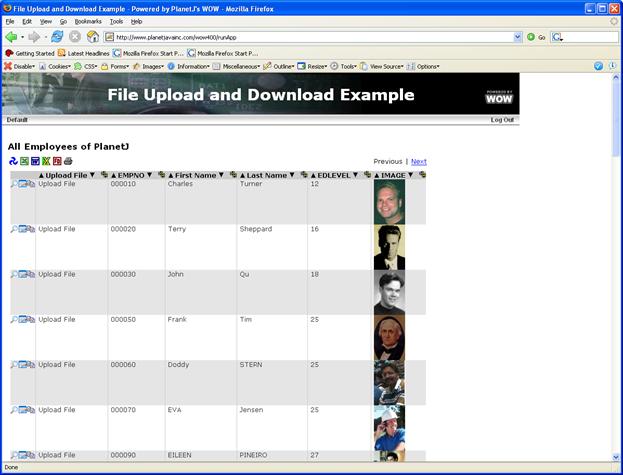
Figure 10-62 File Upload All Employees operation without associations.
After creating the derived field, we need to create FD’s for the employeefiles table. The employeefiles table will hold the files associated with each employee. In the Connections screen, click on the “Edit FD’s” link next to the relevant connection and navigate to wowsamples.employeefiles. Under table functions, click the “Create FD’s” link. Edit the FILE_NAME, MIME_TYPE and FILE_SIZE field descriptors and set their usage ids.
FILE_NAME: -200
MIME_TYPE: -190
FILE_SIZE: -21
NOTE: If going against MySQL sometimes WOW recognizes BLOB fields as SQL Type VARBINARY. For file upload to work correctly we need to use the Blob SQL Type as shown below.
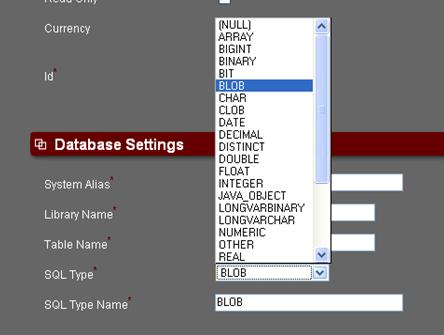
Figure 10-63 Blob field FD. Make sure to SQL Type to Blob
Next, create an associated operation to insert the related files into the database. In this case we have already set the usage ids for FILE_NAME, MIME_TYPE and FILE_SIZE and have set the ID field to auto increment. These fields will be filled in automatically when we try to insert a new file. Now, we need to associate the file with a particular employee, so we will default the employeenum field to ??EMPNO which fills in each employee’s number from the employee table.
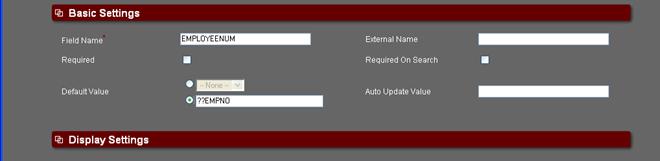
Figure 10-64 Set EMPLOYEENUM field to have dynamic default value depending on selected employee
The associated insert operation will be a standard insert statement except for a few property changes. First we only want to insert one file at a time so we need to change the operations row count to 1 instead of 50.
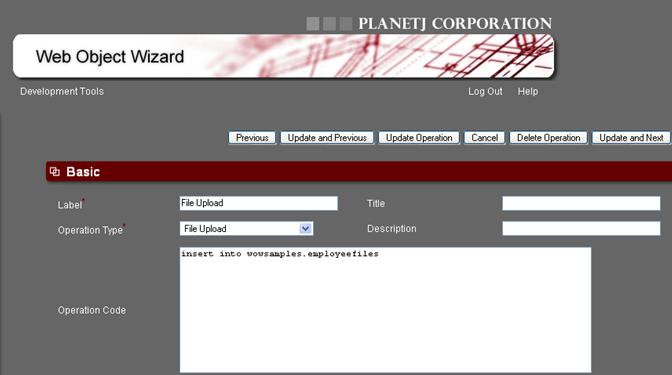
Figure 10-65 File upload operation(normal SQL insert statement)
Now that we have set the required usage ids for the other relevant fields, we want to only show the blob_file field when inserting. To do this we must add the blob_file to the details property of the DisplayColumns property group.
DisplayColumns{details:blob_file;}
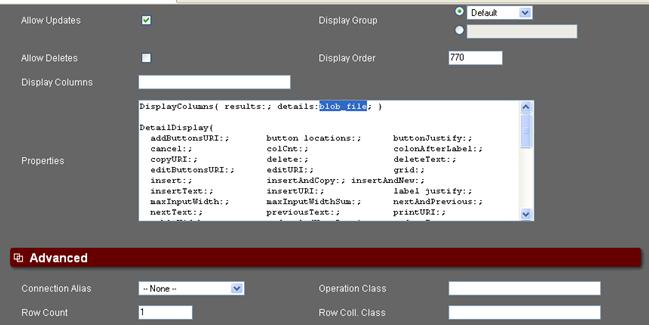
Figure 10-66 Set file upload to only show the blob_file field when inserting.
After we have inserted the operation then we need to associate with the d_upload_files field. Open the d_upload_files FD and set the Associated Operation to the upload file association operation that was just created.
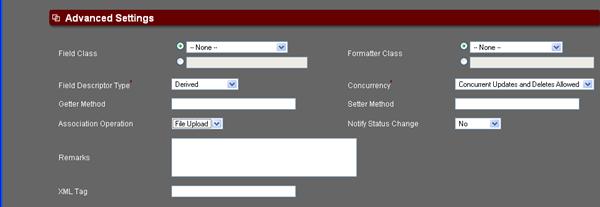
Figure 10-67 Set association “File Upload” to d_upload_files FD.
Run the Employee operation and click on the “Upload File” link.
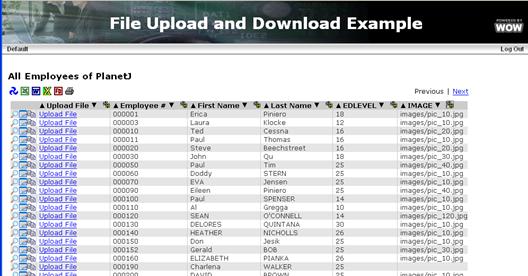
Figure 10-68 All employees with file upload link
Use the browse button to find the file, image or document that you would like to upload to the blob field and then click the insert button. Now, you will have a file that is associated with the employee and stored in a blob field.
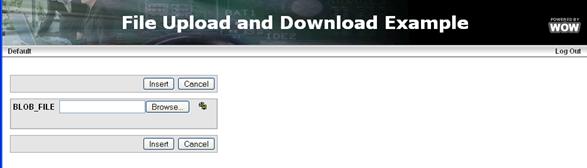
Figure 10-69 Blob file upload before selecting file.
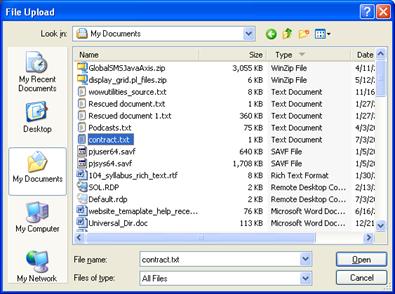
Figure 10-70 Blob file upload file explorer screen.
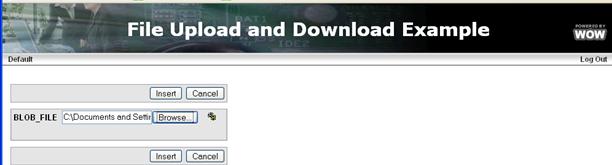
Figure 10-71 Blob file upload after selecting desired file.
10.10.2Set Up File Download
Now that we have setup file upload, we also need to have the ability to download or open those files from the database. In this example we will edit the All Employees operation and add another derived FD called d_view_files.
SELECT 'Upload File' as d_upload_files,'View Files' as d_view_files, empno, firstnme, lastname, edlevel, image from pjdata.employee
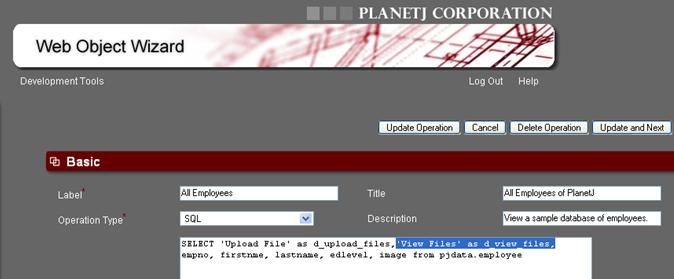
Figure 10-72 All Employees operation with d_view_files derived field.
Now, we need an associated operation which will show all the files associated with a particular employee. Create an Association 1-Many operation to show all files associated with the selected employee.
SELECT * FROM wowsamples.employeefiles where employeenum = ??empno
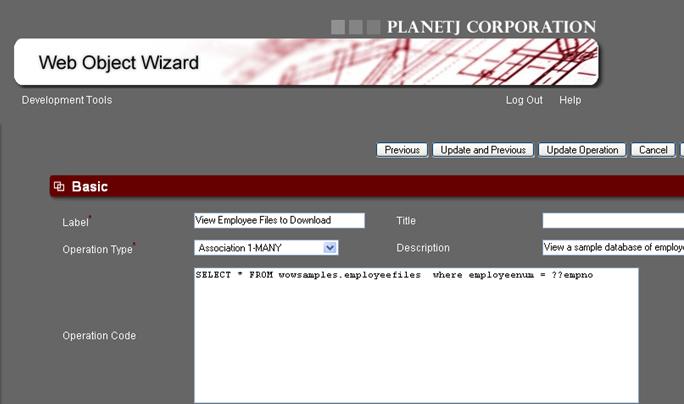
Figure 10-73 View all of selected employees files.
Associate this operation with d_view_files FD which must be created as shown in chapter 10.1. Then run the All Employees operation. Now there is an “All Employee Files” link which can be clicked on to see all the employees’ files.
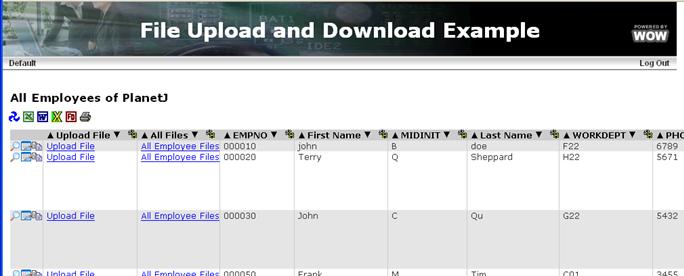
Figure 10-74 All employee operation with “All Employee Files” link.
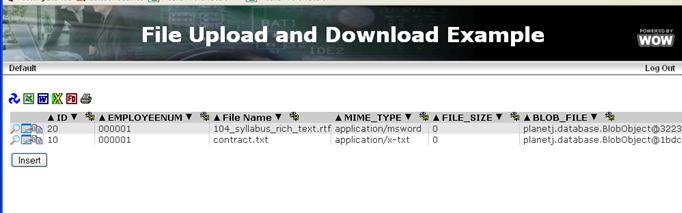
Figure 10-75 Specific Employee’s uploaded files
After viewing all files, we need to create a file download operation to actually download the file to the local computer from the blob field. Create a new operation of type File Download and select the relevant record from the employeefiles table.
SELECT * FROM wowsamples.employeefiles where id = ??id
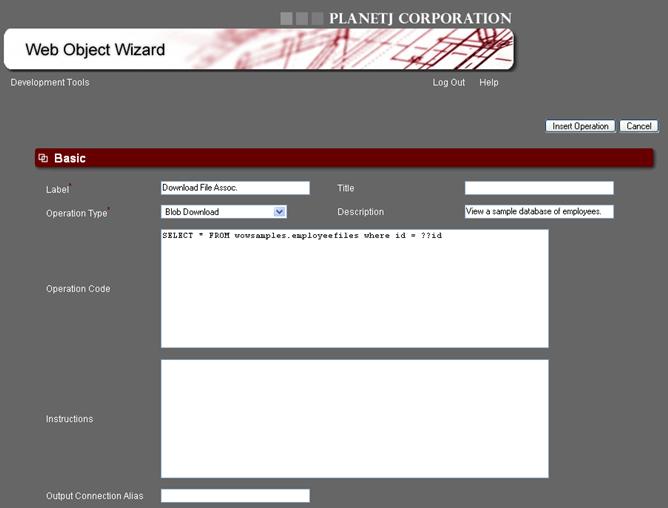
Figure 10-76 Download File association to download file to user’s computer from a Blob field.
Now that the download file association is created, we can associate it with the “View Employees Files” operation, specifically, the file_name FD.
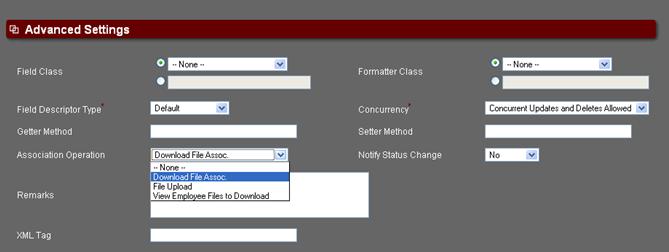
Figure 10-77 Associate the download file operation with the file_name FD.
Now, when a user clicks on the field name they will be prompted to download the file to their local file system.
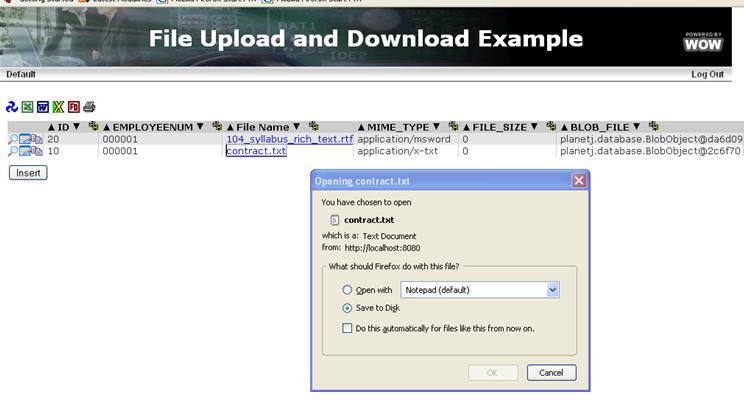
Figure 10-78 Dialog box to download file from Blob field to the users local file system.
10.11 Work Flow
Traditional WOW development easily handles operations such as data lookups, edits, deletes, and provides some “work flow” via associated operations. More complex applications require real “work flow”. Work flow is the logical transition through a number of screens. The sequence of screens could lead to some composite transaction at the end of the process. An example would be an application that enables making an airline reservation.
To enable this capability, two new features have been created:
Global Variables – Variables that can be created and shared throughout a user’s session. Global variables are established and created by setting the field descriptor’s UsageId to –3. When WOW processes an associated selection, insert, update, or delete of a row, any fields present that are marked as Global are set in the user’s session and available to other operations. Other operations may reference those global variables using “??!” followed by the field name (e.g. ??!orderNum). Global variables remain in effect until a row containing that variable is selected, updated, inserted, or deleted and the new row field values override the previous values. Global values can also be referenced in another field descriptor’s default value.
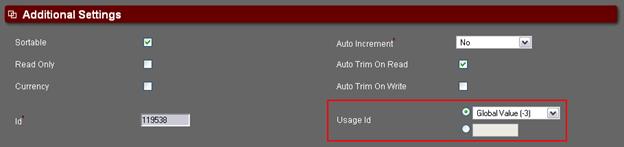
Figure 10-79 Designating a field as a Global Variable in its Field Descriptor .
Next Operation - WOW operations now have a field called “Next Operation” which allows the selection of another operation to execute when the current operation completes. The current operation completes when a row is either inserted, updated, or deleted. At that time, the next operation is executed. The next operation may in turn have a next operation specified thus enabling a complete flow of an application without the need to manually program.
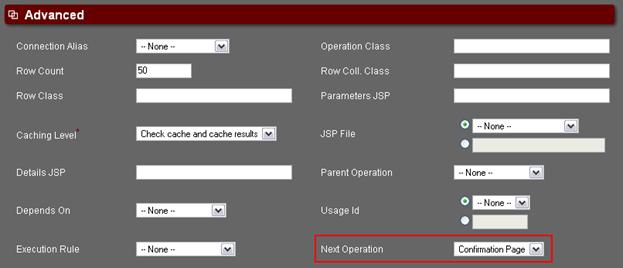
Figure 10-80 Specifying the Next Operation to execute once this operation is complete.
Example 1
A common business scenario involves creating orders by first inserting an order header such as customer name, order number, address, date, etc. Upon completion of the order header record, the user is then allowed to enter order detail records. In this example, the WOW developer would specify the order number (in the order header) as a global variable by setting its field descriptor to –3. Assuming both order header and order detail files have an order number field, the order number field (in the order detail file) would have its field descriptor’s default value set to “??!OrderNumber” where OrderNumber is the field in the order header file. When each order detail record is created, it’s order number is automatically set to the value in the order header (which is the global variable set in the current session). This allows the complete ordering process to be carried out cohesively. Each new order would get a new order number and each order detail would be tied to its order header.
Example 2
Another common scenario for the work flow feature is a confirmation page. For instance, if an end user inserts a bug report record, it may be desired to show a confirmation page assuring the user that his entry has been accepted and will be acted upon. In this case, mark any fields in the bug report’s field descriptors as global by setting the UsageId to –3. Create a HTML code operation that includes confirmation text as well as the desired global variables. For example:
“Your bug report has been logged and the id is: ??!problemNum”
Advanced Work Flow
Sometimes, more complicated work flow scenarios may require programmatic control in terms of what the next completed operation should be. For example, an international flight reservation may require a different sequence of steps (operations) then a domestic flight. Or, if an insurance quote is inserted and it is more than 10,000,000 then it requires additional info, etc. To accommodate these advanced work flow needs, the WOW Java based framework can be overridden allowing you to control the exact flow. For more information, see the section on work flow in the WOW Programmer’s Guide.