|
Chapter 16 |
16. Creating Custom Themes
WOW has the ability to use custom header and footers plus a custom theme to allow users to greatly change the look and feel of their WOW Builder. Due to the nature of this chapter; we will walk-thru the process of creating a custom theme from start to finish. The website we will be using to create our ‘Custom Theme’ will be an old version of the PlanetJ website found at http://www.planetjavainc.com. Since every website is different, and everyone has their own web programming style, the code used from site to site will differ greatly. Knowledge of HTML and CSS is greatly beneficial when creating Custom Themes. A web authoring tool such as Macromedia Dreamweaver can also be useful.
**NOTE** Macromedia Dreamweaver is our web authoring tool of choice and version MX will be used throughout this chapter. Any web authoring tool or text editing tool(Notepad) may also be used.
16.1 Saving HTML from the Web
a. The first step to creating a custom theme is to find the HTML you want to use for your personalized theme. As mentioned above we will be using http://www.planetjavainc.com as our website. Below is a screenshot showing an older version of this website.
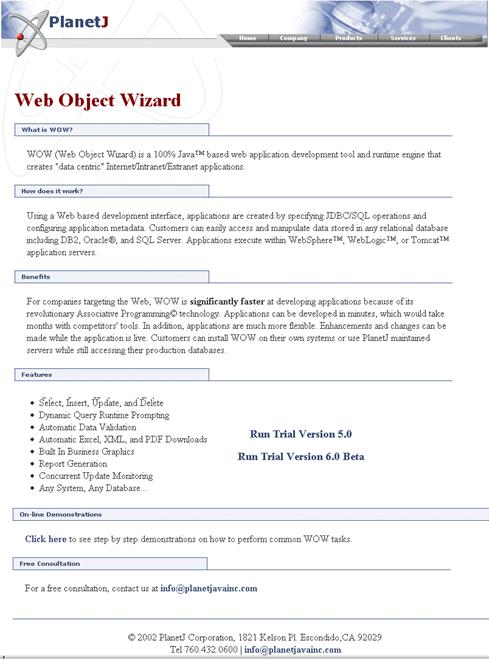
Figure 16-1 The screen shot above shows the web page being used for the Custom Theme.
b. The next step is to save the entire website to a specified location. This is done by going to File->Save As on your browser’s menu bar. After you click Save As a new window will pop up asking for a location to save the file. Browse your hard drive for the appropriate directory and hit save.
c. After the web-site has been saved to the appropriate location there will be a folder and an .html document saved into the specified folder. The screenshot below will show an example of these two objects, they were saved in C:\saved_files
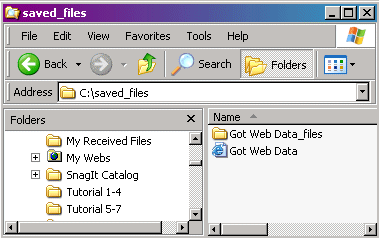
Figure 16-2 The screen shot above shows the location of the newly saved web-site folders and files. C:\saved_files
16.2 Creating Custom Theme Folders
The custom themes are created using three types of files: JSP, CSS, and Images. There will also be three folders inside your custom theme folder with these names. All themes are located in the user folder found within your WOW directory. The screenshot below shows the default path for WOW’s user folder.
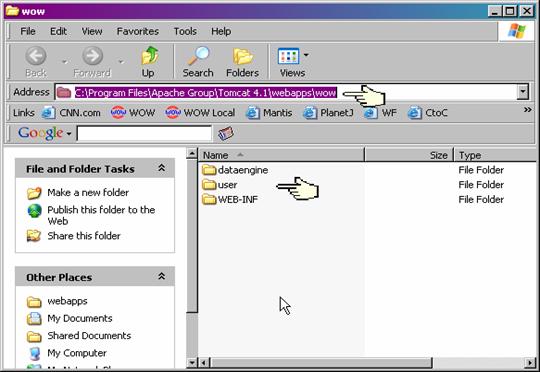
Figure 16-3 The screen shot above shows the location of user folder. Notice the default path and user folder.
d. Open the user folder; notice the template folder along with the readme.txt file there may be more than one template folder with different layouts.
e. To create a new folder make a copy of the template folder by right clicking and selecting copy from the menu as shown in the screenshot below:

Figure 16-4 The screen shot above shows the pop-menu, notice the Copy function which is highlighted.
f. To paste the copy of the template folder into the user folder right click on a blank area in the user folder. Select the paste function which is shown in figure 14-4. This will create a folder called Copy of template in the user folder.
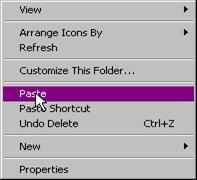
Figure 16-5 The screen shot above shows the pop-menu, notice the Paste function, which is highlighted.
g. Now re-name the Copy of template folder to something that can be recognizable to the theme being created. In the tutorial the Copy of template folder name will be changed to planetj. This is done by right clicking on the Copy of template folder and selecting rename, like shown below.
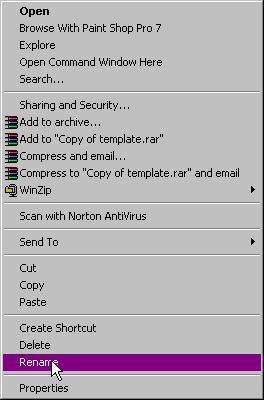
Figure 16-6
The screen shot above shows the pop-menu, notice the highlighted Rename
function.
h. Next double click on the css folder. This folder will contain several CSS files. The only file which we need to worry about now is the template.css file. This file needs to be renamed using the same method as used in Step 4.
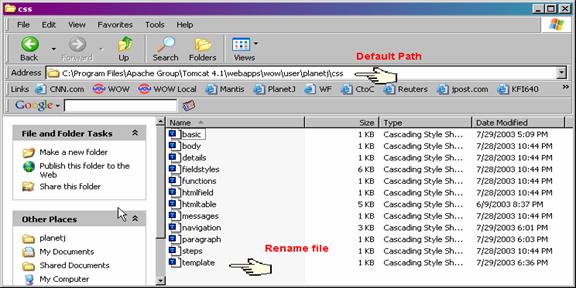
Figure 16-7 The screen shot above shows the default path and the template.css file.
16.3 Creating Header and Footer JSPs(Java Server Page)
We now have to extract the HTML code to use for the header and footer. This process will be different with each website used. Knowledge of HTML is very beneficial for creating the headers and footers, but this is not required.
**NOTE** JSP programming knowledge is not need for this, we only need to save the files as JSPs. The code can be entirely in HTML.
i. Open the folder where you saved HTML file and folder from Section 14.3. This folder should contain all of the images and HTML code needed from the website. The folder should be similar to the screenshot below.
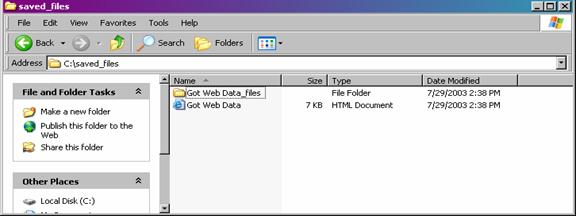
Figure 16-8 The screen shot above shows folder where the website files were saved.
j. Next right click on the HTML file like shown in the next figure. Select one of the applications shown on the pop-up menu and click it. This will open the HTML in the selected web authoring tool.
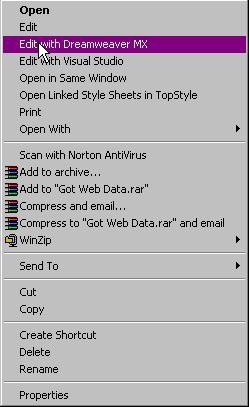
Figure 16-9 The screen shot above shows folder where the website files were saved.
k. Now the code should be opened up in DreamWeaver MX, this can also be done with any other text or web authoring tool. Dream Weaver MX allows you to see both the HTML code and the design view on the same screen like shown in the next figure.
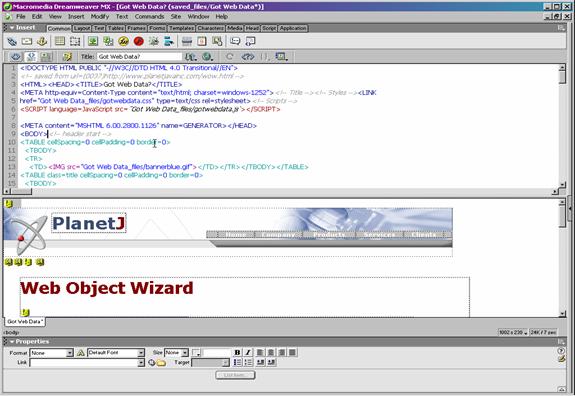
Figure 16-10 The screen shot above shows the lay out of Dream Weaver MX, showing both the design view and code on the same screen.
l. For this step the theme creator will have to veer off on their own with the HTML code. The goal is to extract a good looking header and footer to personalize a WOW Application with. The screenshots below will display the header and footer, first in design view and then the actually HTML.

Figure 16-11 The screen shot above shows the header in design view.

Figure 16-12 The HTML code for the header shown below **NOTE** only
the HTML is displayed above.

Figure 16-13
The screenshot above shows the footer in design
view.
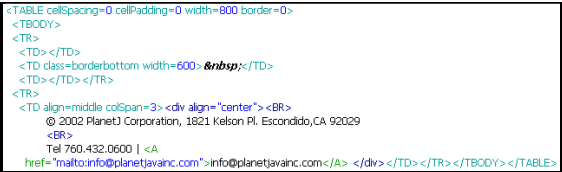
Figure 16-14 The HTML code for the footer shown above **NOTE** only the HTML is displayed above.
m. The header and footer now should be saved as JSP files. These two files will be saved as header.jsp and footer.jsp. To easiest way to accomplish this is to take the header and footer and paste them into a new document. This is done by simply creating a new HTML file in text editor or in this case Dream Weaver MX and copying the appropriate code there.
n. To save the new header and footer files as JSPs make sure you have the appropriate code you want displayed as the header and save the file as header.jsp and footer.jsp respectively. Below is an example of how to save the header.jsp file. File -> Save As -> We need to save the header.jsp and footer.jsp files in the jsp folder that was created in the previous section
**NOTE** The paths of the images will likely change when the HTML is pasted into a new document. Make sure to keep the image paths updated during this process.
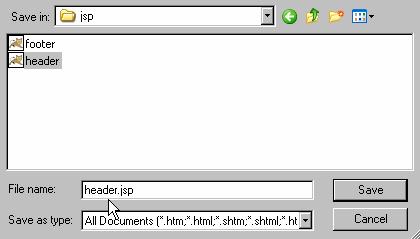
Figure 16-15 Above is the JSP folder found within your newly created folder from Section 14.2. Make sure the suffix JSP is attached to header, like it is above. The path shown above is: C:\Program Files\Apache Group\Tomcat 4.1\webapps\wow\user\planetj\jsp
o. Now we need to copy all of the image files from where they were saved in the first section of this chapter to their new location in the images folder in your custom theme folder. Open up the original data folder which was saved with the saved website. Select all of the image files (jpeg,gif,bmp,etc.) and copy them all by right clicking on all the selected items.
**NOTE** The default path for the images is user\planetj\images replacing planetj with the appropriate name. This assumes WOW is in its default location.

Figure 16-16 After ALL the image files were selected and right clicked on a pop-up menu similar to the one above will appear **NOTE** Every website will have different amounts and types of files in them.
p. Now paste the copied images into the corresponding images folder which you created in this chapter’s first section. Simply right click on a blank area inside the images folder, inside of the custom theme folder, and hit paste on the pop-up menu.
**NOTE** Many web sites will incorporate more than just HTML with their websites. If the header or footer contains Javascript, and that Javascript contains errors, it will interfere with WOW. (HTML with errors may also cause a problem with WOW.) JavaScript, especially un-functional JavaScript can prevent WOW from functioning. USE AT YOUR OWN RISK!!!!!
16.4 Cascading Style Sheets (CSS)
Cascading Style Sheets (CSS) are a big part in creating custom themes. The custom CSS files allow you to change virtually every aspect of WOW’s look and feel. All the CSS files needed are located inside the CSS folder inside your custom theme’s folder. Only two CSS files, navigation.css and htmltable.css need to be edited to create a custom theme. Follow the steps below for directions on editing CSS files.
**NOTE** If there is a template.css file inside the CSS folder make sure
to change its name to match the name of your custom folder.
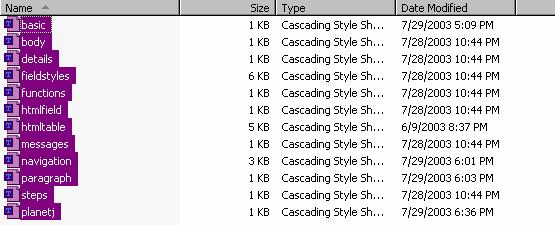
Figure 16-17 The screenshot above shows all of the CSS files located within the CSS folder located in your custom theme folder.
q. The first file we need to edit is the navigation.css file. To do this right click on the file and a pop-up menu similar to Figure 14-19 will appear. Select an application to edit the CSS file by clicking it.
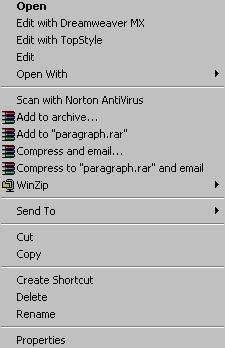
Figure 16-18 The screenshot above shows the pop-up menu after right
clicking the navigation.css file.
r. After clicking on the selected option the CSS file will open up inside of the appropriate CSS editor, this will be different depending on what you selected and what applications are installed on your system.
**NOTE** Top Style Pro is used in this tutorial; some CSS knowledge will be required. You can use any text editor or web authoring tool.
s. The next figure shows a block of CSS code that is used to edit the custom theme. These settings are to change the Table of Contents inside of WOW. Choose the appropriate settings to correlate with your header and footer saving the file when finished.
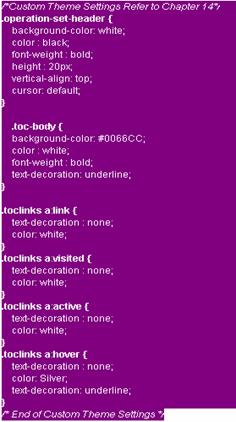
Figure 16-19 The screenshot above shows the CSS code, this is used to change the look and feel of WOW’s Table of Contents.
t. Follow steps 2 and 3 above to edit the htmltable.css file. Follow the commented section inside of this file for added assistance. When finished save the file and exit the program.
16.5 Configuring the Header and Footer
Configuring the header and footer is accomplished by editing a current application. Inside of the WOW edit screen you will set the header.jsp and footer.jsp up within the applications display properties. It is assumed that an application has already been completed, if not refer to the chapter on Building a WOW Application.
u. The first step is to edit a previously created WOW Application (This can be done by selecting your application and then clicking the edit icon.) This will result in a screen similar to the following screenshot
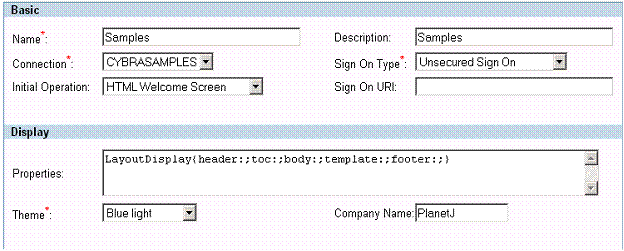
Figure 16-20 An example of the edit application screen. Some of the screen isn’t shown; the only relevant field is the properties field.
v. Now
add the path of the custom header.jsp and footer.jsp files to the
Layout Display like shown above. This is done by putting the path of each file
into their appropriate locations between the colon ( : ) and semi-colon ( ; )
located above in Properties - > Layout Display. The screenshot below will
show you an example of this. Hit Update upon completion.
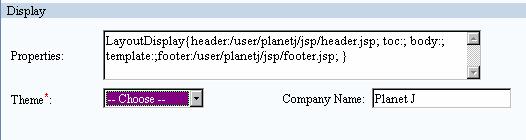
Figure 16-21
Above shows where to add the path of the header.jsp and
footer.jsp files
w. Now you need to enter the WOW Utilities operation found in the Table of Contents of WOW under Development Tools. Make sure you’re logged in using the same email and password used above. After logging into the WOW Utilities click on Add Theme. This will bring up a screen similar to the one below.

Figure 16-22 Above shows the Add Theme screen.
x. Enter the path for your personalized CSS file ( the file changed from template.css). Give the theme a description and hit insert. Figure 14-23 below shows and example of this.
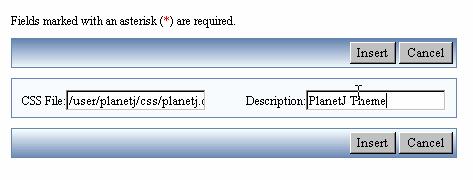
Figure 16-23 Above shows a populated Add Theme Screen with the path /user/planetj/css/planetj.css
y. Now you should have a custom theme attached to an application. Turning your WOW theme into something like this!!!!! (shown below).
Figure 16-24 The screen shot above shows a WOW Application Utilizing a Custom Theme.
**NOTE** If anything in your Custom Theme looks out of place, especially on the headers and footers make sure the HTML is correct and all of the images and miscellaneous files are mapped correctly.