|
Chapter 22 |
22. Interfacing WOW with Excel
22.1 Creating Reports and Graphs with WOW and Excel
Since Excel is widely used for data analysis and charting, we added the capability to access data from your Database and then chart that data into custom graphs and charts in Microsoft’s Excel program. This is a very powerful feature because it allows you to customize the graph and charts a great deal and still bring in the data from Database. We also have the feature to use one of WOW’s Excel templates to create and run excel charts from data returned in an operation. In sections 22.2 and 22.4 we explain how to get your data into excel spreadsheets and have it update dynamically by using the web query option in Excel. This means you have to set up your own Excel file. In section 22.5 through 22.6 we will show you how to use one of PlanetJ’s Excel templates that came along with the installation of WOW to show data returned from an operation into a report or graph format in Excel.
22.2 WOW Setup for Excel Web Query
First, make sure that you have created an application and have an operation that selects from the database some information that you would like to graph. In this case, we have selected from the pjdata.employee table the number of employees in each department. The way we do this is select all of the departments and then sum up all the records of employees and which department they are a part of:
select deptno, sum(deptno) as employees_in_department from pjdata.employee
Employees_in_department is a derived field meaning it is created when the select statement is run and is not actually inserted into the database.
22.3 Creating and Updating Excel Tables from WOW Web Data
WOW excels at pulling information from any database and presenting it in a browser. This provides powerful processing but at times you may want to have an EXCEL spreadsheet setup with graphs and other formatting attributes and then merge database data into it at runtime. The feature described below, gives you that ability.
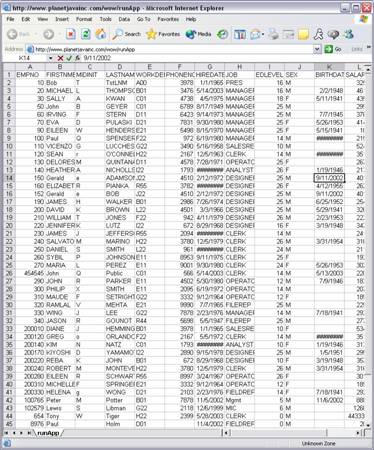
Figure 22-1 WOW data in an Excel worksheet inside of a browser
Steps to create a web query:
a. Use of this feature requires Microsoft Excel. Open a new Excel spreadsheet or a preexisting spreadsheet that you would like to use for graphing. With Excel opened as below and a WOW application running with your target data showing, you are ready to begin the web query process. Excel provides the ability to perform a “web query” to get data. The web query is just a URL call that returns data in an HTML format. Excel allows you to specify an HTML table to use as a data source. In Excel go to Data –> Import External Data –> New Web Query to get data from a WOW HTML table.
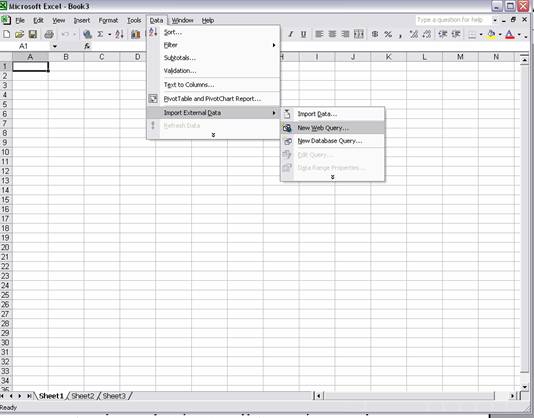
Figure 22-2 Create a New Web Query step screen
b. This enables Excel users to code a web query that invokes a WOW operation and puts the results into a “PREBUILT” Excel worksheet. Data can be refreshed on demand. Before creating the Web Query, there is some information that needs to be noted and changed about the application for it to be properly shown in the Excel. The application like shown below has many queries but for this example we are only going to worry about the “employees” operation.
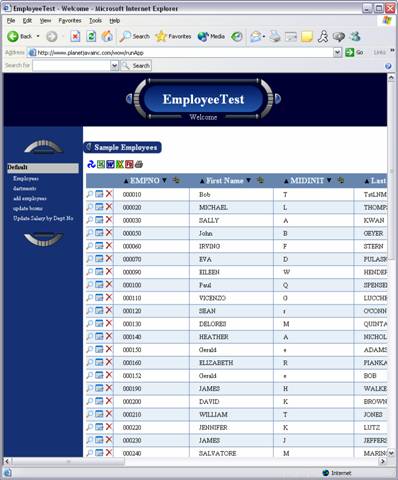
Figure 22-3 EmployeeTest application
**Note that you can use any query operation to get data**
c. A common problem is that when the table data is imported or refreshed, copy and delete icons will show up on the excel spreadsheet, which may be undesirable. Simply adjust the operation to disable those features. Refer to the appropriate areas of this manual to adjust these features.
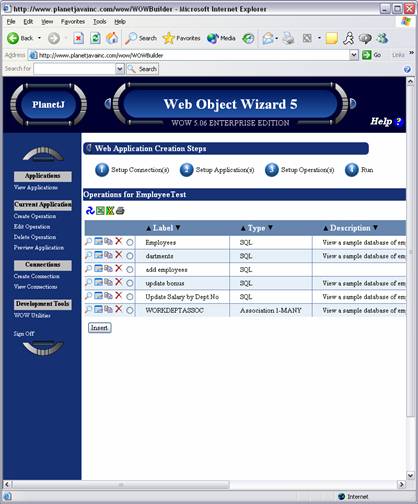
Figure 22-4 WOW Builder operations page
In the display menu for the Operation you may want to disable the options for Details, Inserts, Deletes, and Updates so they won’t be shown on the table. You may also remove the “copy row” feature in the display properties by setting it to false as shown below. Now that all the extra options are turned off, make sure you write down the Operation ID located in the Internal section of properties. Excel will use this ID to recognize the specific operation within the application to get data from.
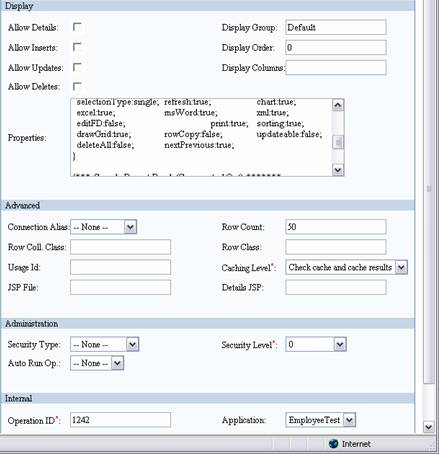
Figure 22-5 Operation edit screen
d. If you only want certain columns of a table to display in Excel you could write those columns in the Display Columns field with commas between columns. Then only those columns would show in WOW and be updated in Excel. After changing all extra options and writing down the Operation Id (above ex. 1242), update the operation.
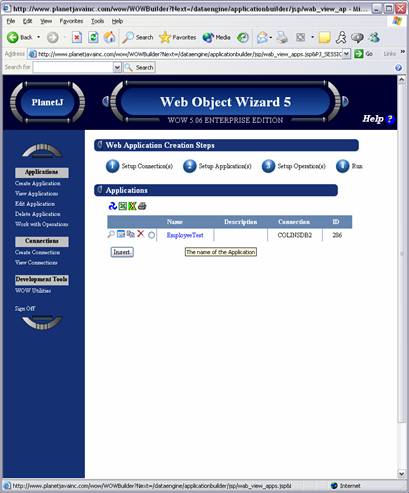
Figure 22-6 WOW Builder application screen
e. Click on the name of the application to run it in a new browser window, then copy the generated URL or write it down. This is the URL that will used by Excel Web Query. It should look similar to http://www.planetjavainc.com/wow/runApp?id=286. Now we are ready to go through the Excel import external data process.
Bring up the Excel spreadsheet that was previously opened and start a new web query.
Setting up a New Web Query in Excel 2002-
After opening the Web Query dialog box shown below, you will see a browser window.
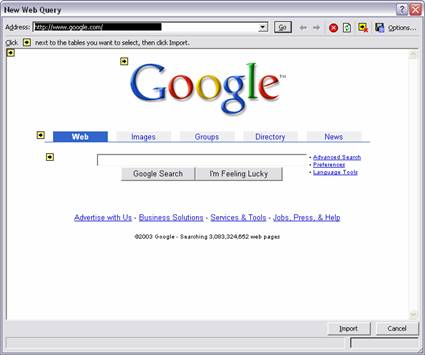
Figure 22-7 Web Query browser dialog
f. This is the web page that Excel is going to look for to open up HTML tables and update the Excel tables. Now, either type in the URL of the application or use copy and paste. This will open up the application but without the operation or table that you want. Now append the Operation ID recorded earlier to the URL.
g. The web query should now be of the following form: www.planetjavainc.com/wow/runApp?id=xx&opid=yy
xx is the id of the application while yy is the id of the operation.
For this example we use http://www.planetjavainc.com/wow/runApp?id=286&lvid=1242
Now press enter and the operation should show up in the web query screen. There will be little yellow arrows around the page representing the location of various html tables. Select the one containing your desired data. A green checkmark will appear to indicate you have selected a particular table. Press import to proceed.
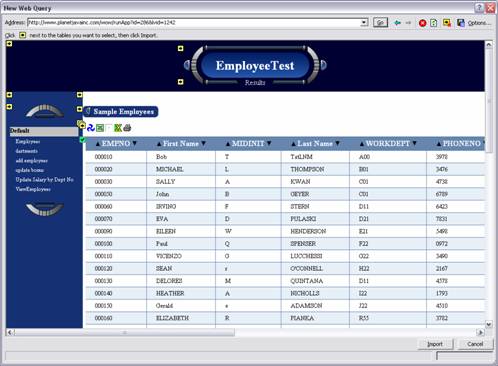
Figure 22-8 Web query screen - choose tables to import using yellow arrows
h. Excel will then return an import data screen with the option to either create a new worksheet with the data from WOW or put it in current worksheet. Pick the option suitable for your situation.
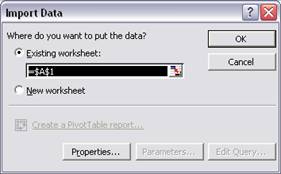
Figure 22-9 Web Query Import Data Screen
After selecting the data location, Excel will momentarily say “getting data” and then display the WOW table information in an Excel table like shown.

Figure 22-10 WOW data in Excel worksheet
By using a right click anywhere on the imported data, options such as refresh values, edit query information, or edit range options are available.
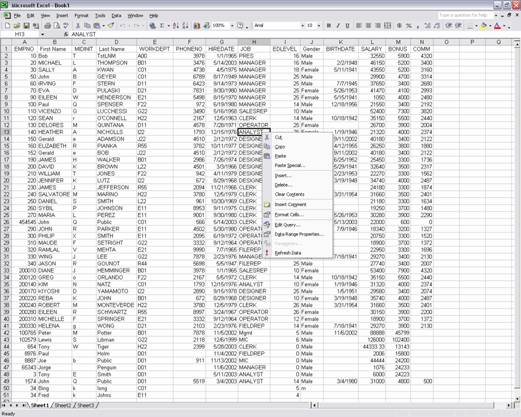
Figure 22-11 Option menu to refresh data and edit data
Setting up a New Web Query in Excel 2000 or earlier-
Setting up the Web Query is a little different in earlier versions of Excel. Below is the New Web Query screen. Option 1 is where you enter the application and operation’s URL.
Figure 22-12 New Web Query screen
After setting the URL you need to set the second option to use only specific HTML tables. Use the table identifier “WOW” which is the standard HTML table id that WOW will generate for data tables. Then after setting the third option to none, the web query should be ready to run.
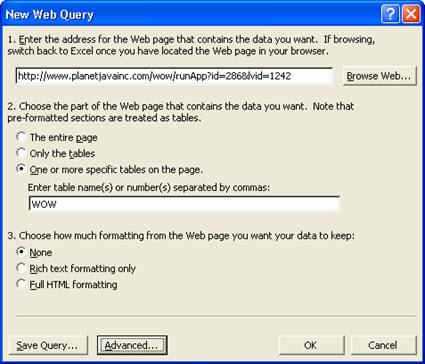
Figure 22-13 New Web Query screen with WOW information
You will get the import data screen asking where you want to put the table data from WOW. Select a location and click OK.
Figure 22-14 Web Query import data screen
After selecting where to put data, Excel should say “getting data” and display the WOW data in an Excel table as shown below.
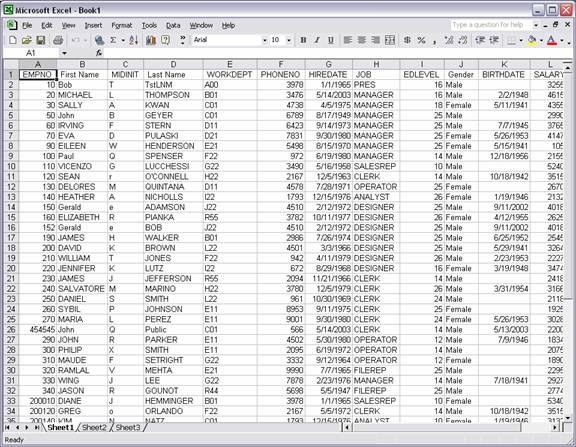
Figure 22-15 WOW web data in Excel worksheet
After the table has been created, you can right click anywhere on the data for various web query options (refresh values from web, edit query information, or edit range options).
22.4 Integrating WOW with Existing Excel Files
WOW provides the ability to generate a new spreadsheet from any existing data. It may be desirable to have a preformatted spreadsheet, which contains titles, business charts, etc and have WOW update the data dynamically from your database. This is possible with new support in WOW 7.0. A spreadsheet is placed on the web server at specific location. WOW can be configured to read in the spreadsheet, update the data, and send the merged Excel file to the users browser.
22.5 Setting WOW Operations to use Existing Excel Templates
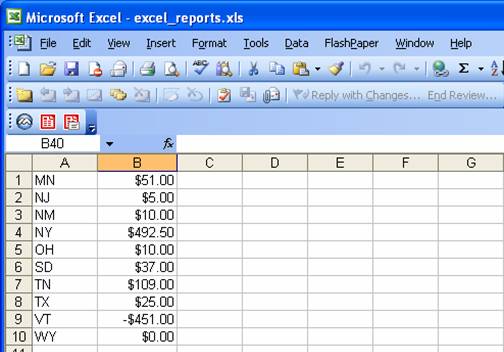
An application and operation must be created that provides access to your data. For example, the following operation does a simple select of states and the balance due by each state. Next, the operation needs to have some properties set so that it knows which Excel file to use. Shown below is the operation with the SQL that returns the states and balances due for each state.
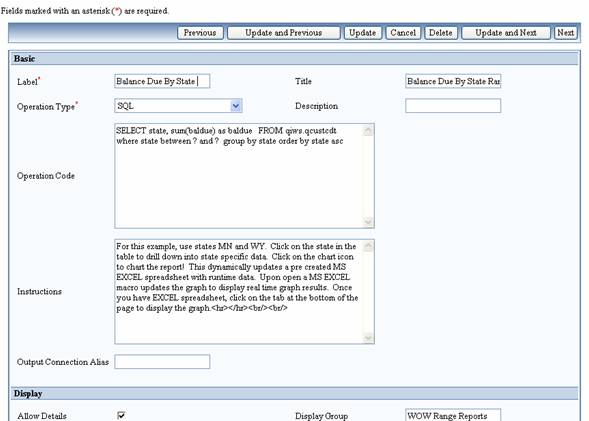
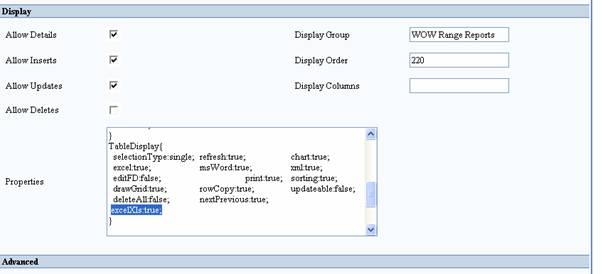
After the operation is open for edit there are some properties that need to be added. In the Properties field of the operation there are property groups like DisplayColumns, DetailDisplay and TableDisplay. These are the standard property groups but there may be others. In the group, TableDisplay, add the following property: excelXls:true;
**NOTE: Properties and PropertyGroups are case-sensitive.
This property tells the operation to display the chart icon when the operation runs.
Now that WOW knows to show the Excel Chart icon, it needs to know which Excel file to open when the chart icon is pressed. The specifics of the property need to be set, such as what excel file to open, and what worksheet inside of that excel file to write the data to.
To set the specifics of the excelXls property we need to insert a Property Group called XLS, as shown below. XLS has three properties that need to be set, including:
fileName:excel_reports.xls;
sheetIndex:2;
directToFile:false;
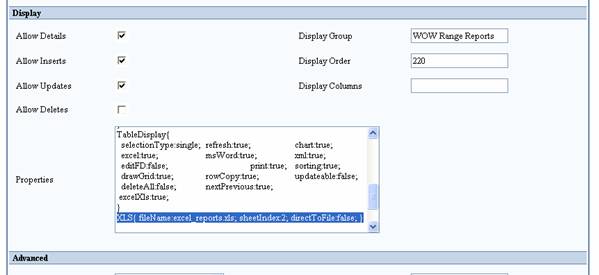
filename - This is the Excel template file that will be opened when the chart icon is pressed.
sheetIndex - This is the worksheet in the Excel file where the data will be written.
directToFile - true: go directly to Excel chart when the operation runs.
false: have to click on chart icon to open Excel chart.
Now that the operation display
properties have been set, update the operation. After execution of the
operation, a graph icon ( ![]() ) shows up alongside the Microsoft Word and Excel
icons.
) shows up alongside the Microsoft Word and Excel
icons.
![]()
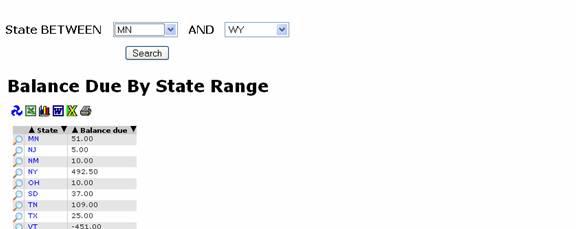
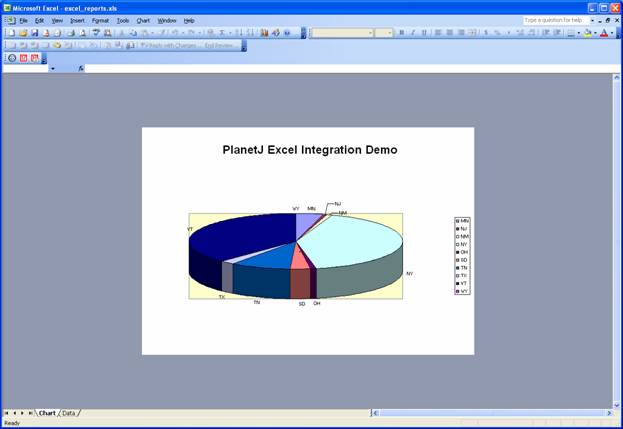
After the data has been
returned, click on the graph icon ![]() to open the data in an Excel graph and/or
spreadsheet. The data will be automatically imported and shown on an Excel
chart, there is also a tab called data that has the returned results in table
format.
to open the data in an Excel graph and/or
spreadsheet. The data will be automatically imported and shown on an Excel
chart, there is also a tab called data that has the returned results in table
format.
An Excel macro updates the chart after the data has been updated. Users may see a security warning that a macro is being run. They can safely grant permission.
**NOTE – It is necessary to use a template provided by PlanetJ because of the included macros. However, a template can be changed to any graph or display and can be made to handle any number of columns or rows.
The PlanetJ template is located in the ‘wowexcel’ folder inside your application server. For example:
C:\Program Files\Apache Software Foundation\Tomcat 5\webapps\wow64\web-inf\wowexcel\
There are a few samples included that you can use as is or copy, rename, and change to make custom chart or reports. When using the XLS property filename just specify the file name and WOW will automatically look in the wowexcel folder.
22.6 Creating Reports from Data Imported from WOW into Excel
After creating an Excel spreadsheet, it is possible to create reports, order forms, etc using the power of Excel along with WOW. This WOW feature allows the full power of Excel to be combined with live database data. Sophisticated Excel applications can be created complete with macros, graphs, and pivot tables.
22.7 Restrictions
- The Excel macro requires that data be written to a spreadsheet called “data” and the chart be in a sheet called “chart”. Experienced Excel developers may update the macro or create their own to meet specific needs. WOW professional services may also be used for customization needs.
- Browsers may handle downloads differently. Browser support and specific browser behavior are beyond WOW support and control.
- Users may be required to have MS Excel or the MS Excel viewer to view spreadsheets.